Prerequisites
-
The client must use a browser based on the Google Chrome engine. Regardless of whether the user's device is a mobile phone, tablet, or computer, a Chrome-based browser is required. Using other browsers may lead to issues.
-
During use, system-pushed messages require the user to authorize browser subscription. Please agree and authorize the subscription to avoid missing notifications.
-
Before official use, please prepare employee data, as well as data for children and parents. These need to be imported into the system. For import instructions, refer to the [User & Roles Module].
-
The payment function requires PayPal activation before use.
-
For other issues, please contact admin@preschools.top
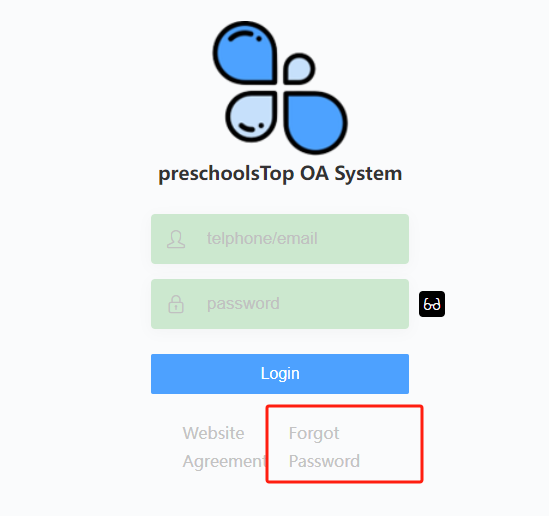
Forgot Password
-
If the user has forgotten the login password, they can reset it using the following method.
-
Clickon [Forgot Password].
- After entering the user form information, click [Get verification code]. If the password is being reset via phone number, a SMS verification code will be sent. If the password is being reset via email, check the spam folder in case the email is filtered.
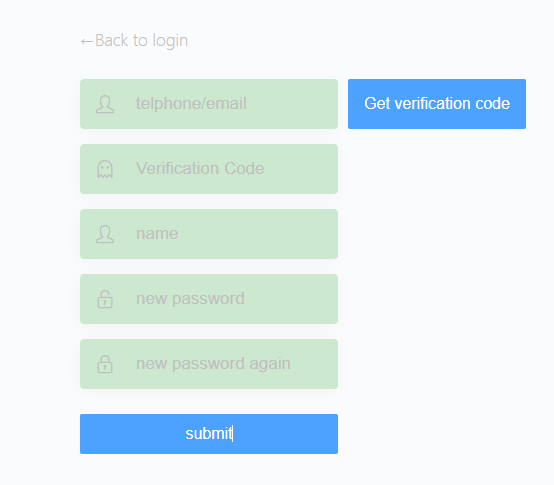
- Click [Submit] to submit the changes.
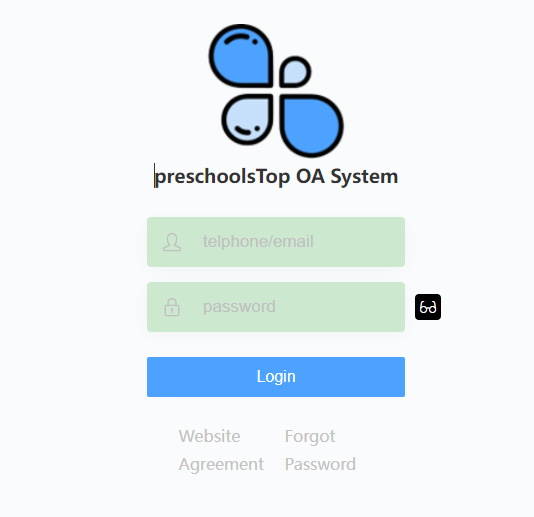
User Login
- The user
opensthe login page entryhttps://***.preschools.top/OA/login/index.html, enters the phone number and password to log in.
Note: a. *** is the subdomain prefix provided by the kindergarten. b. The system does not provide an external registration function. The kindergarten needs to input the phone numbers of parents and staff into the system in advance.
- After logging in, you need to choose the corresponding role, such as [admin], [parent], [teacher], etc. Different roles have different permissions for functionalities. To grant permissions for a role, you can go to [User & Role] under [Permission Control] for management.
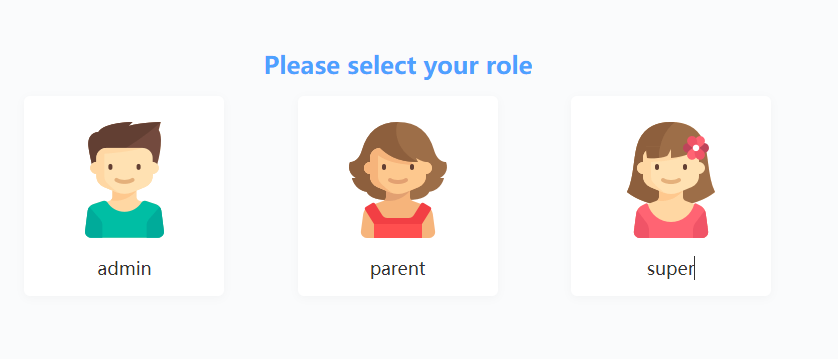
- After selecting a role, click [OA] to enter the backend system.

System Homepage
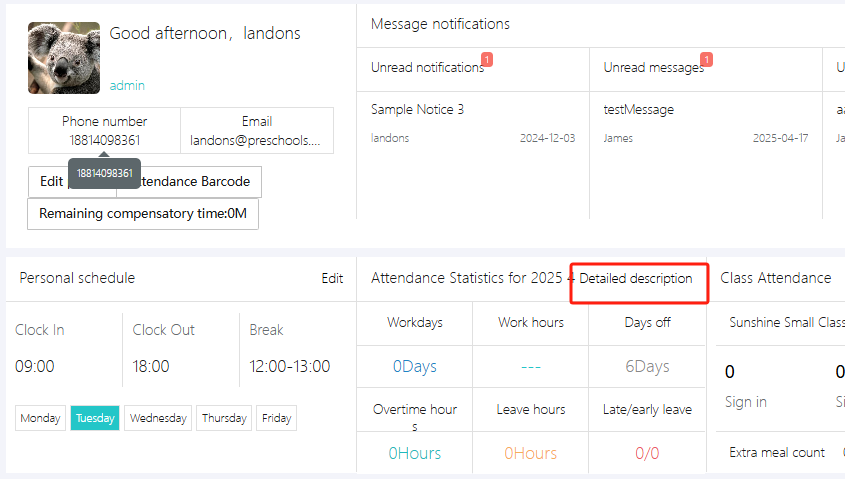
After the user logs in, as shown below, different areas serve different functions.
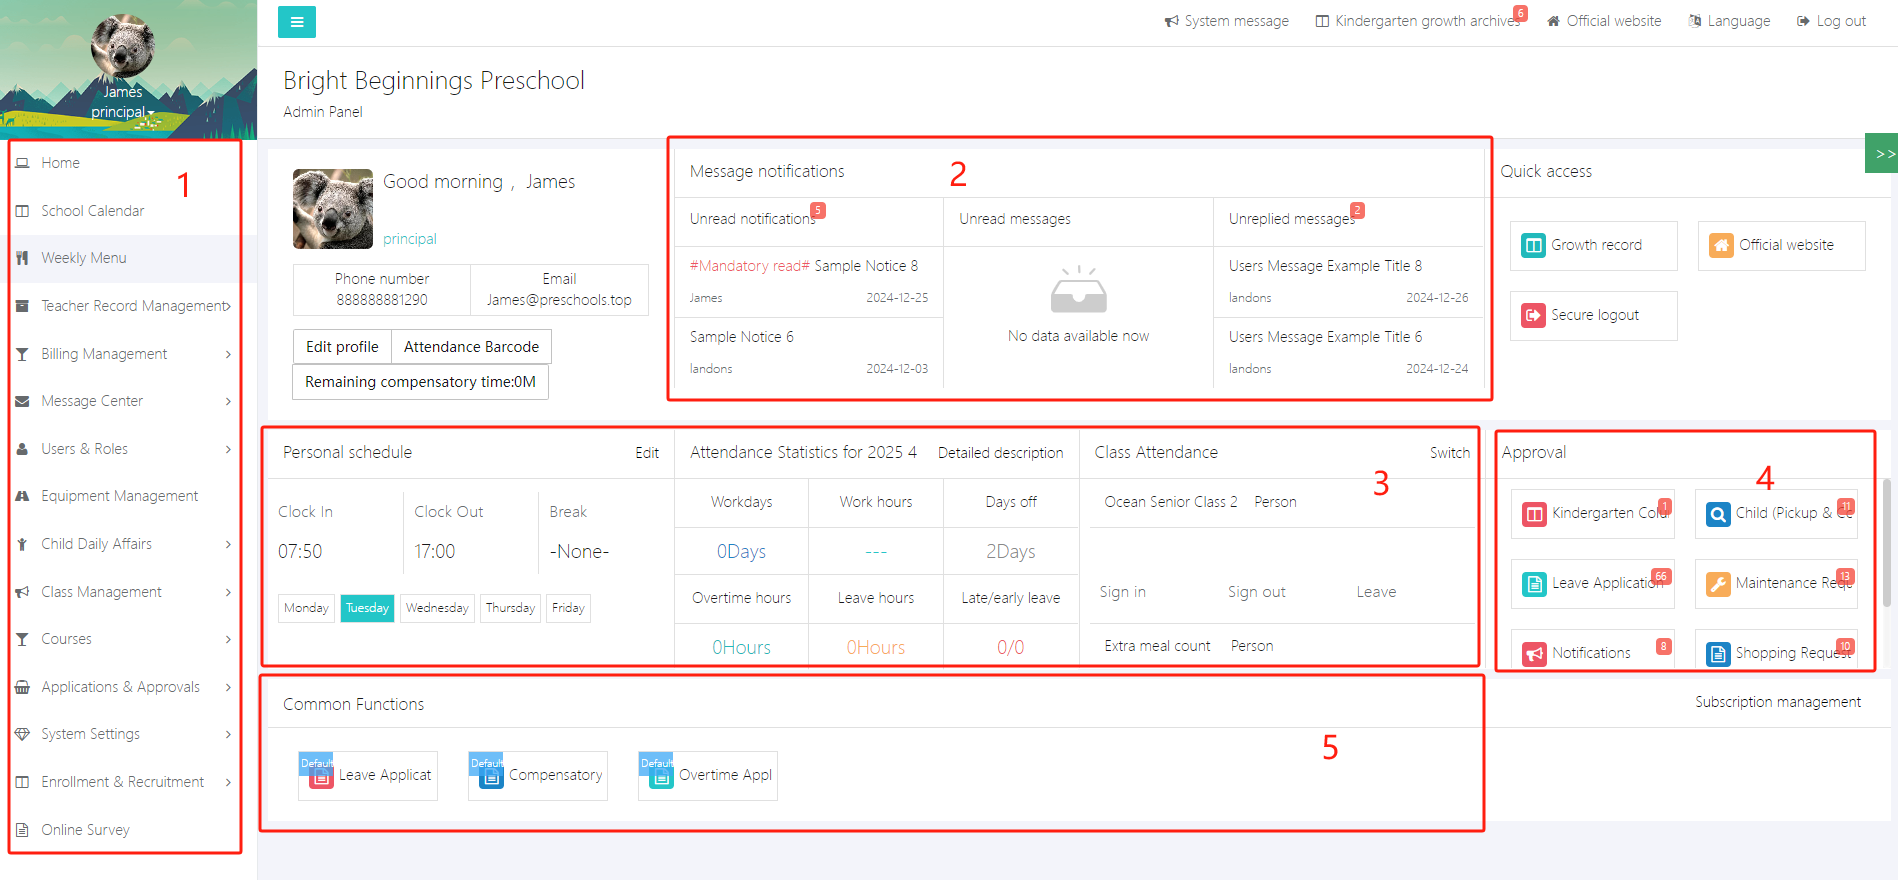
Area 1: System menu. All functions can be accessed through the menu bar.
Area 2: Messages and notifications. This will display recent or unread messages and notifications.
Area 3: Attendance and schedule. Class and personal attendance can be set and viewed here.
Area 4: Approval alerts. If you are an administrator, this area will show items pending approval such as leave or purchase applications.
Area 5: Frequently used navigation. You can use [Subscription management] to pin your commonly used functions here.
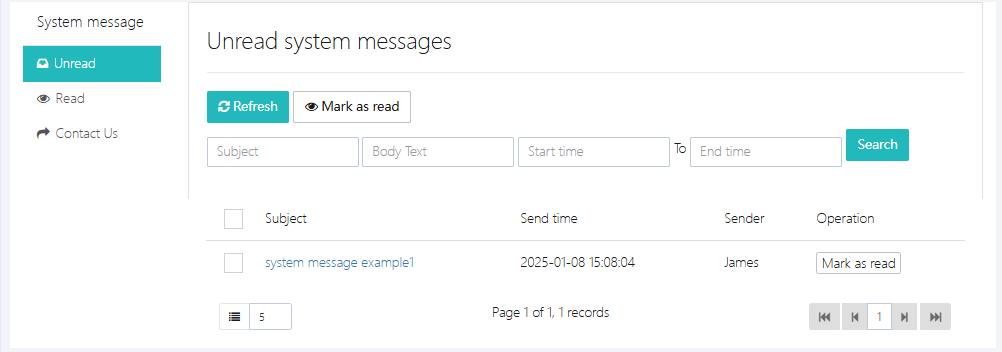
1. System Messages
System messages are usually sent by the system administrator or regularly pushed by the system, such as renewal notifications, feature activation, or upgrade announcements. Click [System Message] at the top right to view.
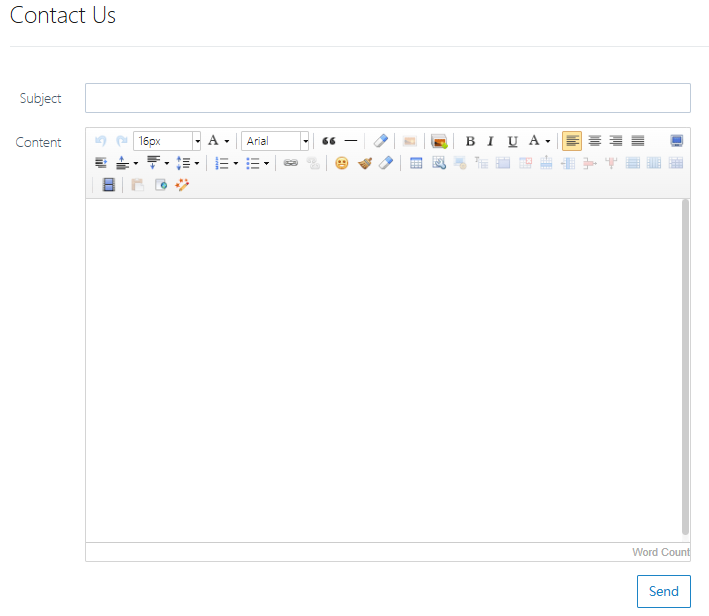
If you have questions or requests, you can use the [Contact Us] feature to send us a message. Fill in the form completely and click [Send].
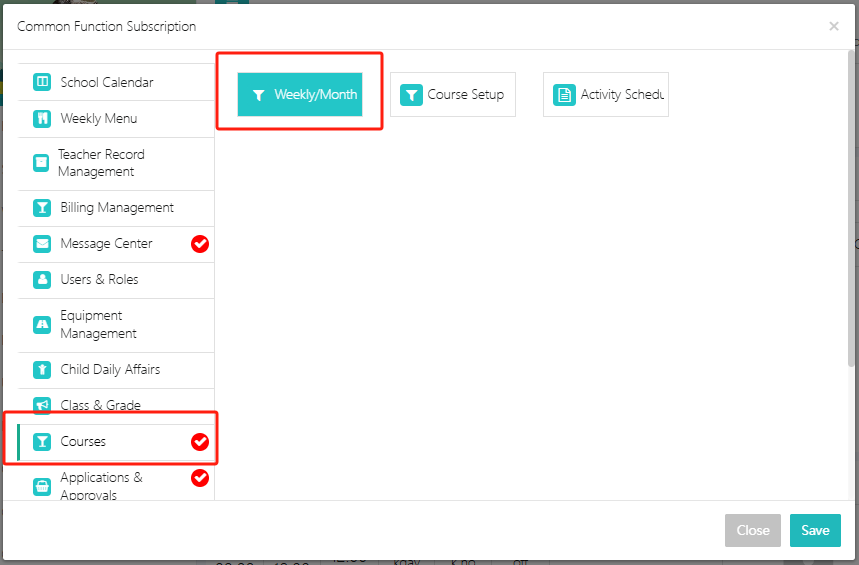
2. Frequently Used Function Subscription
The system provides a subscription feature that allows users to add quick access to commonly used functions to the homepage. Click [Subscription management] to enter.

For example, to add the weekly plan to the homepage, select it and click [Save].
3. View Attendance
To view your own or other teachers' daily attendance, click [Detailed description].
You can switch between personal and all staff attendance views. Note: Without sufficient permissions, you cannot see others’ attendance.

Under "Teacher Attendance", you can export attendance data for all teachers via [Export monthly attendance].
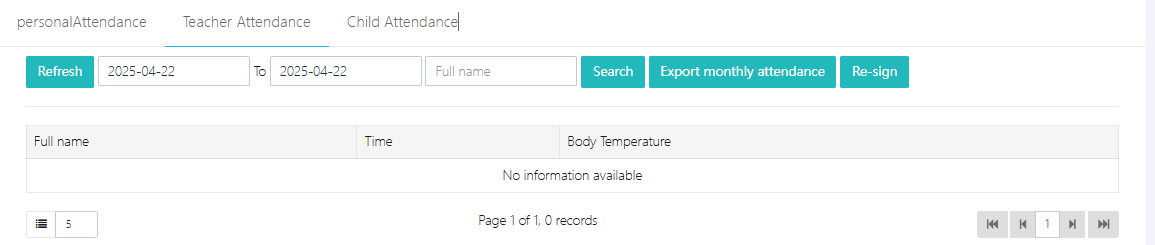
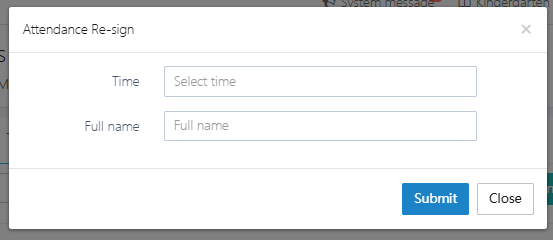
[Re-sign] is used to add or modify attendance data manually.
4. View Child Attendance
Click [Child Attendance] to enter the function.

Here you can view daily attendance statistics using [Daily attendance statistics] and record check-in and check-out data.
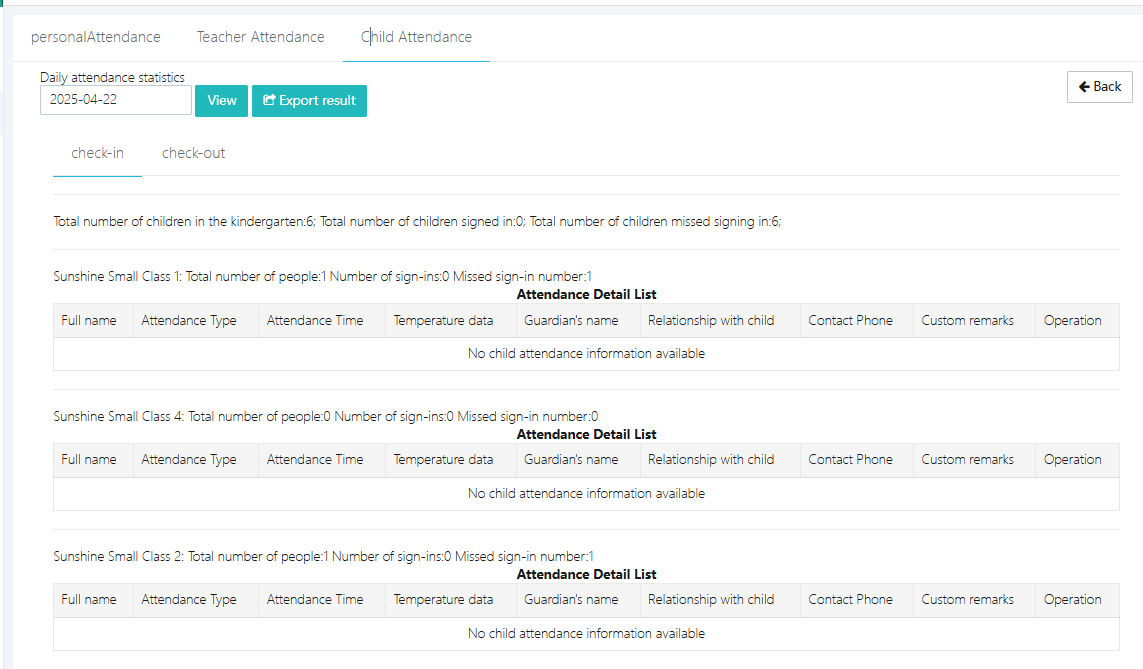
To check a specific child’s attendance over a selected period, click [Statistics].

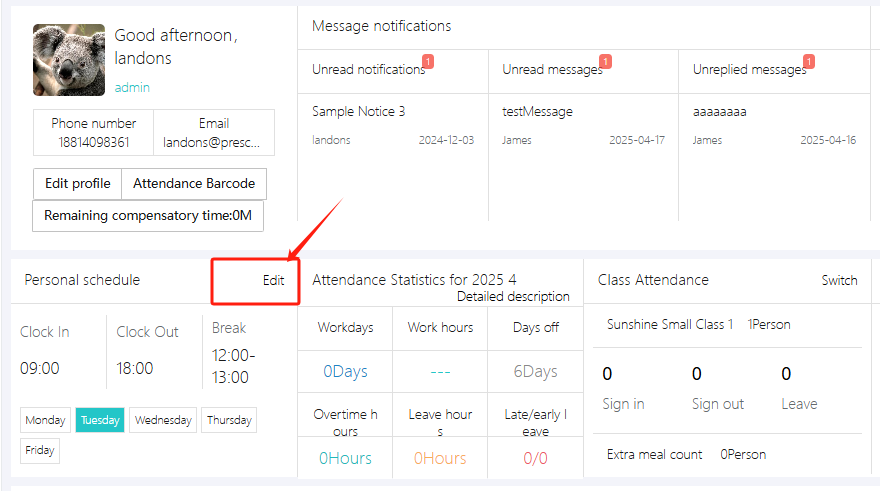
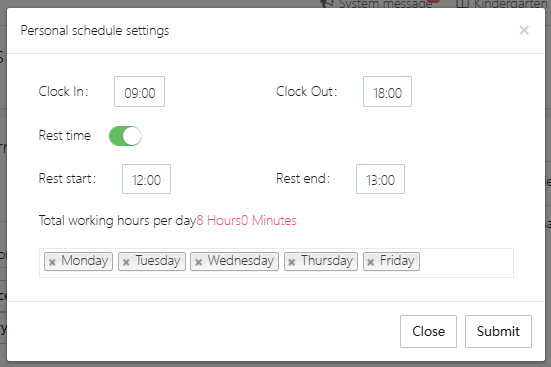
5. Edit Personal Work Time
Everyone must set their personal work hours, or attendance exports may be inaccurate. Click [Edit] to configure.
After setting, click [Submit].
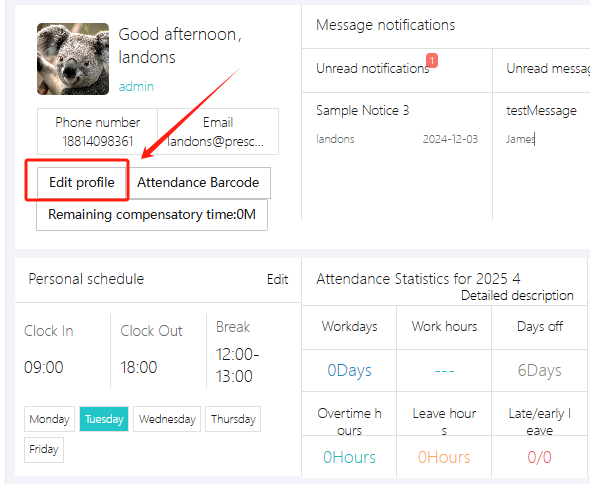
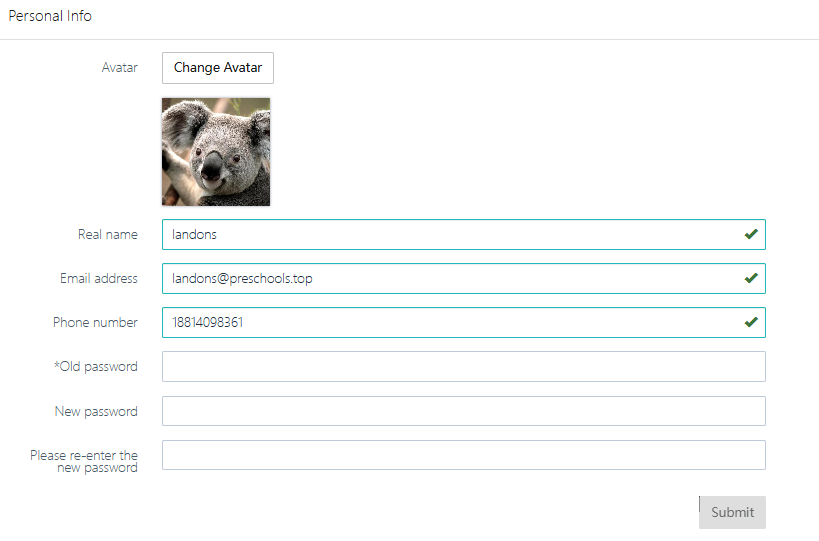
6. Edit Personal Information
To update personal information, go to [Edit profile].
After editing, click [Submit].
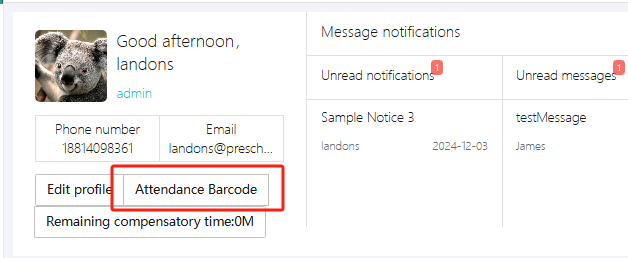
7. Download Personal Attendance Barcode
You can download your personal attendance barcode via [Attendance Barcode]. The image can be saved to your phone or printed, so you don’t need to log in to access it.
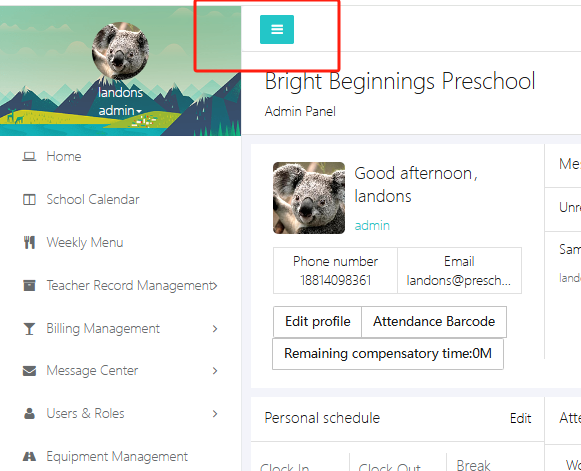
8. Collapse Menu
If you don’t need the left-side menu, you can collapse it by clicking the button shown below.
School Calendar Module
Public school events can be published in this section. Users can click the left menu and select [School Calendar] to enter, as shown below.
Here you can click [Last month] to view the previous month’s calendar, and [Next month] for the next month.
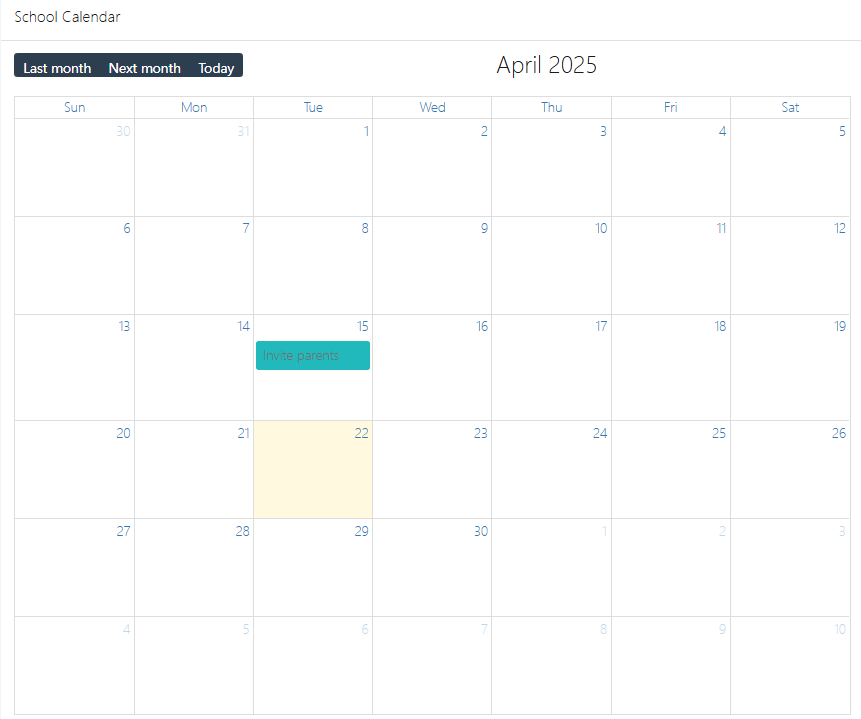
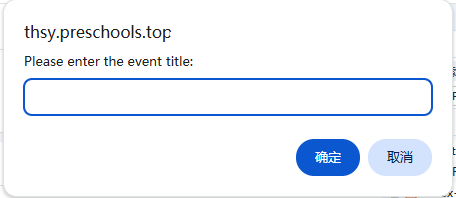
1. Add Event
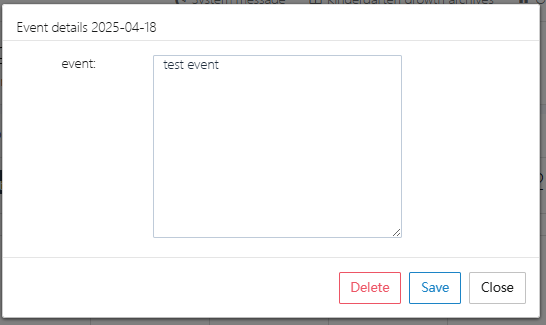
If you need to add a public school calendar event, click the corresponding date and fill in the popup window.
2. Delete/Edit Event
Click the corresponding date and event, then delete the event with [Delete] or edit it with [Save], as shown below.
Weekly Menu
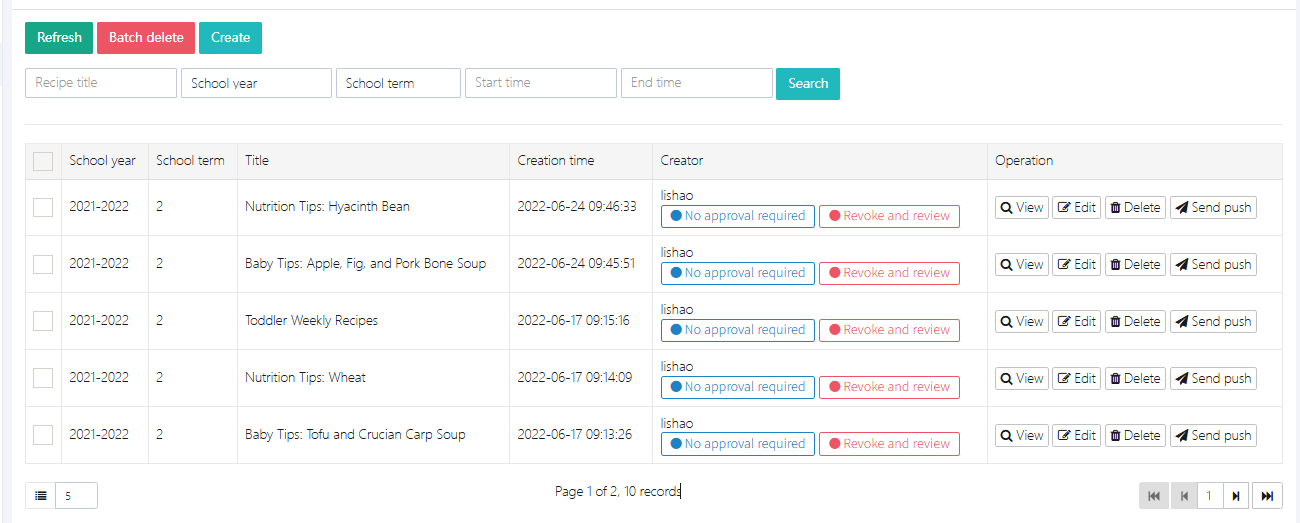
The school’s weekly menu can be published in this section. Users can click the left menu and select [Weekly Menu] to enter, as shown below.
You can see basic information about the weekly menu, including term, academic year, release time, and title.
1. Create Menu
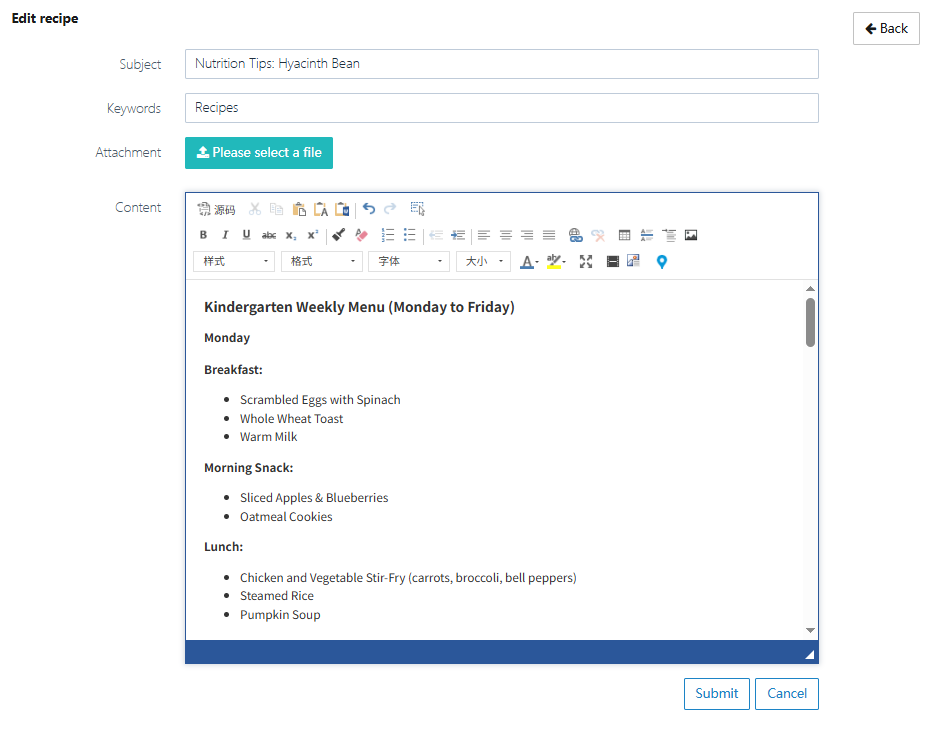
Click [Create] to enter the menu creation page, as shown below.

“Subject” is the title. Usually, we use "Week * Menu" as the title.
“Keywords” are optional. The system will automatically extract them from the Subject.
“Attachment” allows you to upload food photos or digital menu files.
“Content” is for detailed menu content.
After filling in, click [Submit].
2. Edit Menu
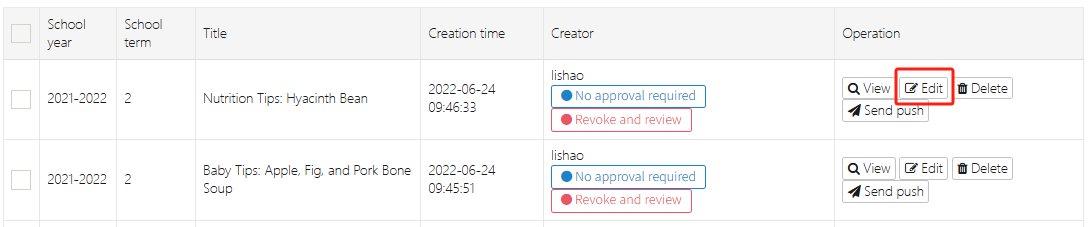
Select the record to edit, click [edit] to enter the edit page. After editing, click [Submit].
3. Push Menu
After editing the menu, click [Send push] to notify everyone.

Teacher Archives
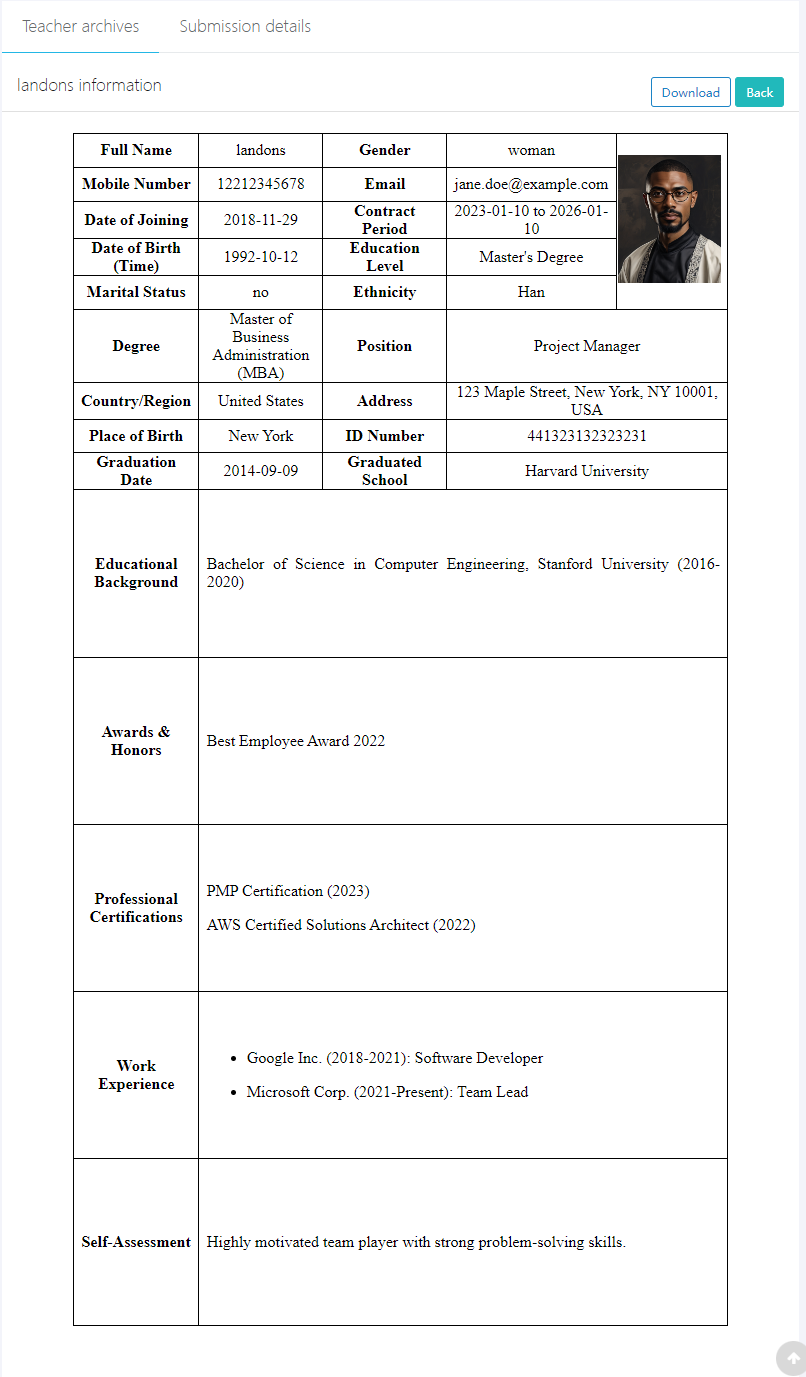
This feature manages all the teacher and staff archives, including their education background, further studies, awards, published papers, and more.
1. Teacher Archives
Here, you can see the basic information of each teacher, including their employment start date, contract period, birthday, and more.
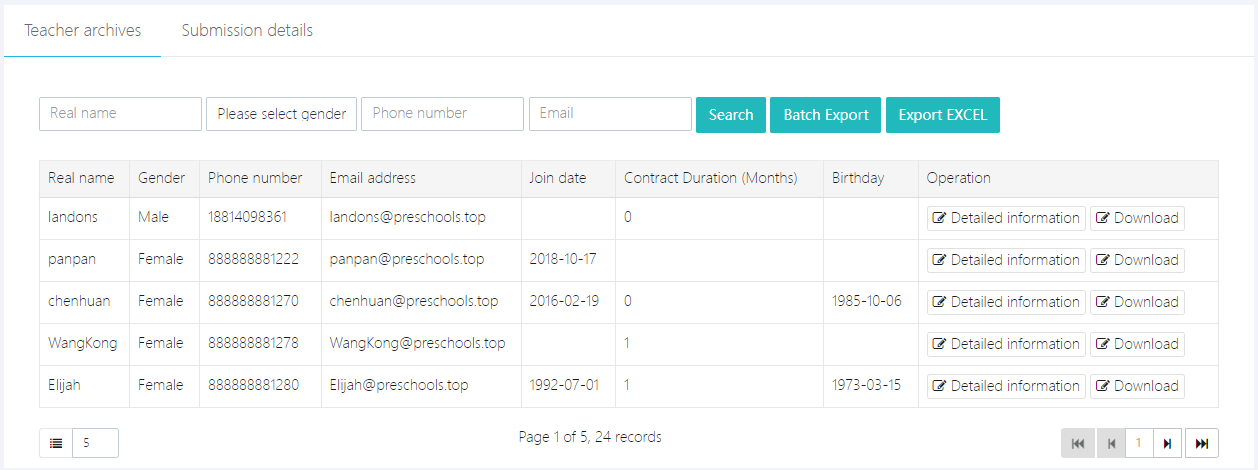
Click [Detailed information] to view the full archival content. If you need a Word document, click [Download] to download it.
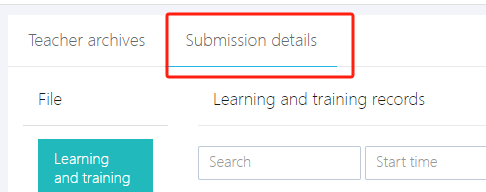
2. Paper Submission Details
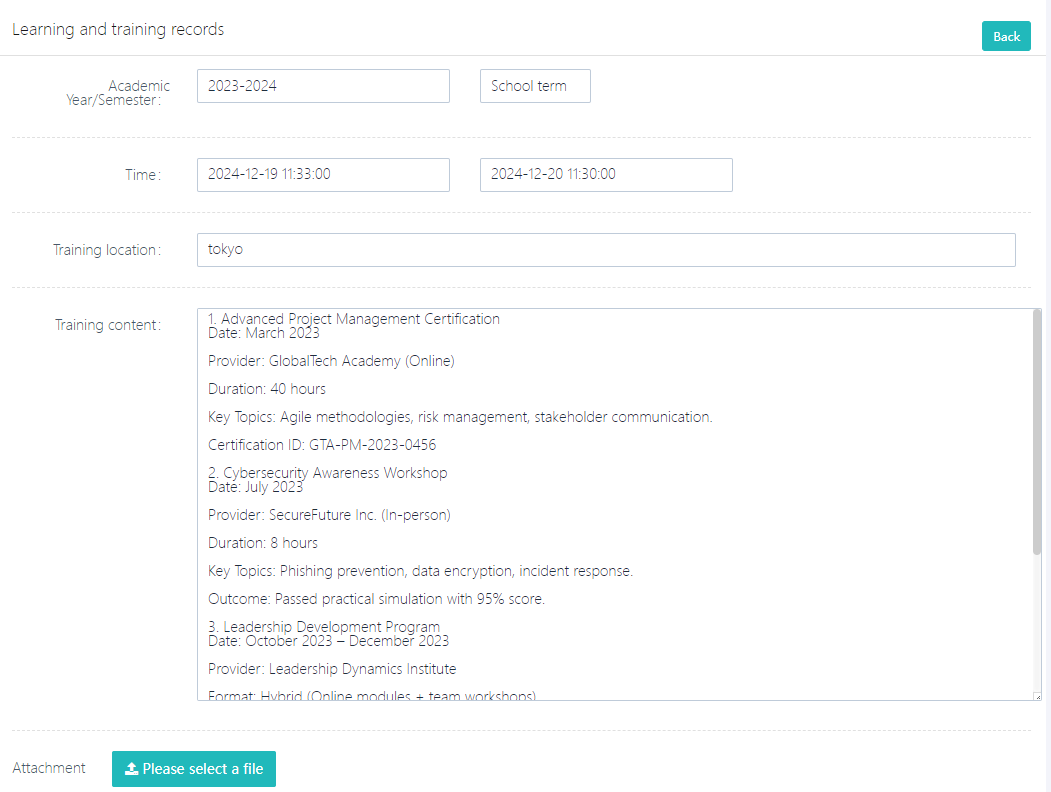
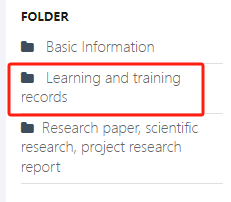
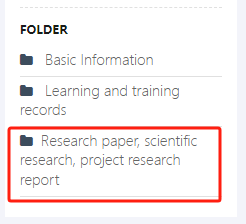
Click [Submission details] to switch to the teacher's file upload status. There are two main categories for file uploads: [Learning and training records] and [Research paper, scientific research, project research report].
Click [Detailed description] to see the detailed content of the files.
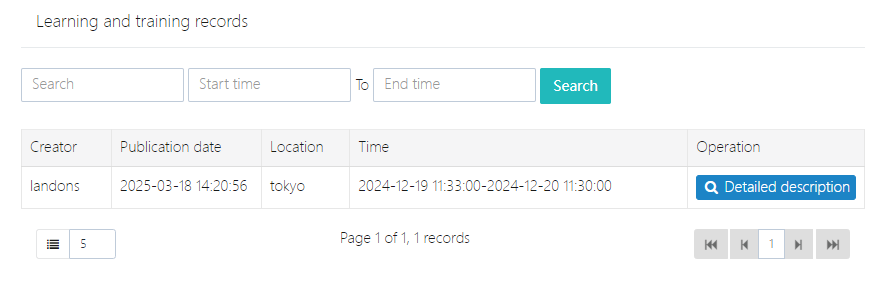
- Detailed content of external learning and training experience is shown as follows:
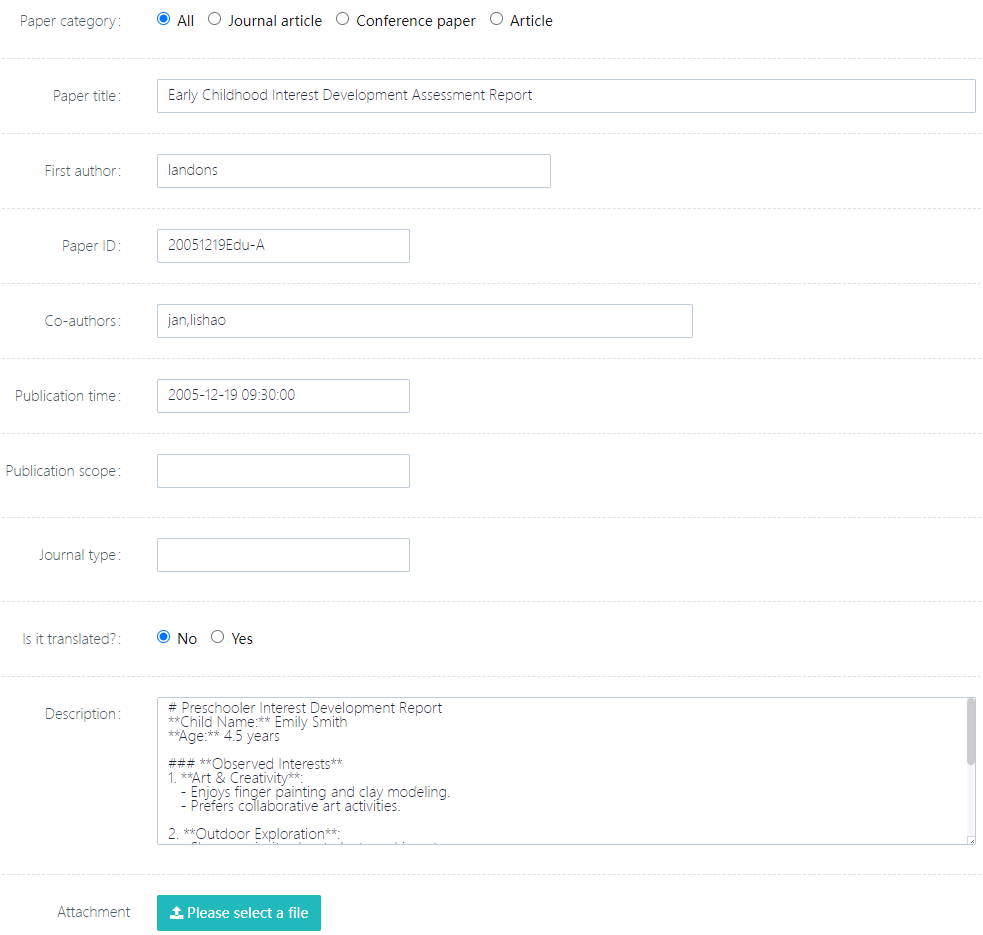
- Detailed content of papers and reports is shown below:
My Records
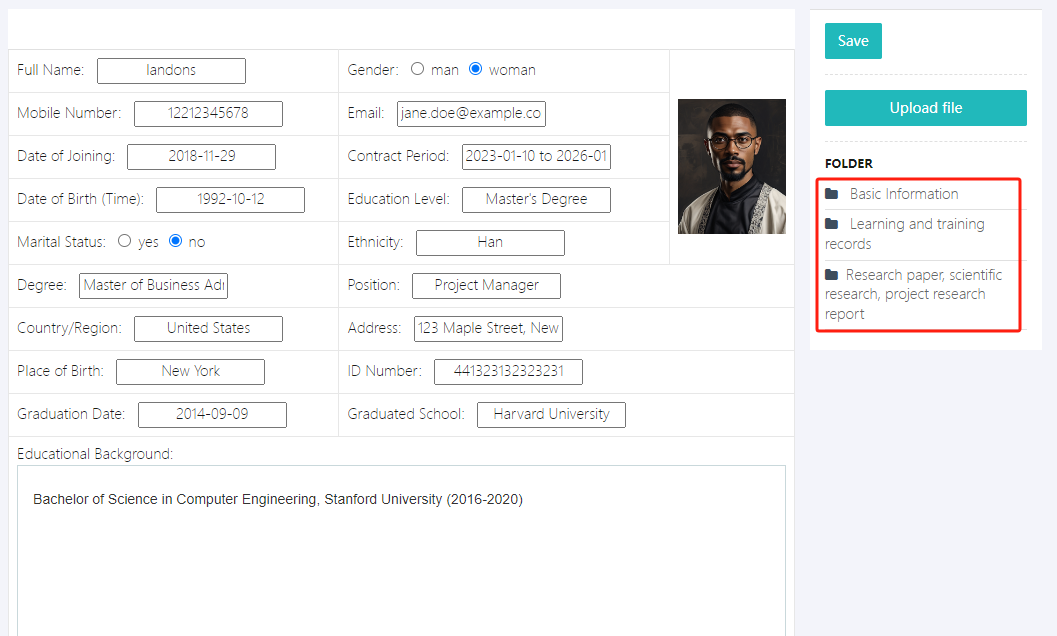
All the archived information in the system is maintained by the faculty and staff themselves. Click [Teacher Record Management] -> [My Records] to enter the personal record editing interface, as shown below:
1. Edit Personal Records
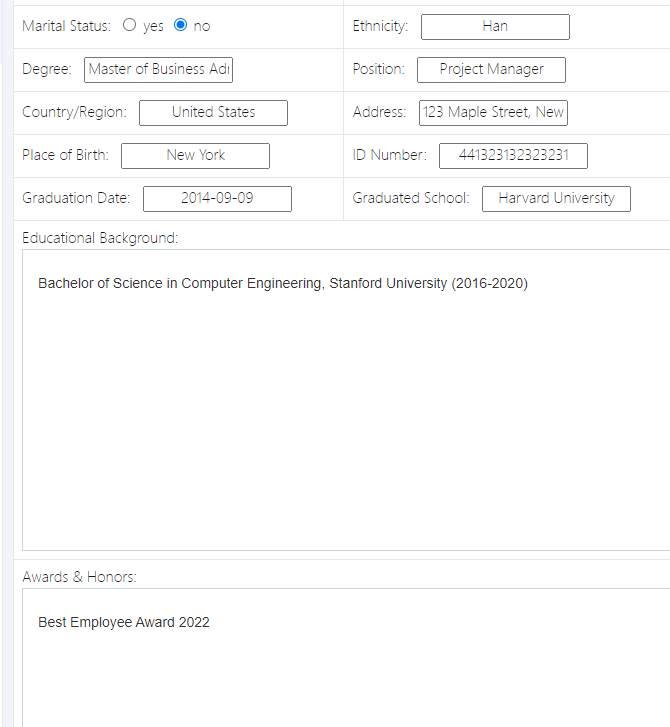
Click [Basic Information] to enter the detailed record page. This page contains personal information such as educational background, religious beliefs, ethnicity, awards, etc. After filling in the information, click [Save] to save.
2. Personal Learning and Training Records
- Click the category on the right [Learning and training records], as shown below:
- Click [Add New] to add new records or [Operation] -> [Edit] to edit personal learning and training records.
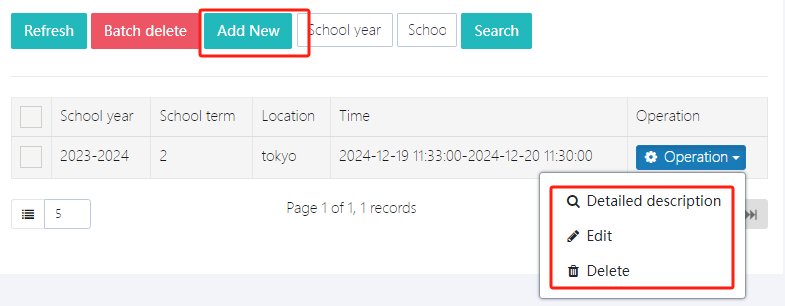
After filling out the form, click [Save content] to submit.
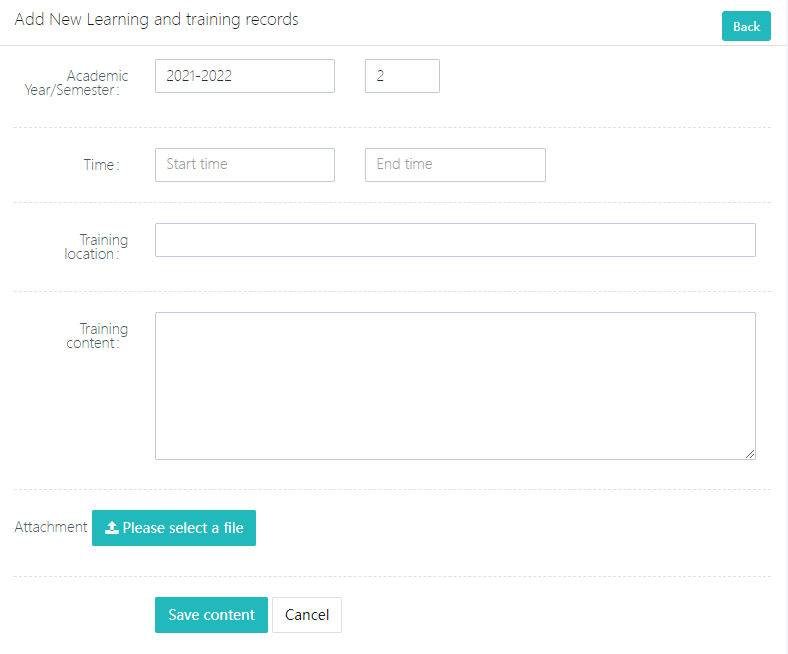
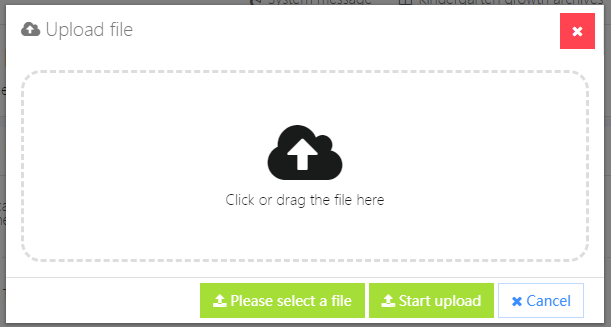
If you need to upload supporting documents, click [Attachment] to upload.
3. Personal Papers, Reports, and Other Materials
- Click the category on the right [Research paper, scientific research, project research report], as shown below:
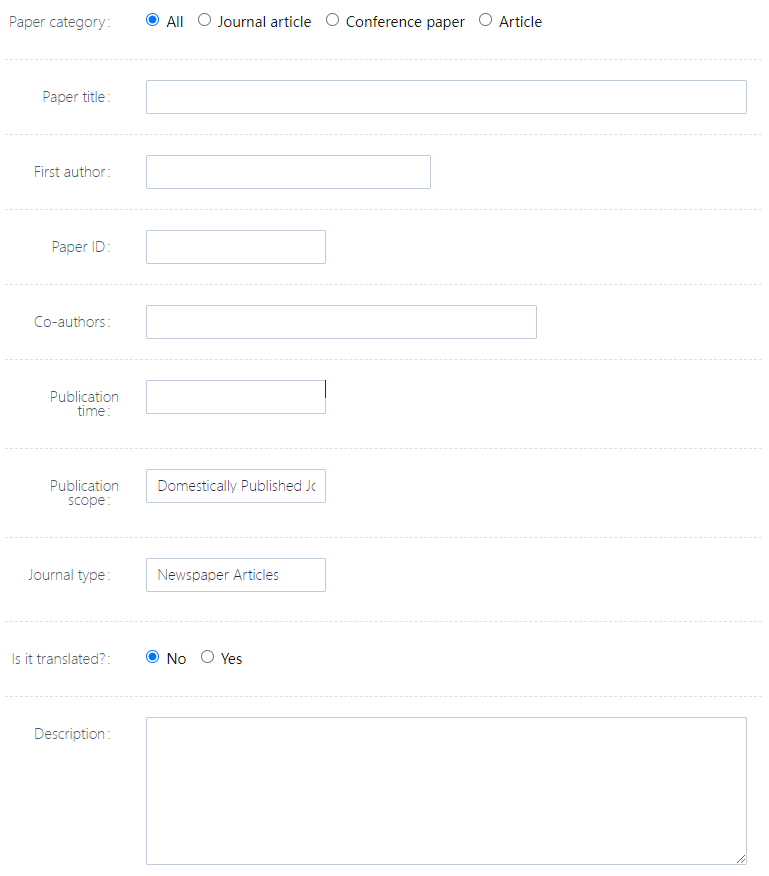
- Click [Add New] to add new records or [Operation] -> [Edit] to edit.
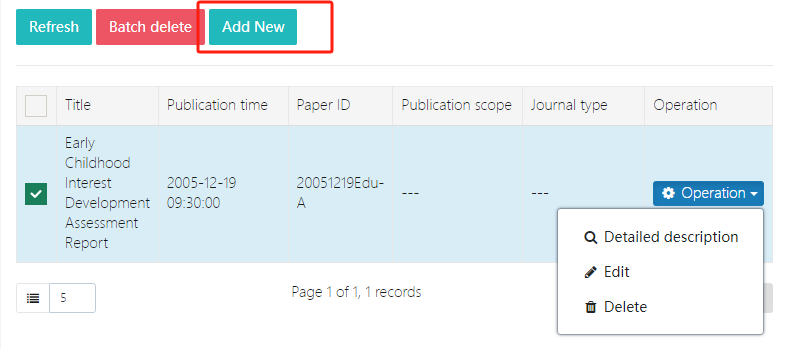
- After filling out the form, click [Save content] to submit.
Fee Items
This section is for schools to set up fee items, such as school uniforms, meal fees, school fees, and other miscellaneous charges. All fee items can be configured here, and once set up, they will be available for selection in the bill.
Note: If the school has set up courses and they are also chargeable, they will be displayed here. To edit the course information, go to [Course] -> [Course Setup] for editing.

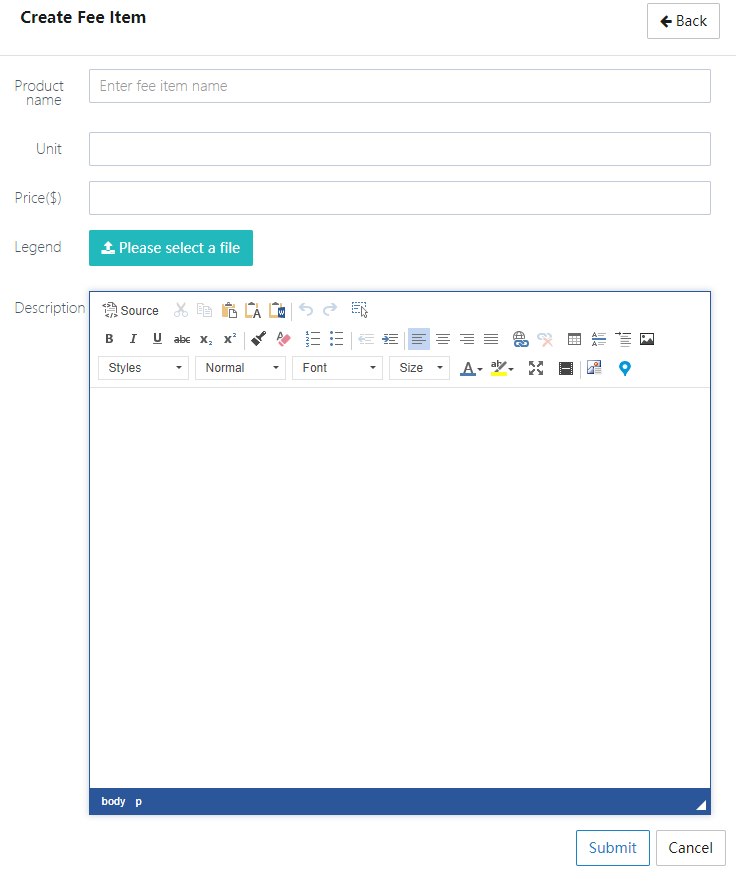
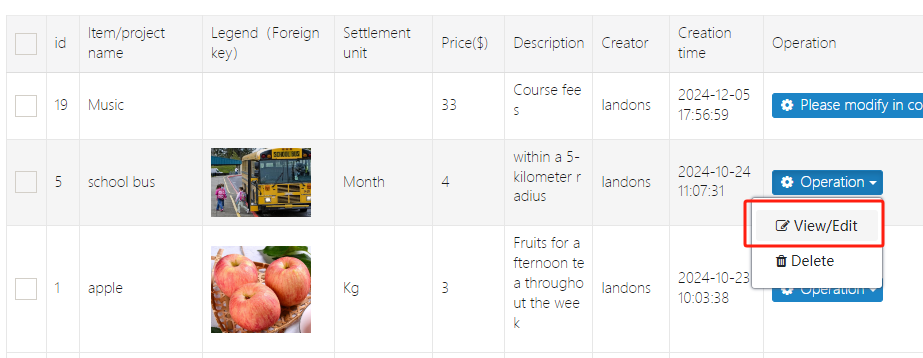
- Add a new fee item: Click [Create], fill out the form, and submit it.
- Edit an existing fee item: Select the item to edit, click [Operation] -> [View/Edit], and after editing, click submit. Modifying an item will not affect the bill information that has already been generated.
Customer Management
This feature is used to manage customer information for non-system users, i.e., customers defined by yourself. All customer management can be handled here.
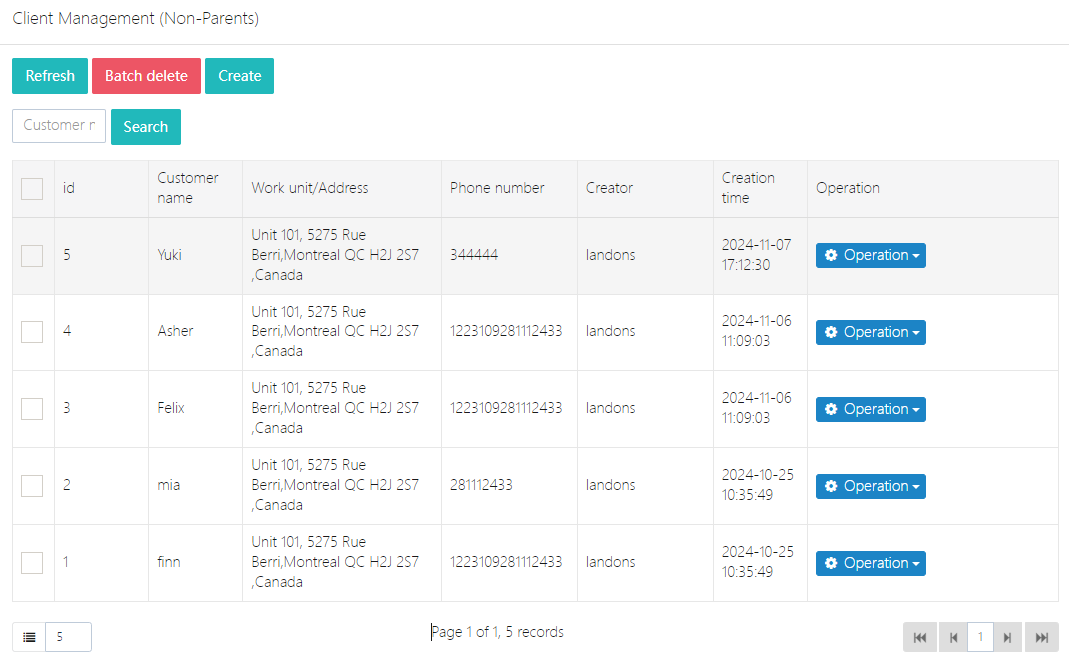
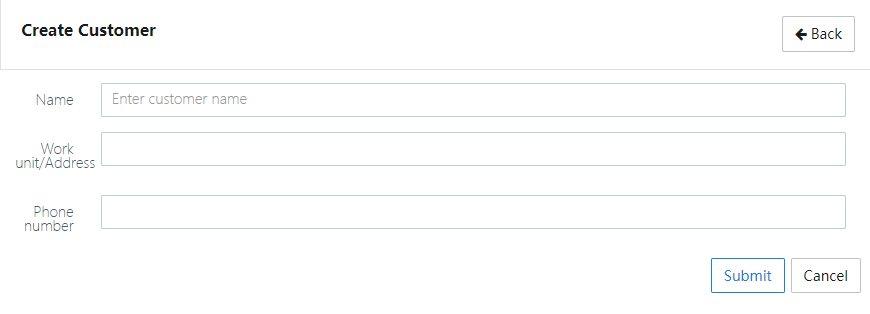
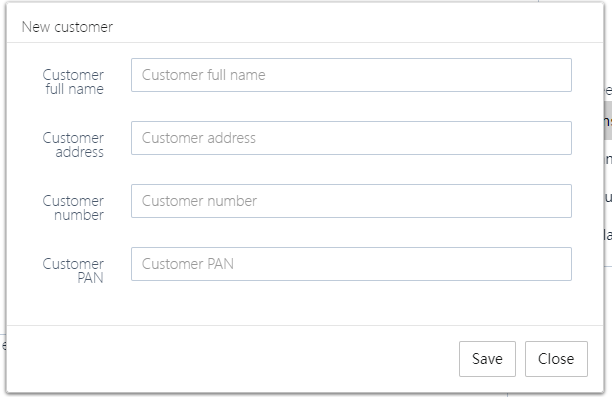
1. Create a Customer
Click [Create], fill in the customer's information, and then click submit.
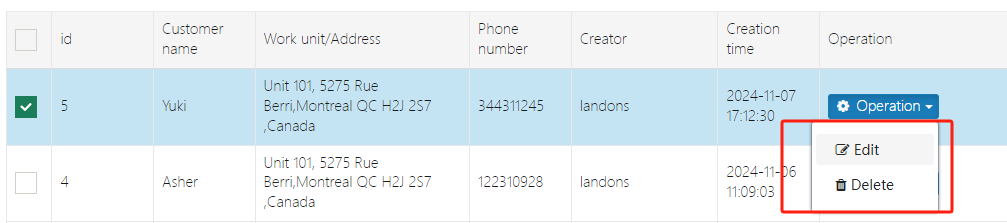
2. Edit or Delete a Customer
Select the customer you want to operate on, click [Operation], and you will see related options to edit or delete the customer.
My Bill
This feature lists the bills related to you, and you can pay any outstanding bills here.
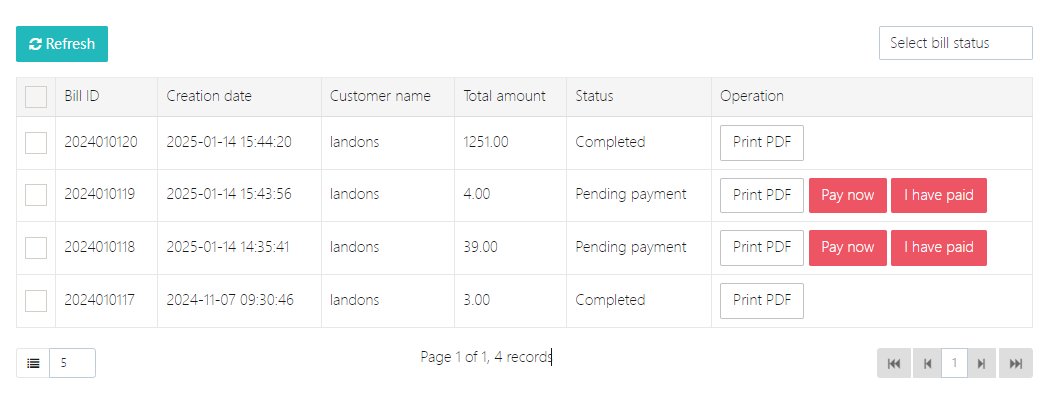
If you have completed the payment but the bill status is still Pending payment, you can click [I have paid] to refresh the status.
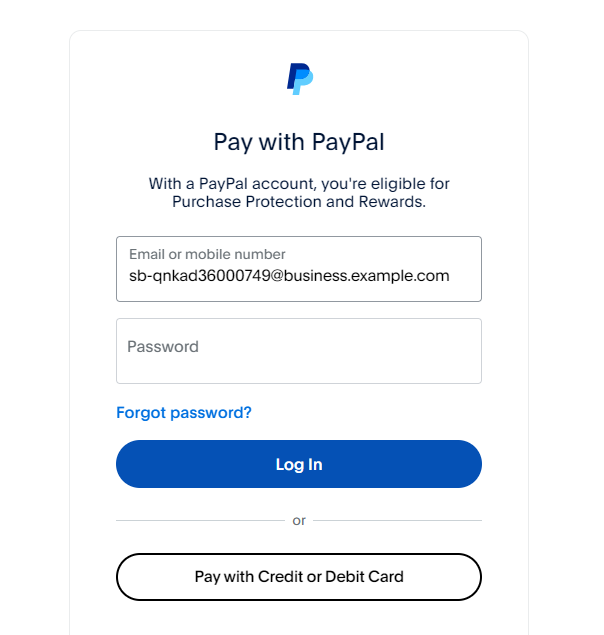
Payment Redirect
After clicking [Pay now], the system will redirect to the PayPal login page and guide you through the payment process, as shown below.
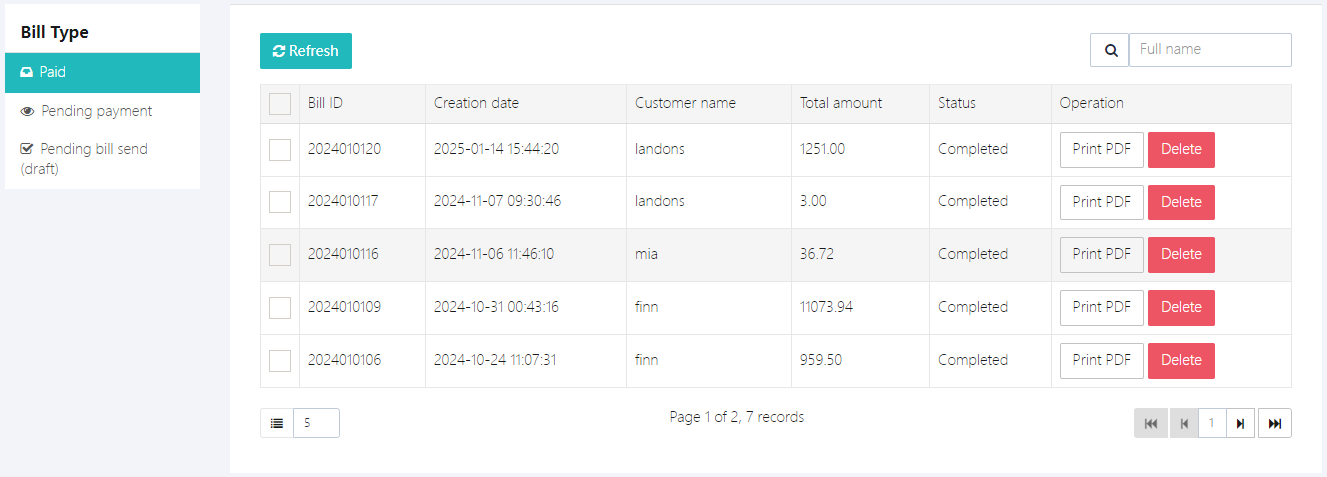
Bill Management
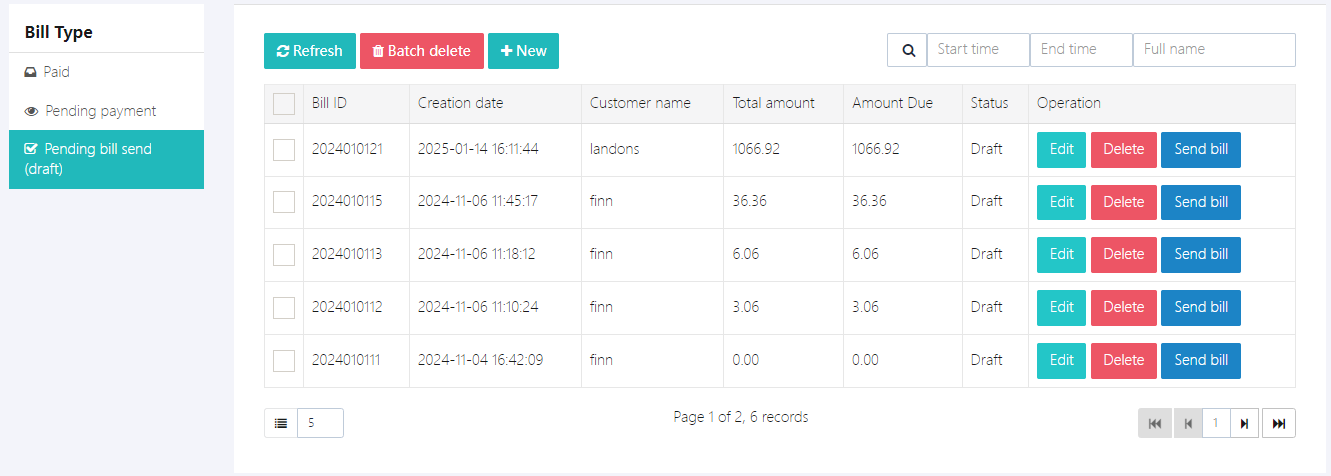
This feature will display all the bills in the system and categorize them as [Paid], [Pending payment], or [Pending bill send (draft)].
Note: Since the system uses PayPal as the payment gateway, the school must have a PayPal account for receiving payments.
1. Paid Bills
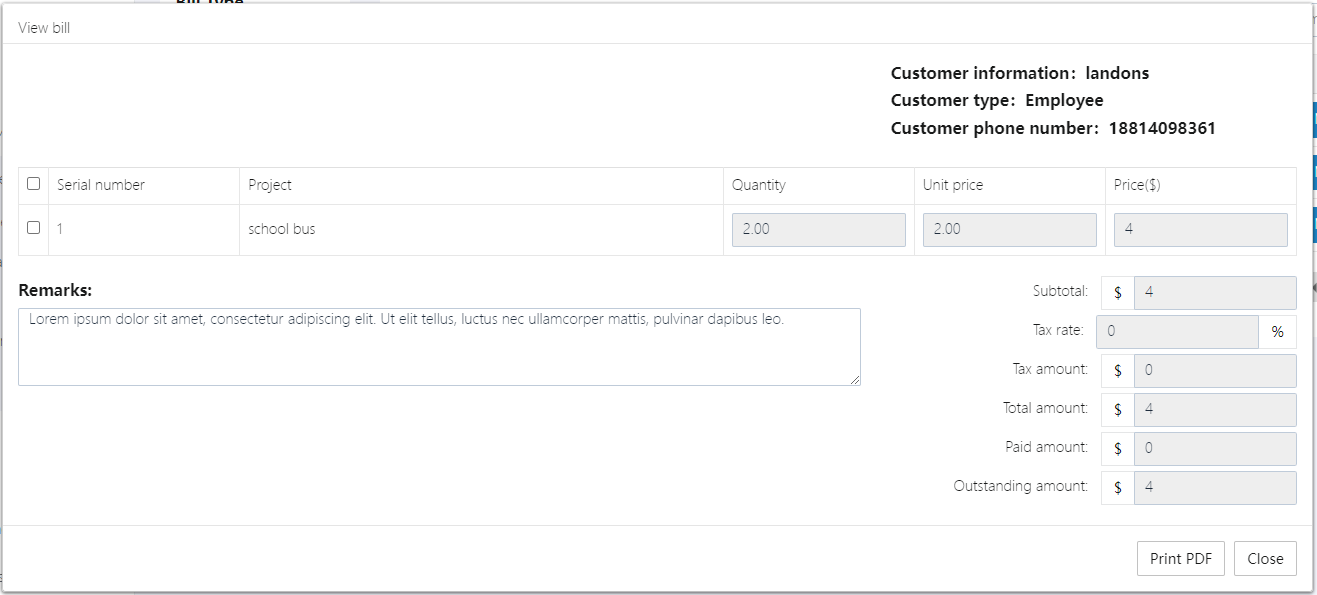
2. Pending Payment Bills
These are bills that the user has not paid yet. All bills can be manually marked as paid through [Mark as paid] if the user has paid offline.
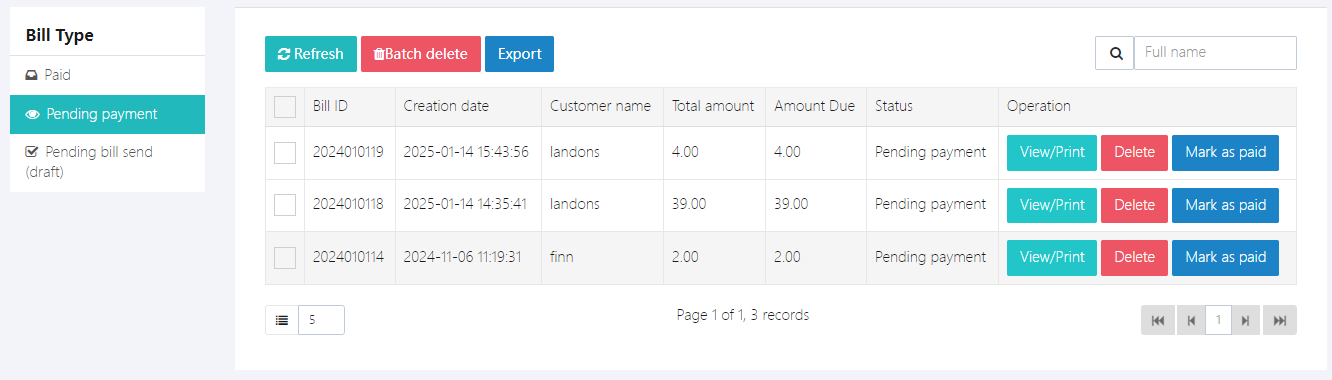
Users can click [View/Print] to print the bill or generate a PDF.
3. Bill Drafts
Users can create a new bill here by clicking [+New], then click [Send bill] to send it to the user for payment.
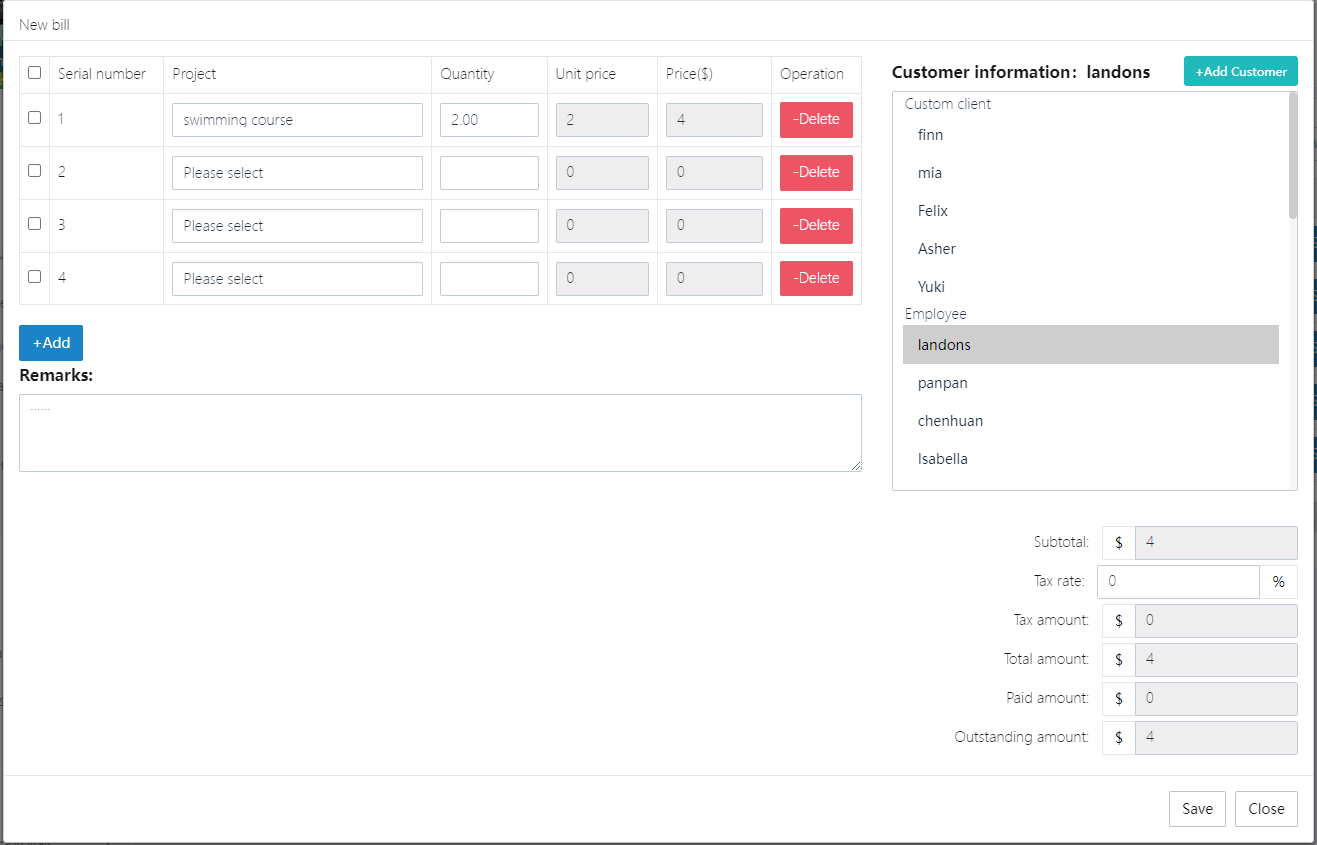
4. Create a New Bill
-
Click [+Add] to add details. These details are sourced from [Billing Management] -> [Fee Item Management].
-
Click [+Add Customer] on the right to add the billing person's information. If the bill recipient is a parent, student, or teacher in the school, you can directly select them from the dropdown menu.
-
Enter the bill remarks.
-
Click [Save] to save the bill. At this point, the bill status is a draft. You must click [Send bill] to turn it into an official bill.
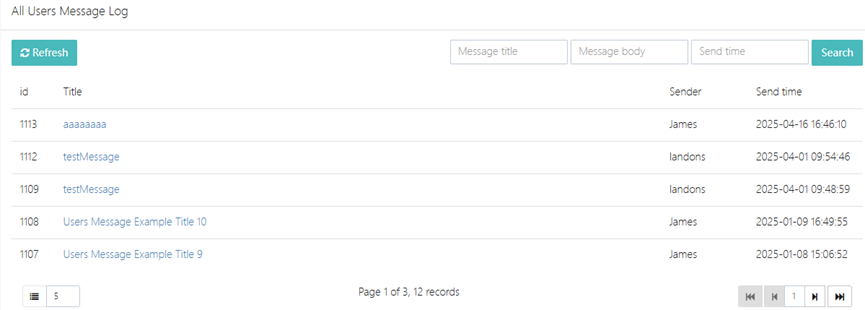
All-Users Message History
This module allows users to view and manage the history of all sent messages, supporting fast search, pagination browsing, and viewing the detailed content, attachments, and recipient status of each message. Below is the description of the main functional modules:
1. Message List
-
Search Bar: Supports quick search of historical messages by "message title".
-
Pagination: Displays the current page number and total records at the bottom (e.g., Page 1 of 3, 12 records).
-
List Fields:
- ID: The unique identifier for the message (e.g., 1113).
- Title: The message subject (e.g., Users Message Example Title 10).
- Sender: The name of the message creator (e.g., James).
- Send Time: The specific time the message was created (format: YYYY-MM-DD HH:MM:SS).
- Operation Buttons:
- Refresh: Click to update the list and retrieve the latest message records.
2. View Message Details

-
Operation Steps: Click on the message title in the message list.
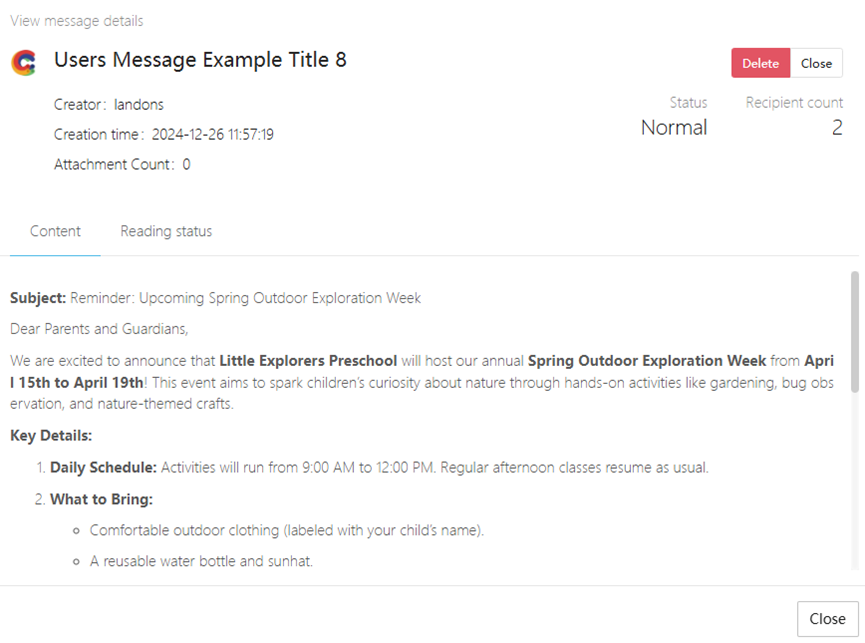
- Details Page Content:
- Basic Information:
- Title: The message subject.
- Creator: The sender's name.
- Create Time: The time the message was sent.
- Attachment Count: Displays the total number of attachments (e.g., 1).
- Message Body: Contains the specific content (e.g., activity notifications, reminders, etc.).
- Recipient Statistics: Displays the number of recipients for the message (e.g., Recipient count: 2).
- Basic Information:
- Details Page Content:
- Attachment Display
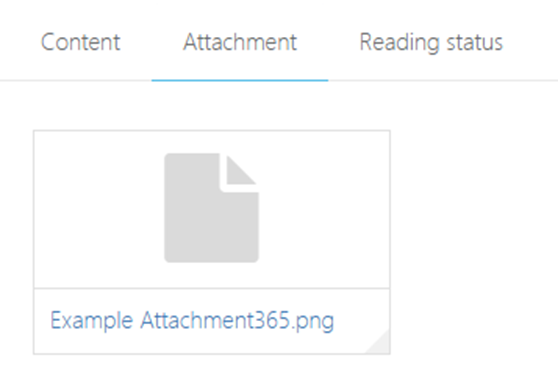
- In the message detail page's "Attachments" section, the filename is displayed (e.g., Example Attachment365.png).
- Operation: Click the attachment name to preview or download the file (specific system functionality may need further clarification).
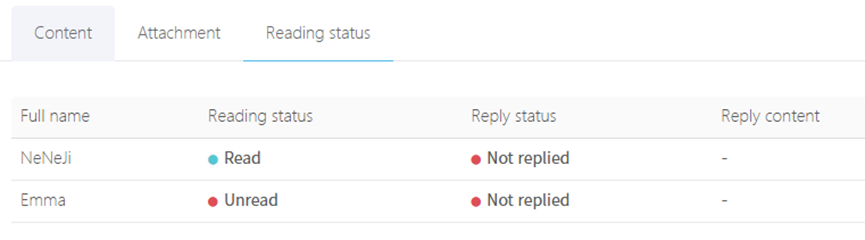
3. Recipient Status
-
Status Panel: Displays the interaction status of each recipient at the bottom of the message detail page.
- Field Description:
- Name: Full name of the recipient (e.g., NeNeJi, Emma).
- Reading Status: ● Read (green marker): The recipient has viewed the message. ● Unread (gray marker): The message has not been read yet.
- Reply Status: ● Replied: The recipient has responded. ● Not replied: Default status (e.g., all examples in this case show "Not replied").
- Reply Content: Displays the recipient's specific feedback (if none, it shows "-").
- Field Description:
Operation Notes:
- Message Search: Enter the full or partial title keyword and click the Search button to quickly locate the target message.
- Pagination Browsing: When there are many records, you can switch pages via the page numbers at the bottom.
- Status Update: The reading status is automatically synchronized by the system, no manual operation is required.
- Attachment Limitations: A single message supports multiple attachments. Please refer to the system documentation for specific file format and size limitations.
Notifications
This module supports users in efficiently creating, approving, sending, and tracking various kindergarten notifications. It includes advanced features such as Scheduled Push, Mandatory Reading, Opinion Solicitation, and supports multi-level approval workflows and reading status tracking.
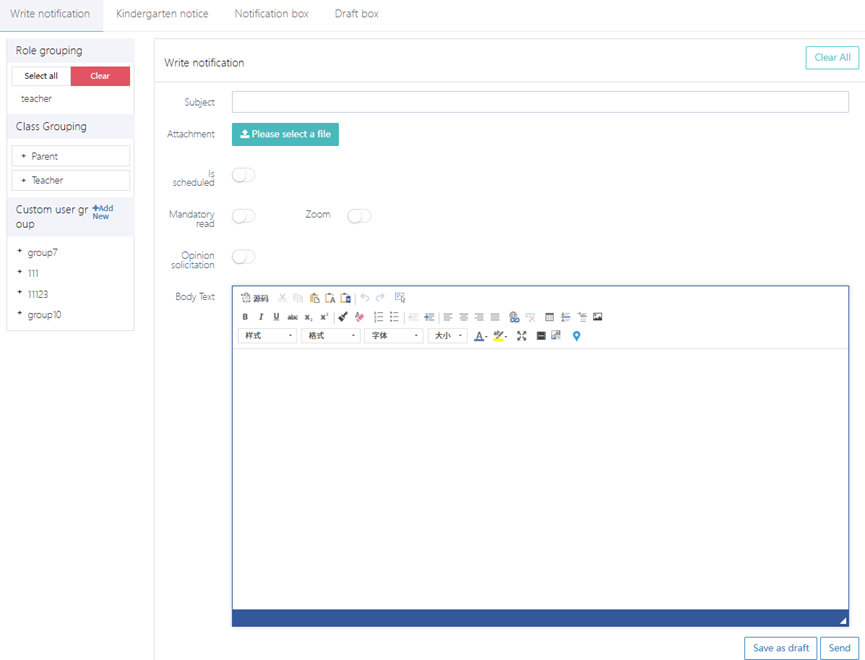
1. Writing Notifications
-
Select Recipient Scope:
- Role Grouping: Batch select by role (e.g., "Teacher" or "Parent").
- Class Grouping: Select recipient groups by class.
- Custom User Group: Choose a preset user group (e.g., group7) or enter specific usernames (e.g., T11).
-
Fill in Notification Content:
- Subject: Enter the title (e.g., Autumn Parent Meeting Arrangement).
- Body Text: Supports rich text editing, allowing insertion of tables and font formatting adjustments.
- Attachment: Click Please select a file to upload documents or images (e.g., Parent Meeting Agenda.pdf).
-
Advanced Settings:
- Scheduled: Check this to set a specific sending time (e.g., 2024-10-01 09:00).
- Mandatory Read: When enabled, recipients must confirm reading before they can close the notification.
- Opinion Solicitation: Allows recipients to submit feedback within the notification.
- Zoom: Allows recipients to zoom in on the notification content.
-
Save or Send:
- Save as Draft: Click Save as draft to temporarily save the content.
- Send Directly: Click Send to submit for approval (requires permissions).
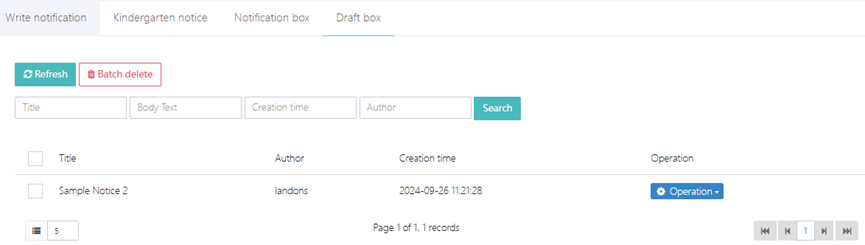
2. Notification List
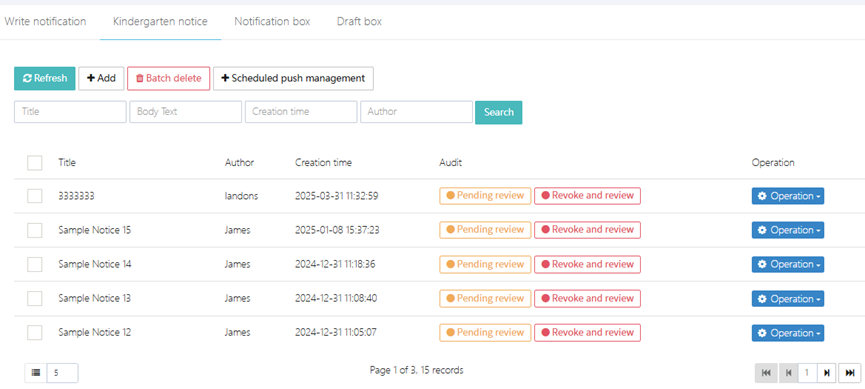
-
List Display: Displays sent or pending review notifications, with fields including Title, Author, Creation Time, and Audit (e.g., ● Pending review).
-
Operation Buttons:
- Batch Delete: Select multiple notifications to delete.
- +Scheduled Push Management: View or modify the preset sending time.
3. Scheduled Push Management
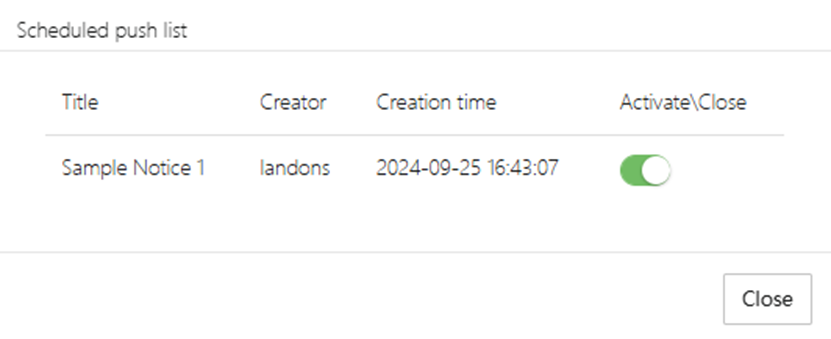
-
List Fields: Title, Creator, Creation Time, Activate/Close.
-
Operation Functions:
- Activate/Close: Click the status icon to toggle the push plan.
- Delete: Cancel a scheduled task.
4. Approval Process
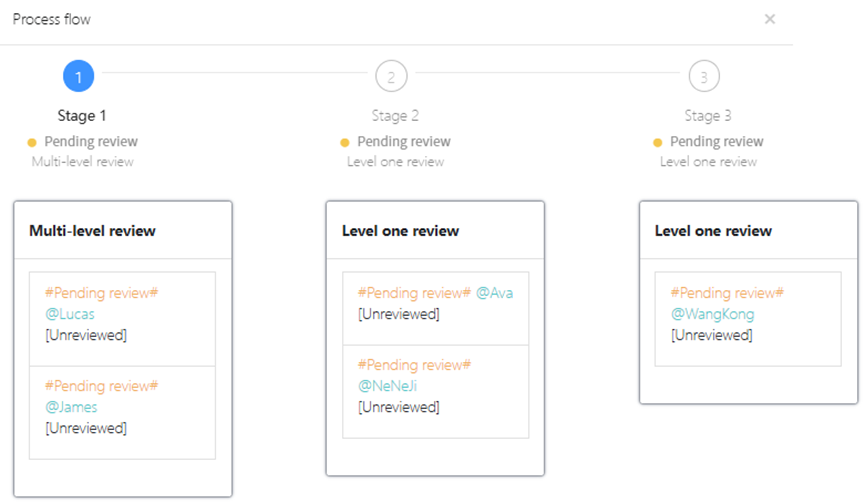
-
Multi-level Approval Mechanism (can be redefined in system settings):
- Stage 1 (Pending Review): After submission, the notification enters the initial review queue, where it is processed by the designated reviewer (e.g., Lucas).
- Stage 2 (First-level Review): After initial approval, it needs confirmation from the second-level reviewer (e.g., Ava).
- Stage 3 (Final Approval): Some important notifications require final approval by the principal (e.g., WangKong).
-
Operation Instructions:
- Reviewers log in and click the notification title in the "Pending Review" list to view the content and choose "Approve" or "Reject".
- If changes are needed, click Revoke and Review to return it to the creator.
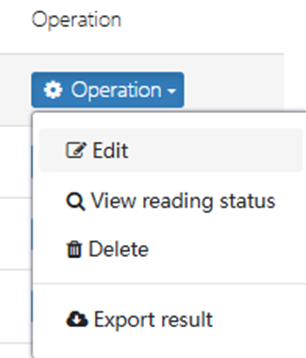
5. Reading Status Tracking
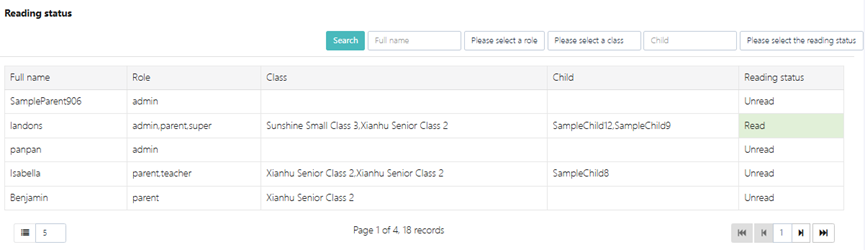
-
Filter Conditions: Supports quick filtering by Role, Class, and Reading Status.
-
List Fields:
- Name: The recipient's full name (e.g., landons).
- Role and Class: Displays user identity and associated class (e.g., admin.parentsupper | Sunshine Class 3).
- Reading Status: Marked as "Read" or "Unread".
-
Data Export: Click Export Result to generate a reading status report (Excel/PDF).
6. Unread Message Management

- Mark as Read: Select multiple notifications and click Mark as read to forcibly update the status.
- Search: Locate specific messages by Subject, Sender, or Send Time range.
7. Draft Box
You can continue editing unfinished notifications or send them directly.
Messages
This module supports users in completing the full lifecycle of messages, including writing messages, managing sent and received messages (Sent Box, Inbox), viewing and replying to messages, and providing status tracking capabilities (e.g., reading status, reply status). Below is a description of the core module:
1. Writing a New Message
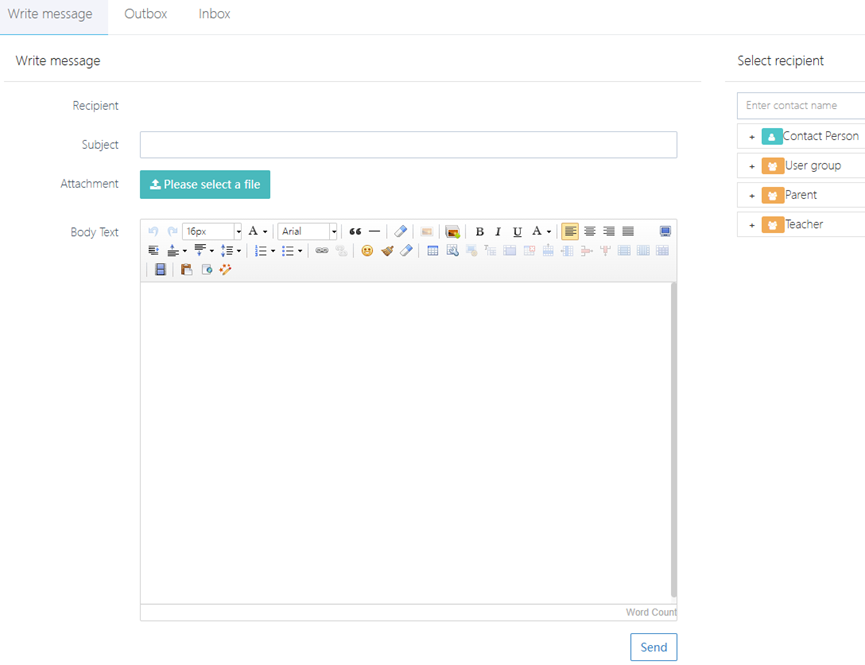
-
Select Recipient (supports multi-selection):
- Contact Person: Enter a name to search for specific individuals (e.g., James).
- User Group: Choose a preset group (e.g., group7).
- Role: Batch select by role (e.g., "Parent" or "Teacher").
-
Fill in Message Content:
- Subject: Enter the message title (e.g., Spring Outdoor Activity Notification).
- Body Text: Edit the detailed content, supporting rich text formatting.
- Attachment: Click Please select a file to upload attachments (e.g., Activity Schedule.pdf), supporting multiple files.
-
Send Settings:
- Word Count: Displays the word count in real-time (e.g., Word Count: 256).
- Send: After confirming the message is correct, click the Send button.
2. Sent Box Management (Sent Messages)
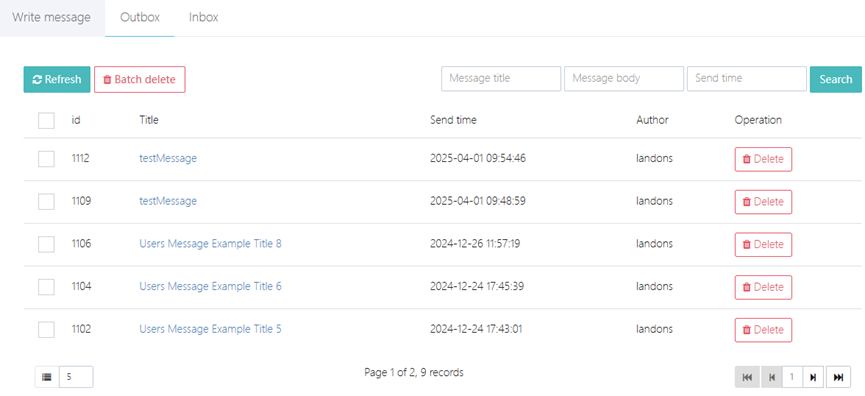
-
List Display:
- Fields: Title, Send Time, Author, Operation (e.g., Delete).
- Pagination: Displays total pages and records at the bottom (e.g., Page 1 of 2, 9 records).
-
Operation Functions:
- Batch Delete: Select messages and click the "Batch Delete" button.
- Delete: Click the "Delete" button next to a specific message.
- Refresh: Click the "Refresh" button to sync the latest data.
-
Message Details:
- Basic Information: Creator, Send Time, Number of Attachments (e.g., Creator: James | Attachments: 0).
- Message Content: Displays the body and attachments (click the attachment name to download).
- Reading Status: Displays whether the recipient has read the message (e.g.,
ReadorUnread). - Reply Status: Displays whether the recipient has replied (e.g.,
Not replied).
3. Inbox Management

-
Message Categories:
- Unread Messages: Marked with the Unread label, needs to be processed first.
- Replied Messages: Marked with the Replied label, can be quickly filtered.
-
Operation Functions:
- Mark as Replied: Select messages and click Mark as replied.
- Search: Search for messages by subject, sender, or time range.
- Refresh: Click the "Refresh" button to update the status.
-
Message Details:
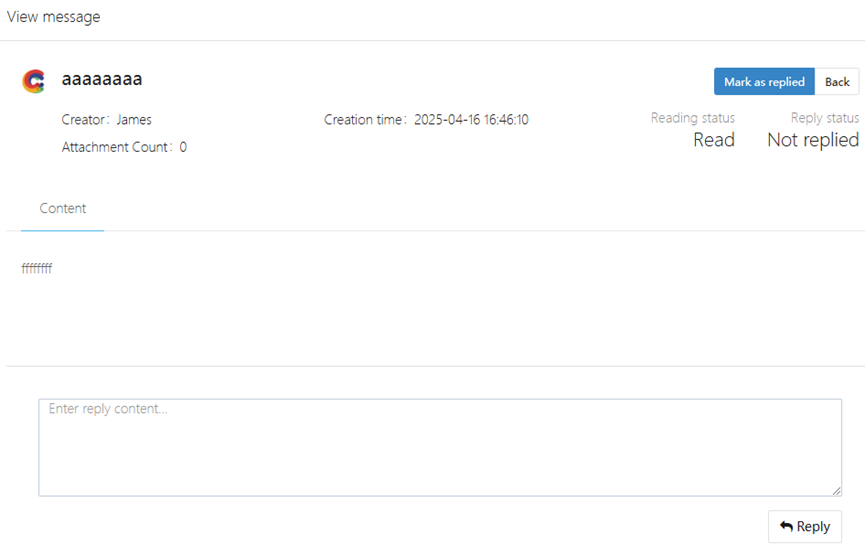
- Basic Information: Creator, Creation Time, Attachments (e.g., Creator: James | Attachments: 0).
- Message Content: Displays the body and attachments (click the attachment name to download).
- Status Tracking:
- Reading Status: Displays whether the recipient has read the message (e.g., Read or Unread).
- Reply Status: Displays whether the recipient has replied (e.g., Not replied).
- Reply Operations:
- Enter feedback in the "Reply Content" box.
- Click the Reply button to submit, and the system automatically marks it as "Replied."
User Groups
This module allows administrators to group staff or parents as needed for batch messaging or notification purposes. It supports the creation, editing, deletion, and member management of user groups, providing a flexible interface for operation. Below is the core functionality description:
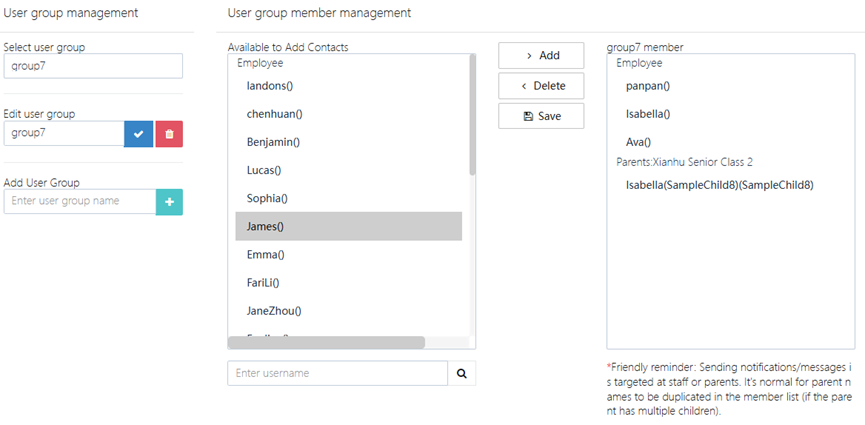
1. User Group Operations
- Select User Group: Choose an existing user group from the drop-down menu (e.g., group7).
- Edit User Group: After selecting a user group, modify its name (e.g., change group7 to Parent Group - Class 2).
- Add User Group: Click +, enter the new group name to create it.

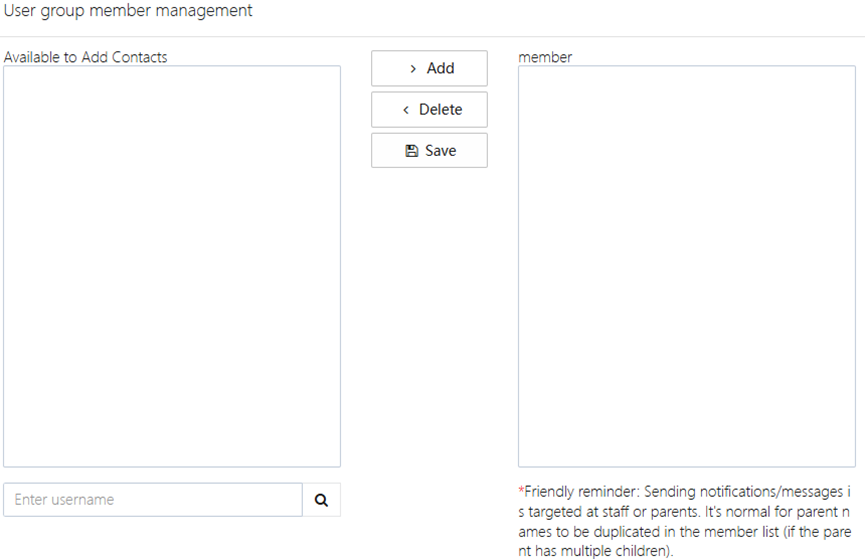
2. User Group Member Management
- Operation Steps:
- Select the target user group (e.g., group7).
- Click "User Group Member Management" to enter the member editing interface.
- Interface Description:
- Available Contact List:
- Categorized Display: Contacts are categorized by role (e.g., Employee, ParentsXianhu Senior Class 2).
- Member Display: Shows members who can be added (e.g., landons(), James(), Isabella(SampleChild8)).
- Member Operations:
- Add Members:
- Select members from the "Available Contacts" list and click the >Add button to add them to the user group.
- Support searching for specific members by entering the username.
- Delete Members:
- In the "User Group Members" list, select a member and click the <Delete button to remove them.
- Add Members:
- Save Settings: After completing the operation, click the Save button to apply the changes.
- Available Contact List:
Notes and Tips
-
Duplicate Member Handling:
- If a parent has multiple children, their name may appear multiple times (e.g., Isabella(SampleChild8) and Isabella(SampleChild9)). The system will automatically mark the associated child's information, which should be carefully checked.
-
Target Audience Distinction:
- When sending notifications, ensure to select either the "Employee" or "Parent" group based on the nature of the user group to avoid sending to the wrong audience.
-
Naming Conventions:
- It is recommended to name user groups clearly to describe their purpose (e.g., Parent Notification Group - Class 2), making it easier for future management.
-
Member Limitations:
- There is no limit to the number of members that can be added to a user group, but it is recommended to group them according to actual needs to improve efficiency.
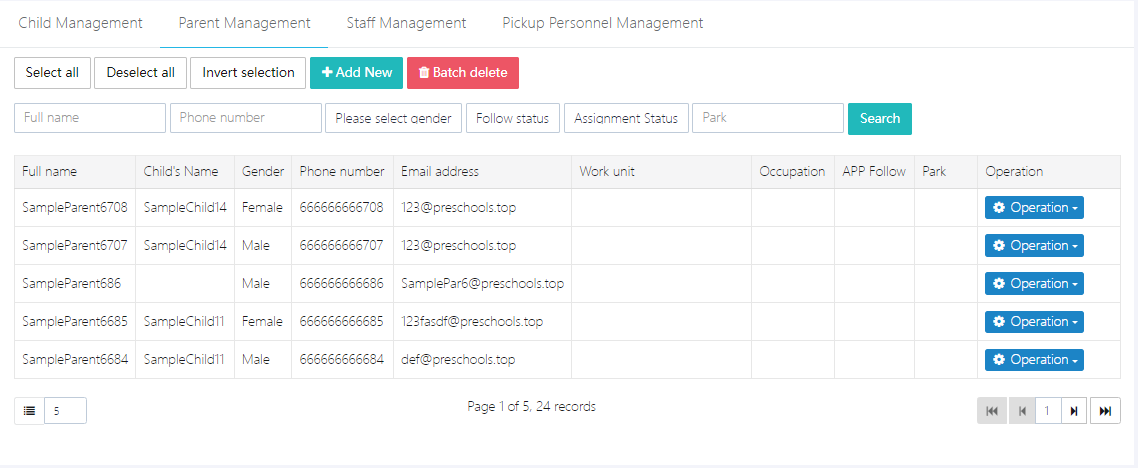
Parent Management
Users can access Parent Management via [Users & Roles] -> [Personnel Management] -> [Parent Management]. This feature provides all parent information (excluding third-party pickup persons), allowing for adding, deleting, viewing, and modifying parent details.
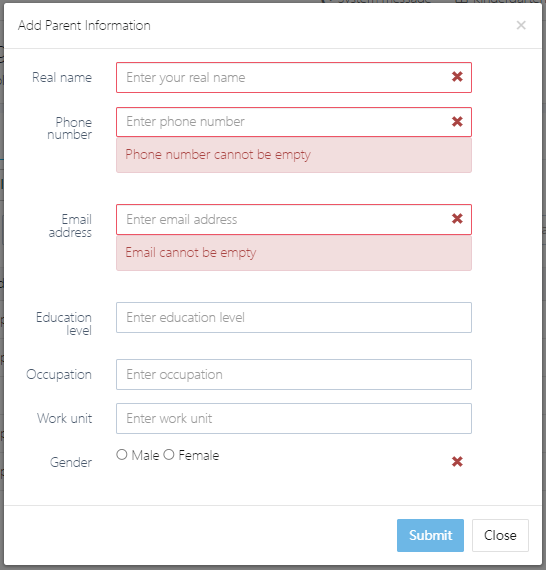
1. Add Parent
Click [Add New], and fill out the form with the complete information. Afterward, click [Submit]. Note: If the phone number or email you enter already exists in the system, it will update the existing account information.
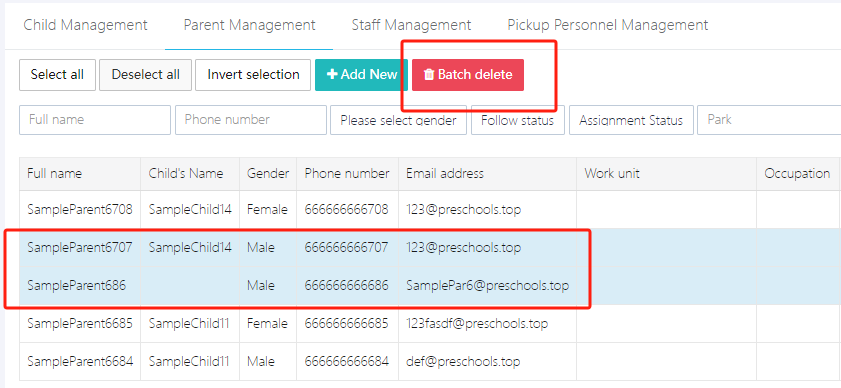
2. Delete Parent
To delete a parent, first select the parent information you wish to delete. Then, click [Batch delete]. Note that deleting parent information will not delete the associated child's data. To delete the child, please go to [Child Management].
3. Modify Parent Information
Select the parent you wish to edit, then click [Operation] -> [Edit].
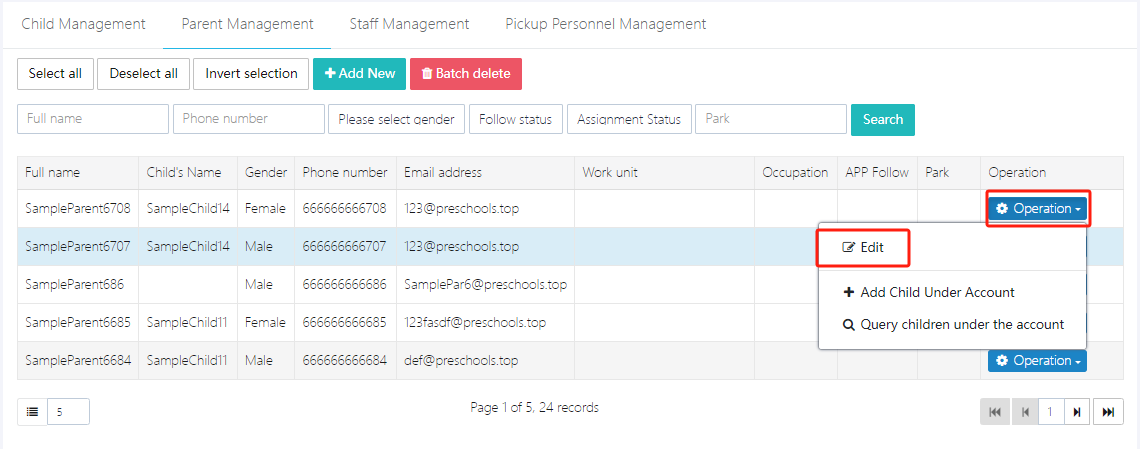
In the pop-up window, fill in the fields to be modified. Afterward, click [Submit] to save.
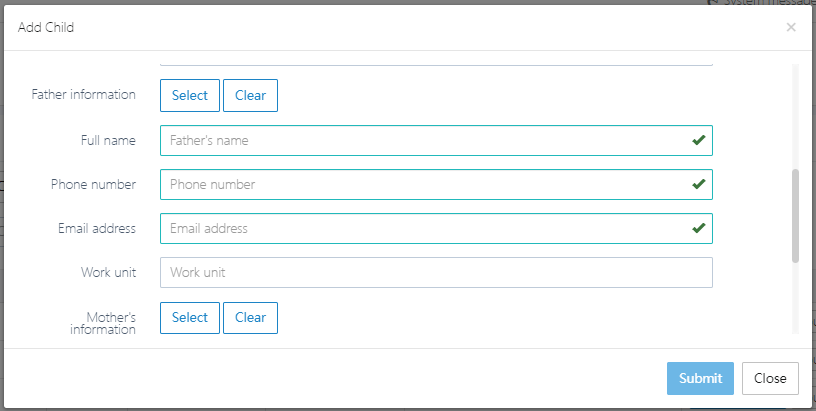
4. Add Child
After adding parent information, you need to add a child under the parent’s account. Go to [Operation] -> [Add Child Under Account], and in the pop-up form, fill in the child's name, date of birth, etc. After completing the form, click [Submit].
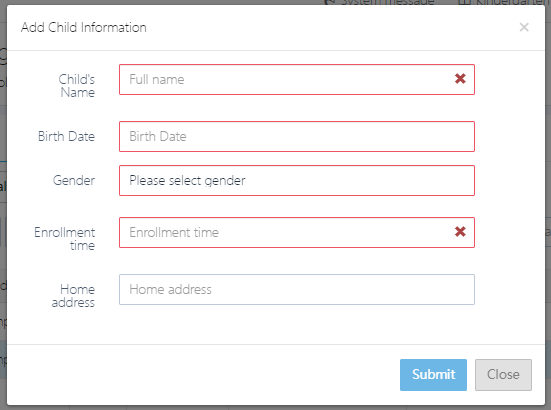
Note: If the child is already in the system and the parent’s information is added later, after completing the parent’s details, you can operate under [Child Management].
5. View Child
If you need to view which children are associated with the parent’s account, click [Operation] -> [Query children under the account].
Permission Management
Users can access Permission Management via [Users & Roles] -> [Permission Control]. This feature allows for adding, deleting, viewing, and modifying user roles and permissions.
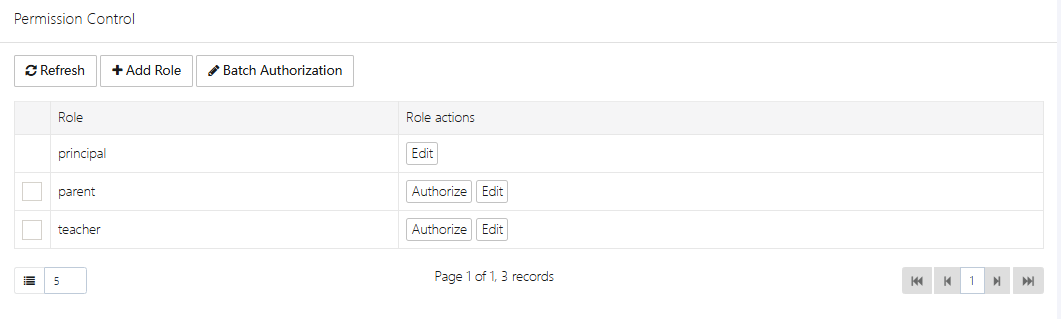
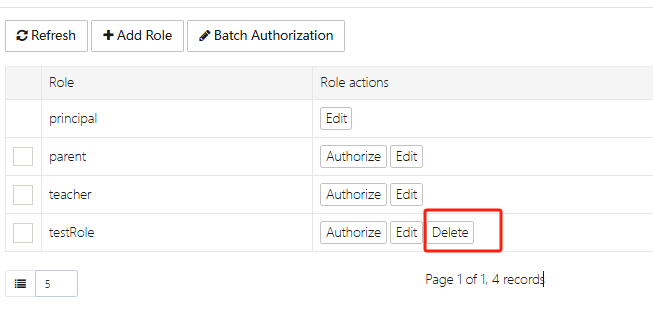
1. Add Role
Click [Add Role], as shown in the image below. In the pop-up window, enter the role name, click [Submit], and then proceed to step 2 for permission assignment.

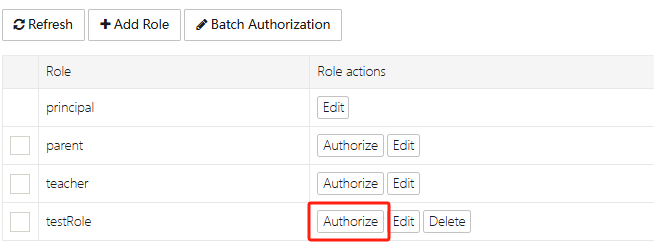
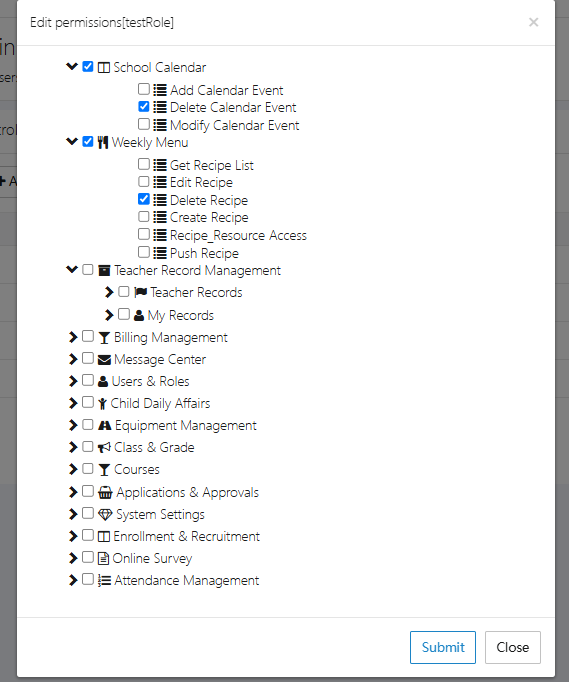
2. Assign Permissions to Role
For example, to authorize the newly created [testRole], click [Authorize].
We have authorized it to delete school calendar events and delete weekly menus. After making your selections, click [Submit].
3. Delete Role
Not all roles can be deleted. Some system default roles do not have a delete button. However, custom roles can be deleted at any time.
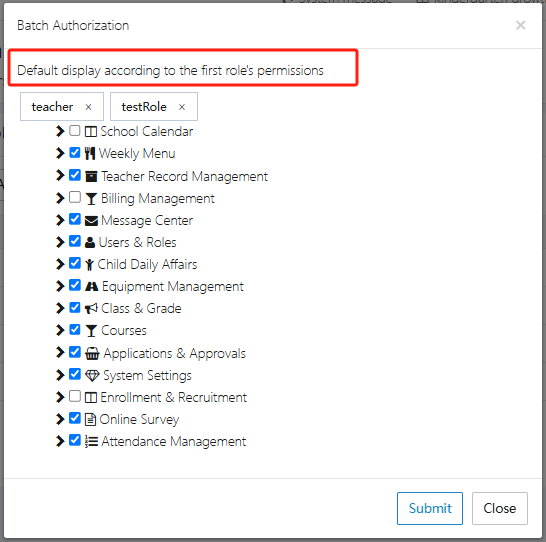
4. Batch Authorization
If you want to copy one role's permissions to another role, you can use [Batch Authorization]. The permissions of other roles will be based on the permission list of the first role.
Child Management
Users can access Child Management via [Users & Roles] -> [Personnel Management] -> [Child Management]. This feature provides information about all children in the school and allows for course selection, parent assignment, and class assignment.
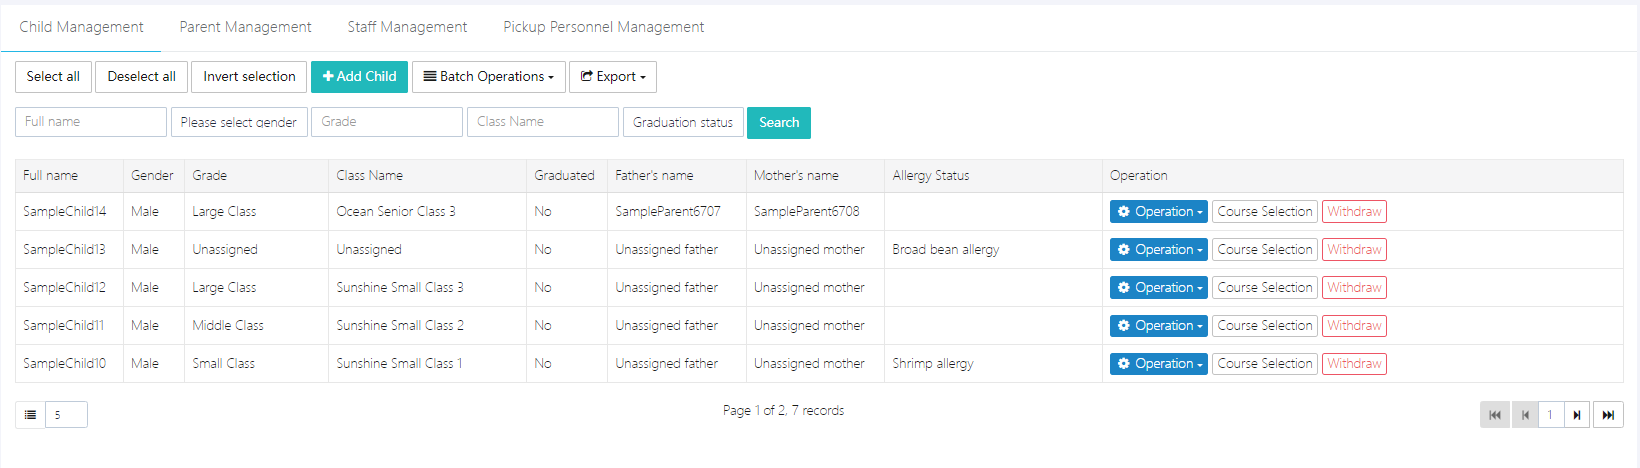
1. Add Child
Click [Add Child], fill out the complete information in the pop-up form, and then click [Submit].
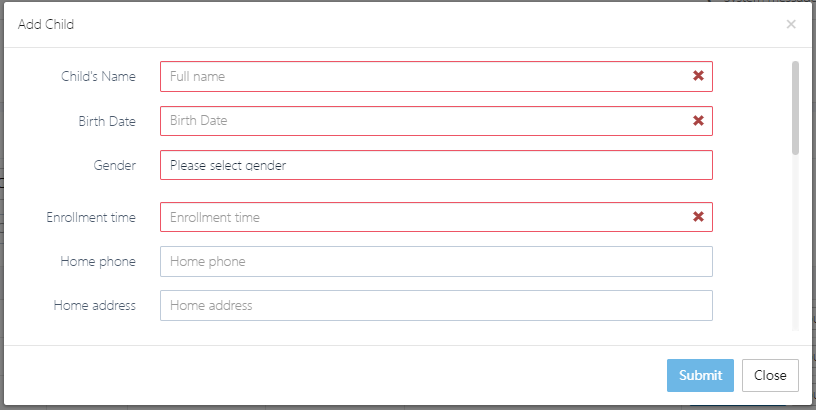
Note: Parent information must also be filled out. If not, it can be added later under [Parent Management] and then matched.
2. Bulk Import Child Information
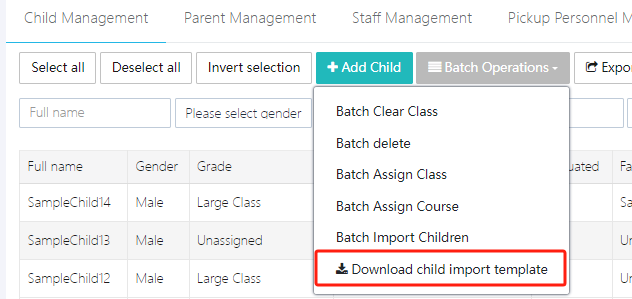
For bulk import, use the template file provided by the system. Click [Download child import template] to download the file and fill it out.
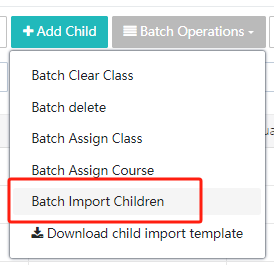
Once completed, click [Batch Import Children] to upload. Note: The class for each child must be filled in. The class must first be created in the [Class Management] module, or the import will fail.
3. Assign Class
If a child's class needs to change, click [Operation] -> [Assign Class] to select a new class for the child.
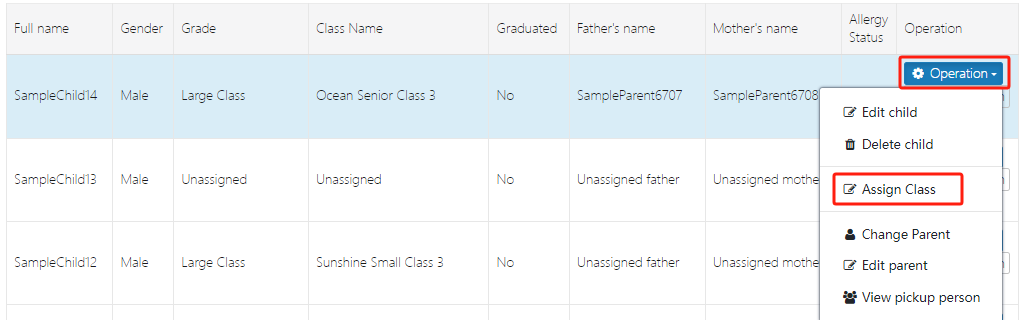
After selection, click [Submit] to confirm.
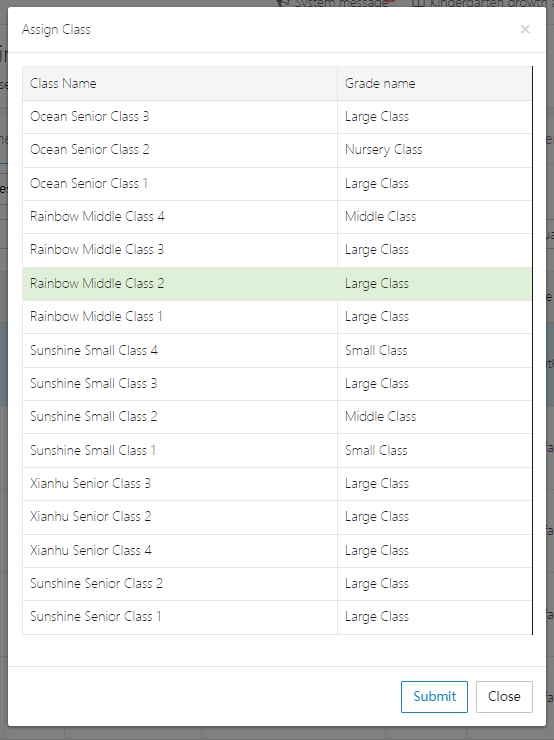
For bulk operations, use [Batch Operations].
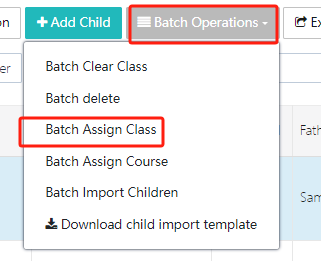
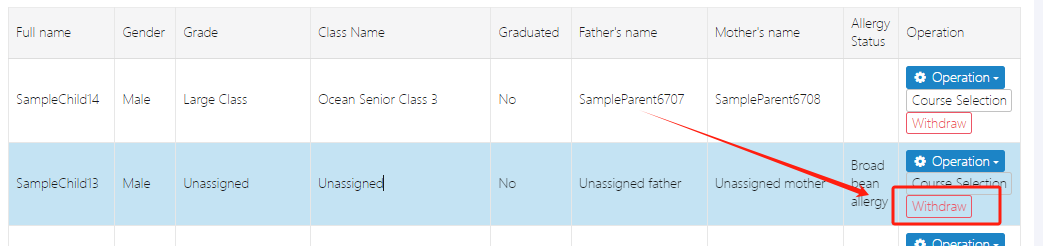
4. Withdraw from School
If a child withdraws from school, their information needs to be deleted from the system. Click [Withdraw] to perform this action. Note: Once withdrawn, the child's information will be marked as deleted in the system. If the child returns to school, a new account must be created, and previous pickup codes will no longer work.
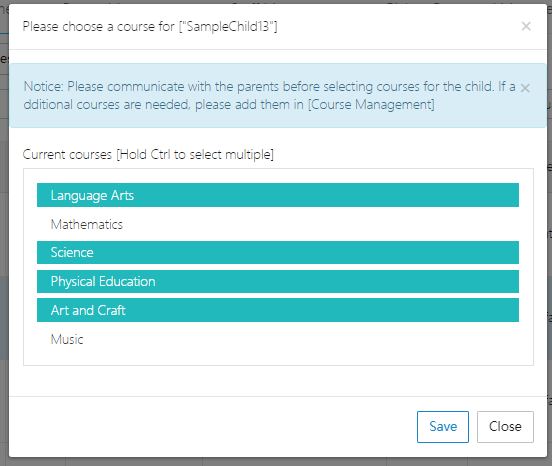
5. Course Selection
The school administrator must first set up courses under [Course Setup] before the child can select courses here. Click [Course Selection], and the list of courses set by the school will appear. After selecting, click [Save] to confirm. Note: If the course is paid, the change will generate a corresponding bill.
6. Edit/Change Parent Information
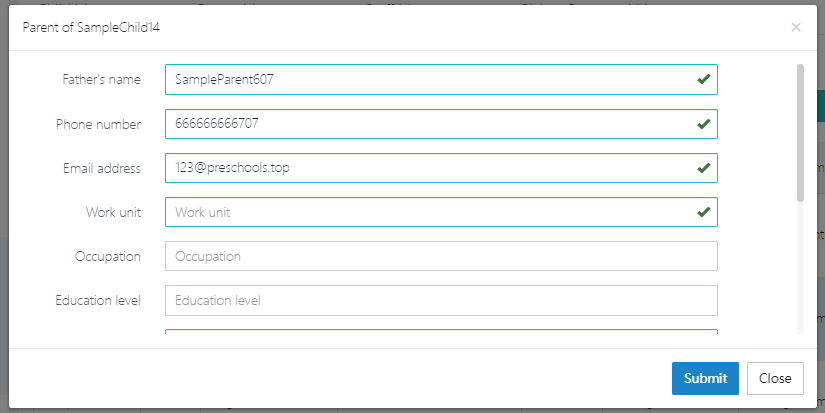
If the parent's contact information changes (mainly the phone number), the administrator should go to [Operation] -> [Change Parent] or [Edit Parent] to make the update.
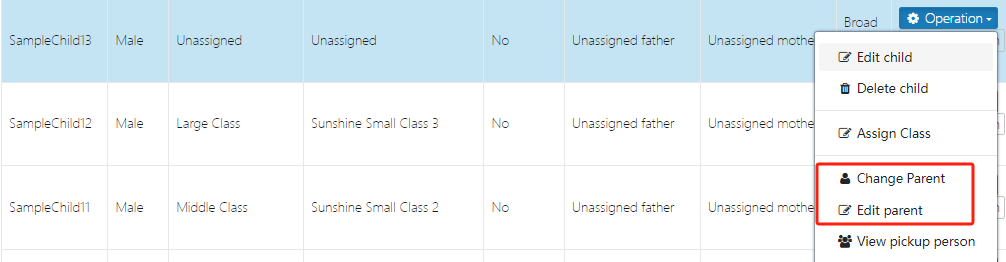
As shown, to modify the parent's phone number, click [Edit Parent], make the changes, and click [Submit].
7. Query Pickup Person (Non-Parents)
A pickup person is a third party who picks up the child, such as a nanny, housekeeper, or relative. To add a pickup person, click [View Pickup Person]. Parents and schools should carefully verify the identity information of the pickup person.
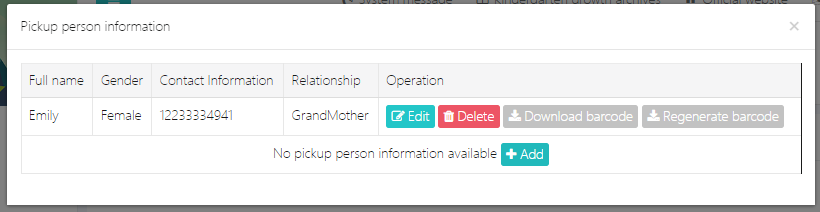
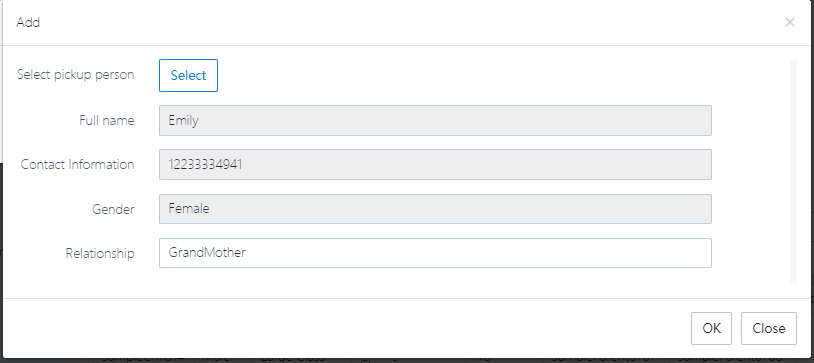
To delete the pickup person, click [Delete], or to add one, click [Add].
If the pickup code is lost or suspected to be stolen, it can be regenerated by clicking [Regenerate Barcode]. The old code will immediately become invalid.
8. Export Roster
To export the list of all children, click [Export] -> [Export Roster (EXCEL)].
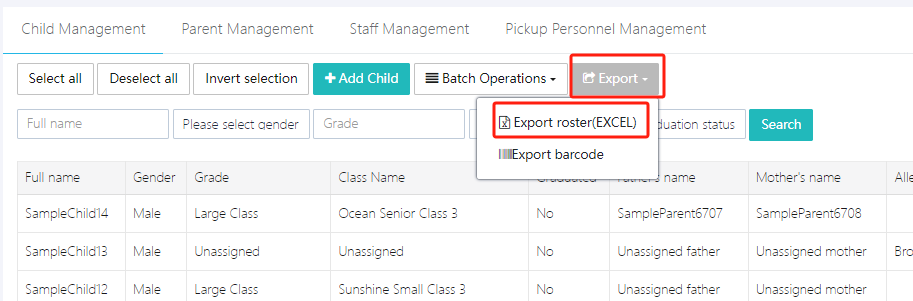
9. Export Pickup Code
Parents can log into the system via mobile to find their child's pickup code, or teachers can export and send it to parents in bulk. Parents can save it on their phones.
Click [Export] -> [Export Barcode] to perform this action.
10. Delete Child
To delete a child, click [Operation] -> [Delete Child]. Note: Deleting will also remove the associated parent information. This deletion is irreversible. If the child returns to school later, a new account must be created.
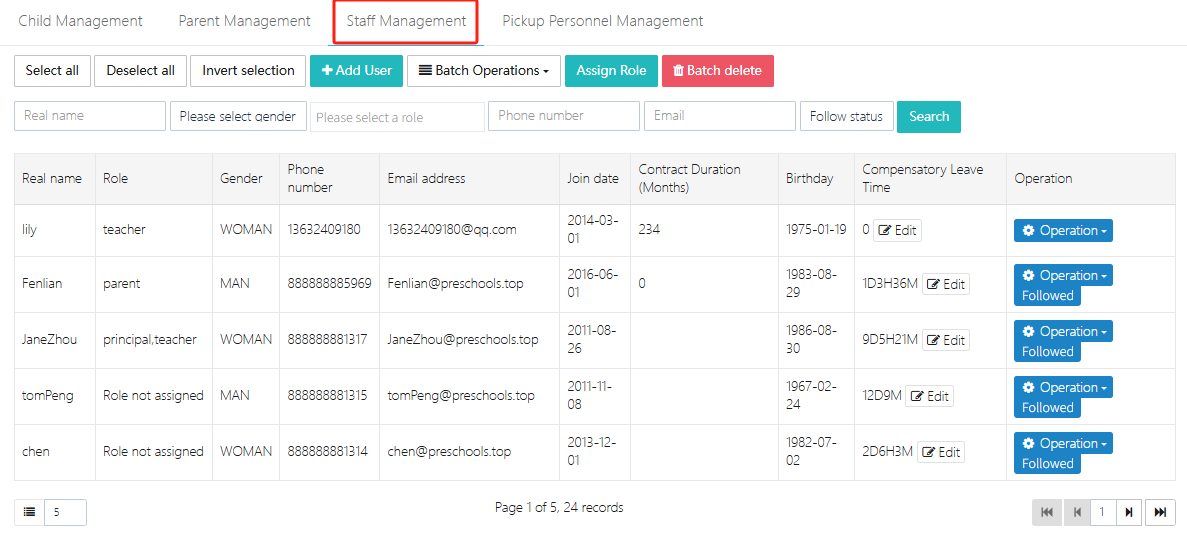
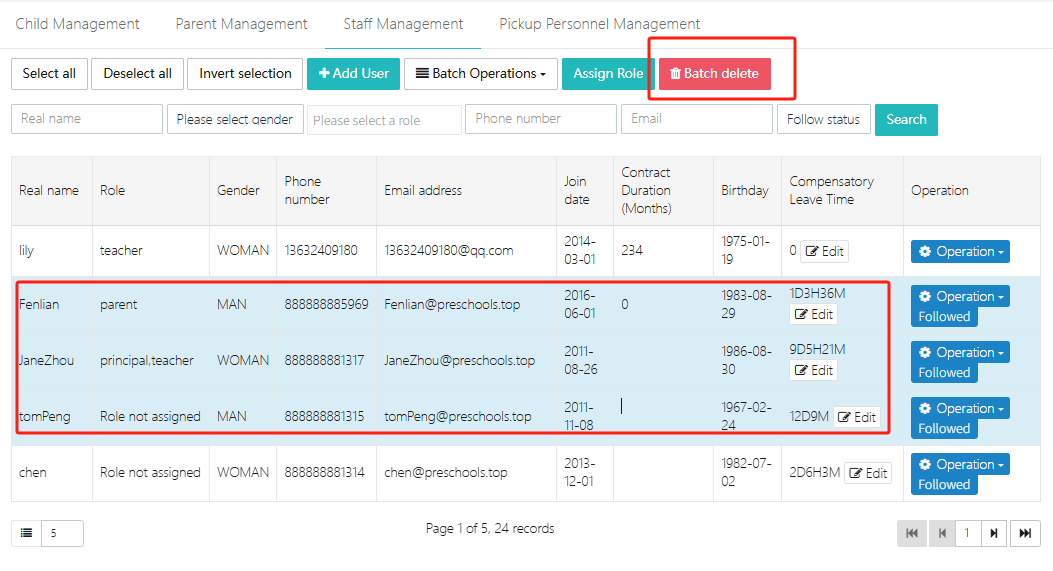
Staff Management
Users can access Staff Management via [Users & Roles] -> [Personnel Management] -> [Staff Management]. This feature provides information about all employees and allows for adding, deleting, viewing, and modifying employee records.
1. Add Employee
Employees can be added either by bulk import or manually via [Add User].
Bulk Import
-
Click [Batch Operations] -> [Download Template] to download our system's import template and fill it out.
-
Click [Batch Operations] -> [Bulk Import Users].
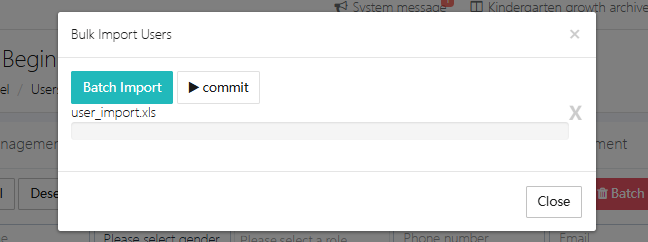
- After uploading the file, click [Commit] to complete the import.
Manual Entry
Click [Add User], fill in the employee's information in the form, and submit. If the email and phone number already exist, the existing account information will be updated, not a new entry.

2. Edit Employee
Select the employee to edit and click [Operation] -> [Edit].
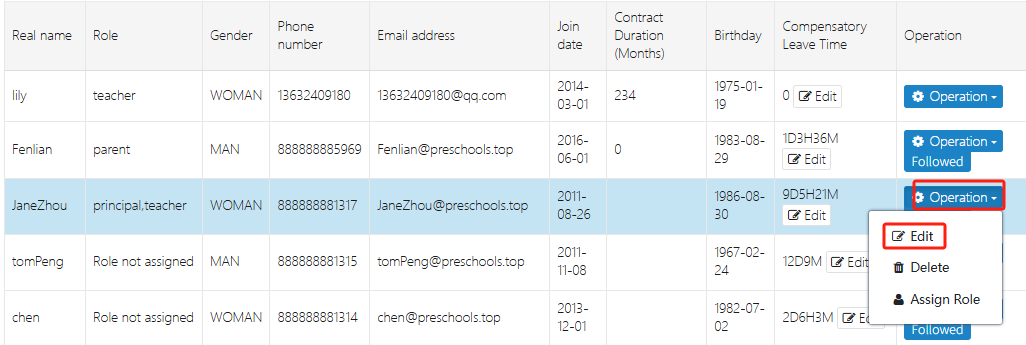
Make the changes in the pop-up window and click [Submit] to confirm.
3. Delete Employee
This feature requires the user's role to be admin or principal.
If an employee leaves the company, click [Operation] -> [Delete] to remove them. Note: Deletion cannot be undone.
You can also delete multiple employees in bulk as shown below.
4. Assign Roles
After adding a new employee, assign them a role. To operate on a single user, click [Operation] -> [Assign Role].
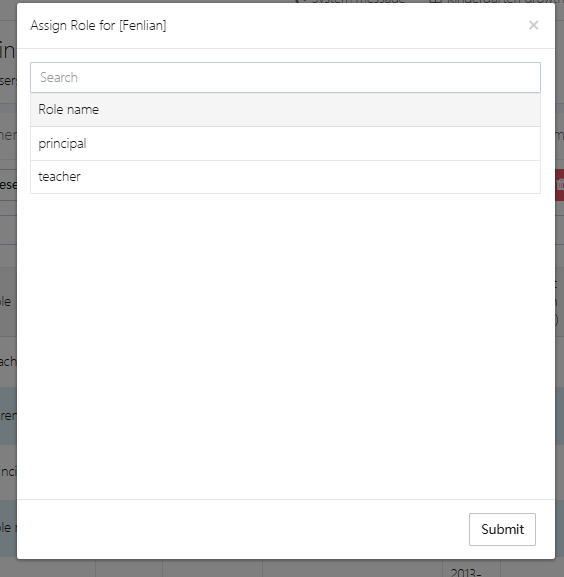
Select the appropriate role and click [Submit] to assign the role.
To assign roles to multiple users at once, click [Assign Role] as shown below.
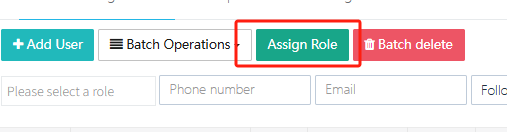
If you need to add a new role, go to [Permission Management] to do so.
5. Modify Compensatory Leave Time
Each employee's compensatory leave time is displayed in the [Compensatory Leave Time] column. To adjust this time, go to the overtime request section. Once the overtime approval is completed, the recorded overtime hours will increase the compensatory leave time. When requesting leave, if compensatory leave time is used, it will be deducted.
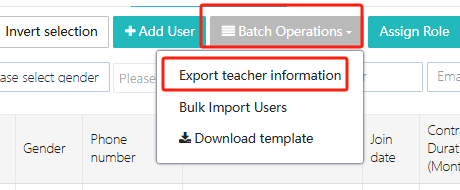
6. Export Roster
Click [Batch Operations] -> [Export Teacher Information] to export all employee information into an Excel file.
Inventory Management
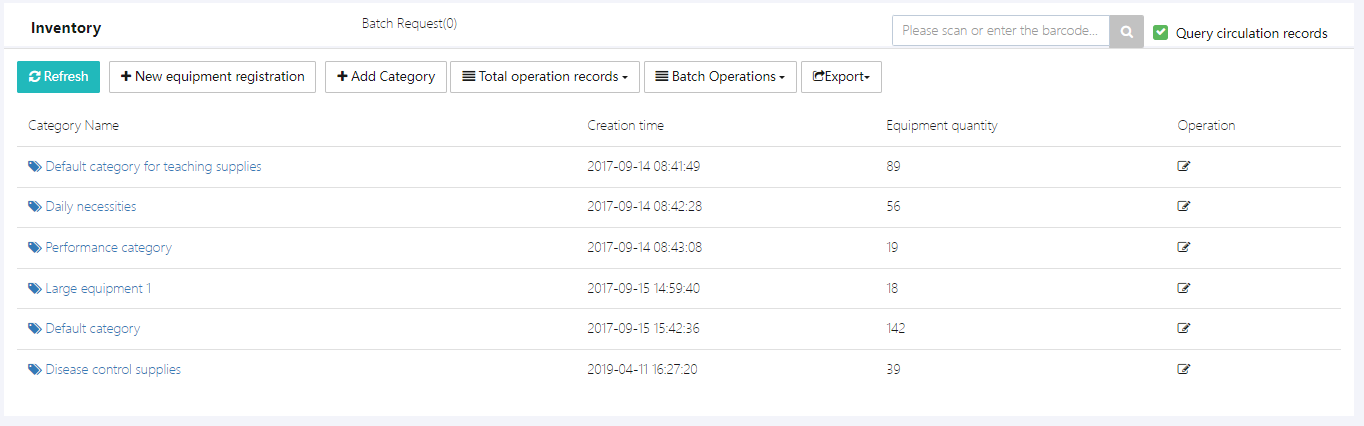
In the school, all items and materials can be managed within this function. Users can click Equipment Management → Inventory to enter the function, as shown in the image below.
Note: [Default category] is the default category and cannot be deleted.
This function can be used in conjunction with the shopping application module. The workflow is as follows:
Shopping Application → Approval → Applicant Purchases Items → Items Stored. For offline purchased items or those existing before the system went live, they can be added via [+New equipment registration].
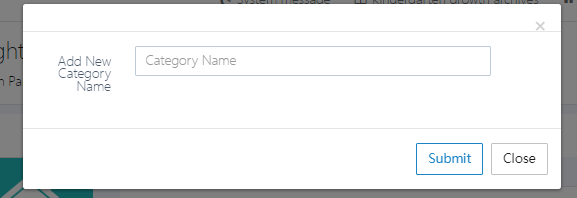
1. Add Category
Users can set their own categories based on the school's needs. Click [+Add Category], fill in the category name, and click [Submit] to submit it.
2. View Items Under a Category
Click on a category to enter it. For example, select [Default category for teaching supplies].
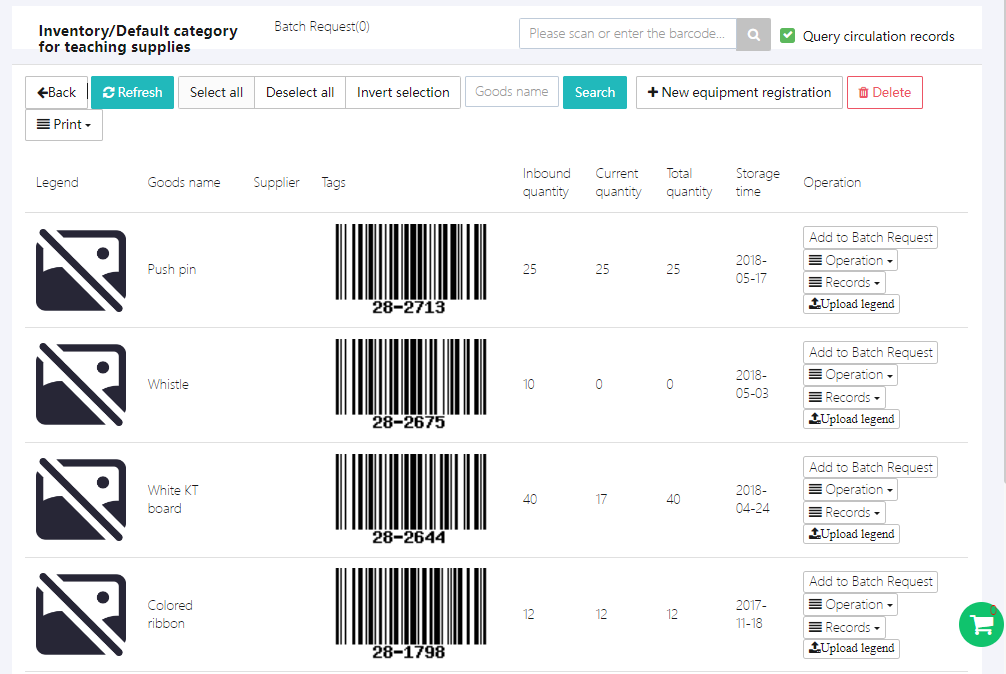
Under each category, you can view item images, names, item codes, current stock quantity, borrowed quantity, and more.
3. Borrow/Request Items
To borrow or request an item, click [Add to Batch Request] to add it to the shopping cart in the bottom right corner. Then, perform batch operations, which are similar to online shopping.
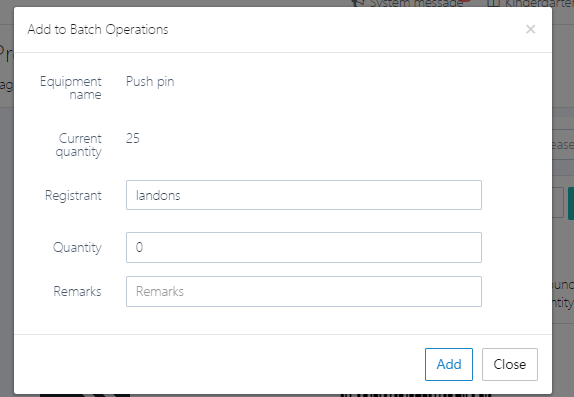
Fill in the quantity to borrow and the applicant’s name. After clicking [Add], it will be added to the "shopping cart".
After selecting the items, click the "shopping cart" to view all items in the request list, as shown below.
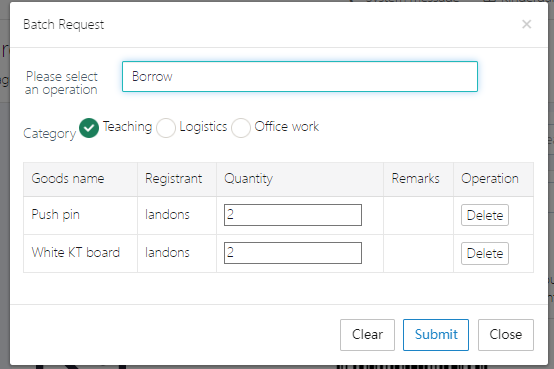
Choose whether to borrow, request, or report damage, then confirm the quantity. If everything is correct, click [Submit] to submit the request.
4. Modify Item Legend
Items should have legends uploaded, as the same item (e.g., a pen) may differ in type. To ensure users can easily identify the correct item when borrowing, use [Upload legend].
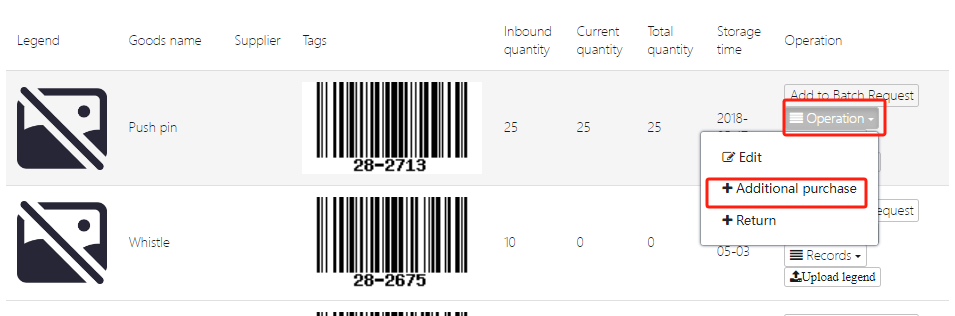
5. Increase Item Stock
There are two ways to add stock to an item: through [Shopping Request] or by directly modifying the stock quantity.
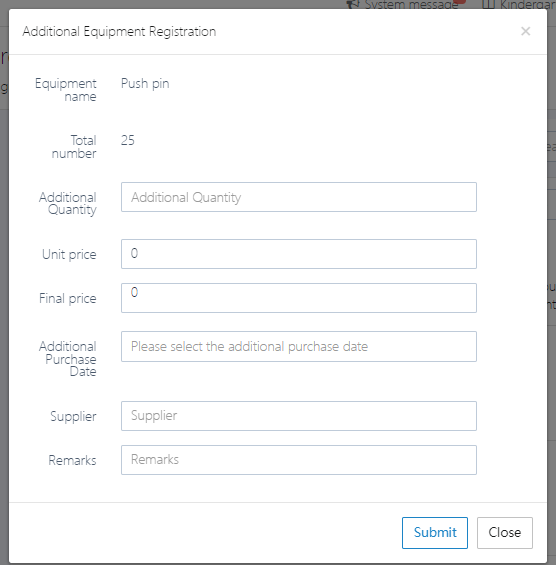
Click [Operation] → [+Additional purchase] to add stock, as shown below.
Fill in item price, quantity, supplier, and other information as required by the system, then click [Submit].
6. Return Items
When users need to return borrowed items, they can click [Operation] → [+Return] to proceed, as shown below.
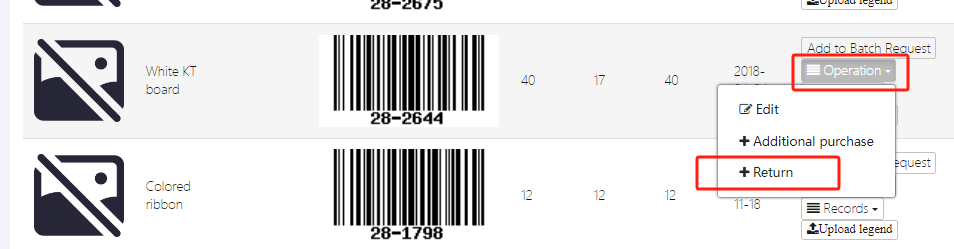
If multiple people have borrowed the same item, select the specific borrower.
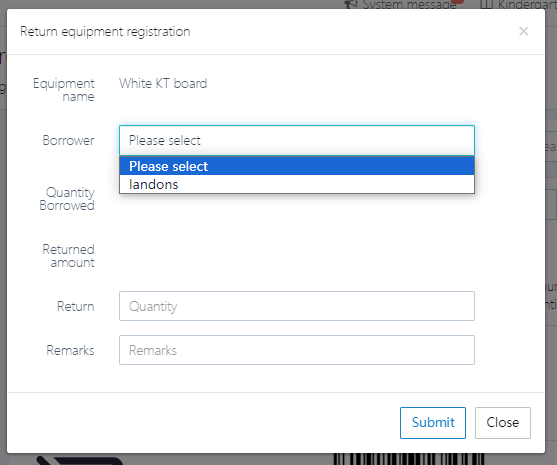
Fill in the quantity and remarks, then submit.
7. View Item Circulation Records
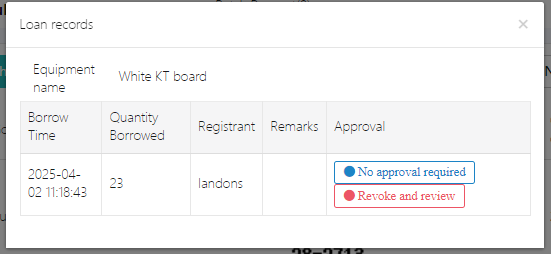
To view records such as borrowing, damage reports, and returns, click [Records] → [Loan records].
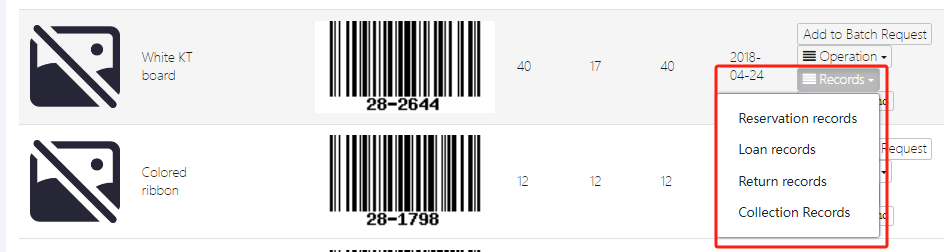
Detailed circulation record:
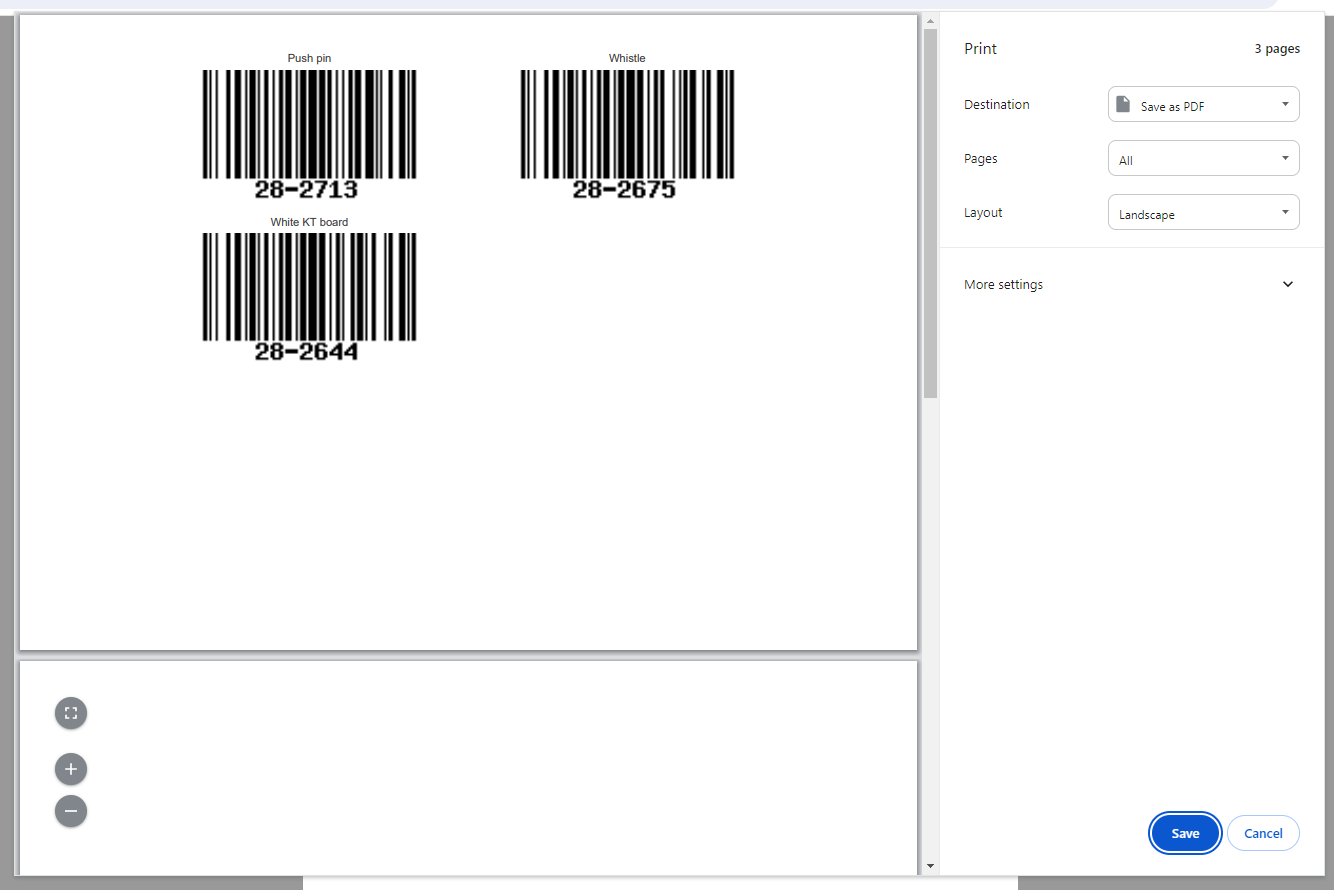
8. Print Item Barcodes
When performing asset management, you can print barcodes for each item and attach them to the relevant items.
Select the items to print and click [Print].

The webpage will automatically redirect to the print page, as shown below.
9. Register New Items
For items not yet in the system, users can click [New equipment registration] to add them. For existing items, simply modify the stock quantity.
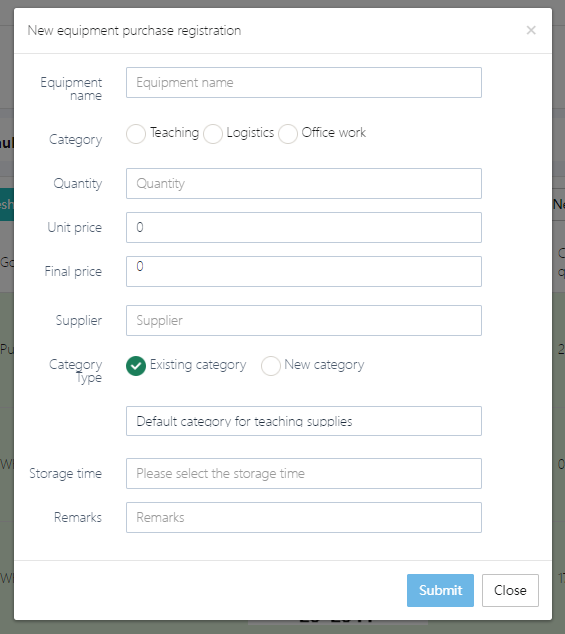
For new items, fill out the form as required by the system. For [Category Type], you can choose an existing category or add a new one.
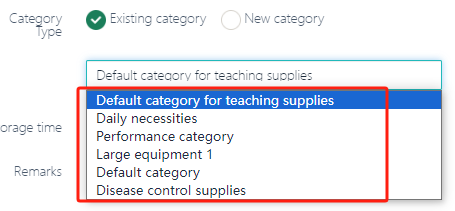
After completing the form, click [Submit].
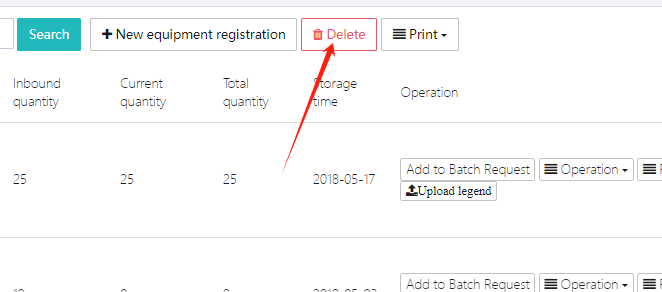
10. Delete Items
To delete an item, select it and click [Delete].
Damage Management
Users can click Equipment Management → Damage records to enter the damage records for items.
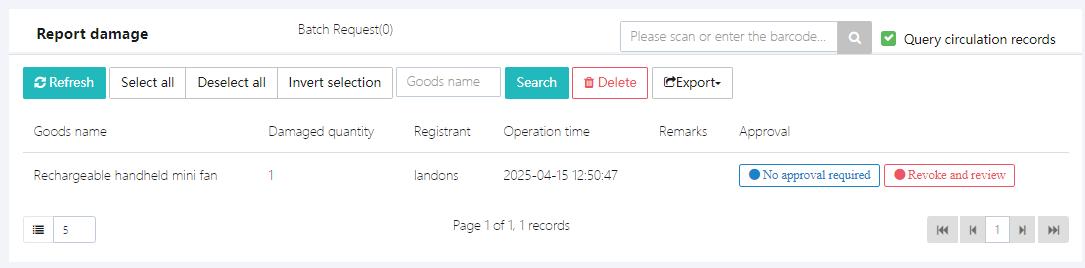
Here, all item damage records are visible, and clicking [Export] allows you to export the records to an EXCEL file.
Purchase Records
Users can click Equipment Management → Purchase records to enter the item purchase records.
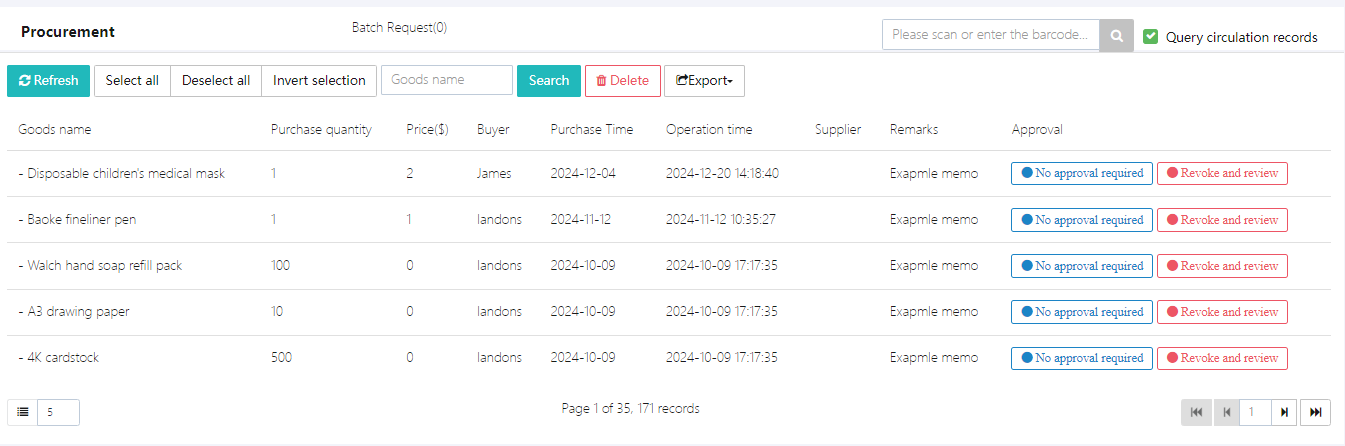
Here, you can see all the item records. Click Export to export them as an EXCEL file.
Child Leave Request
When a child needs to take leave or when the kindergarten management user needs to check which children have requested leave, they can access the Child Leave Request feature through [Child Daily Affairs] -> [Child Leave Request] in the system.
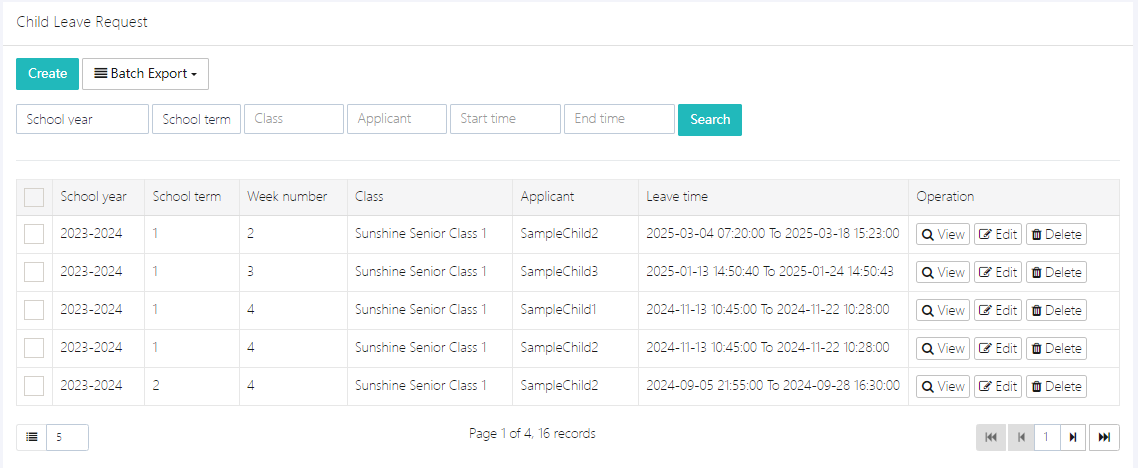
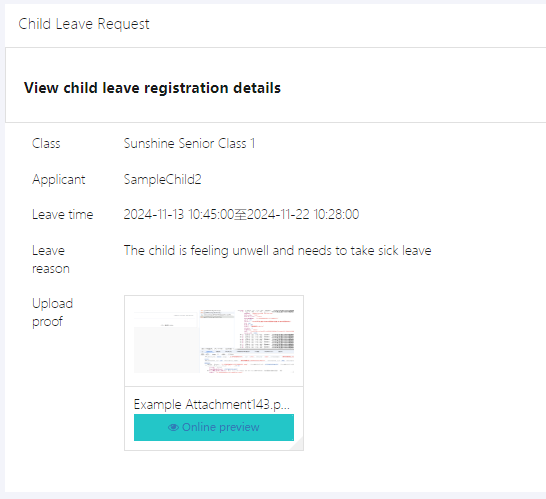
Click [View] to see the detailed leave request content, as shown in the image below.
1. Leave Application
Users can click [Create] to open the application form for filling out. The form is as shown below.
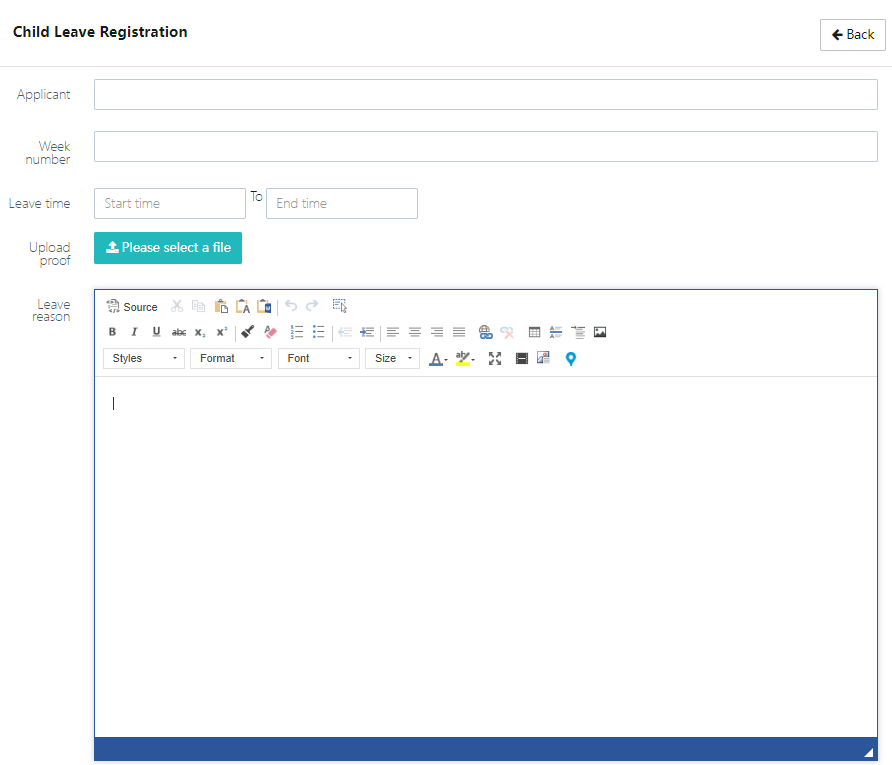
Note: If a leave certificate is required, it can be uploaded as an attachment. After filling out the form, click the [Submit] button to submit the request.
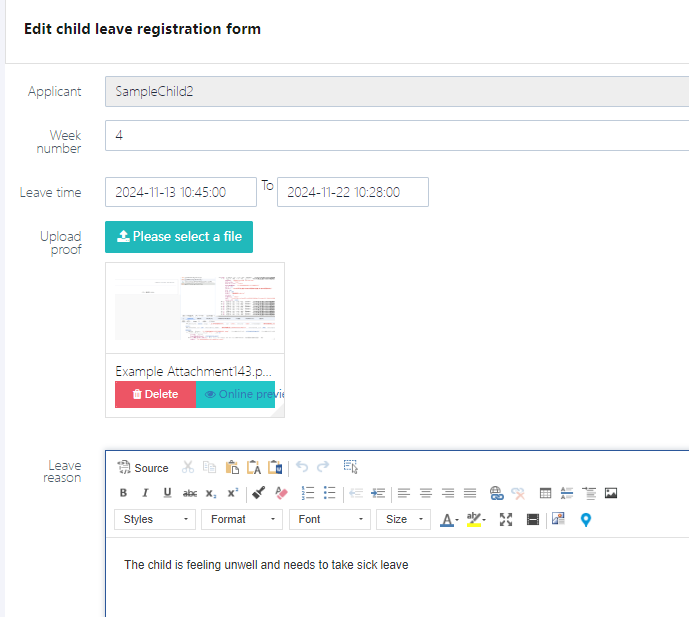
2. Edit Leave Request
Users can click [Edit] to modify the leave record, as shown below. After editing the form, click the [Submit] button to submit the changes.
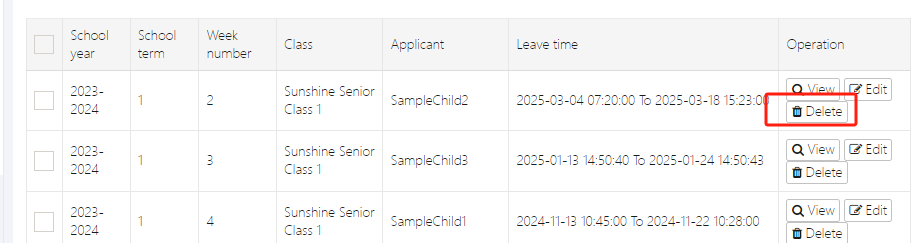
3. Delete Leave Request
Users can click [Delete] to delete the respective leave record.
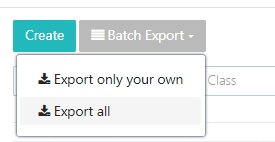
4. Export Statistics
Administrators can click [Batch Export] in the menu to choose to export either individual records or all records. The options are shown below.
Export result:

Child Meal Management
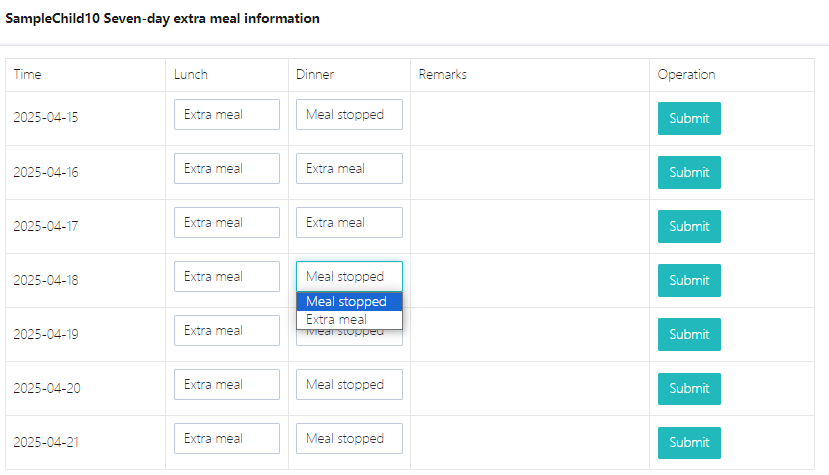
The Child Meal Management feature is primarily provided for parents to select additional meals for their children. When a child needs to stay at school for meals, this feature can be used. Alternatively, if a child needs to skip lunch on a particular day, the feature can also be used to request leave for that lunch.
This feature will show the specific meal status for each child on the day. [Normal meal] indicates a regular meal, while [Meal stop] indicates a skipped meal.
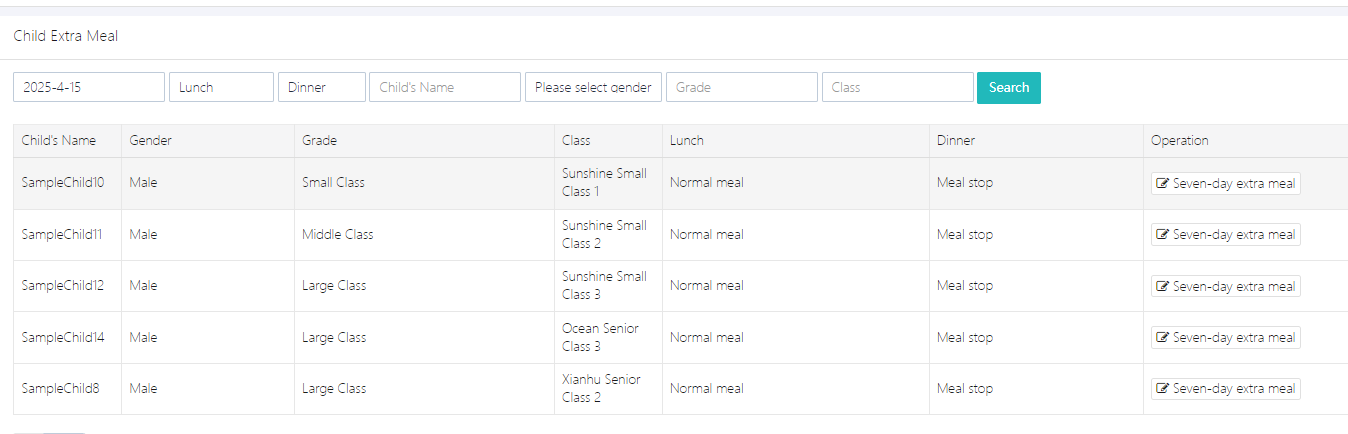
1. Submit Meal Status for Seven Days
The child’s meal status can be managed through the [Seven-day extra meal] option. After making the necessary changes, click [Submit] to submit the meal plan.
Note: If meal status needs to be set, the settings should be done one day in advance for the next day.
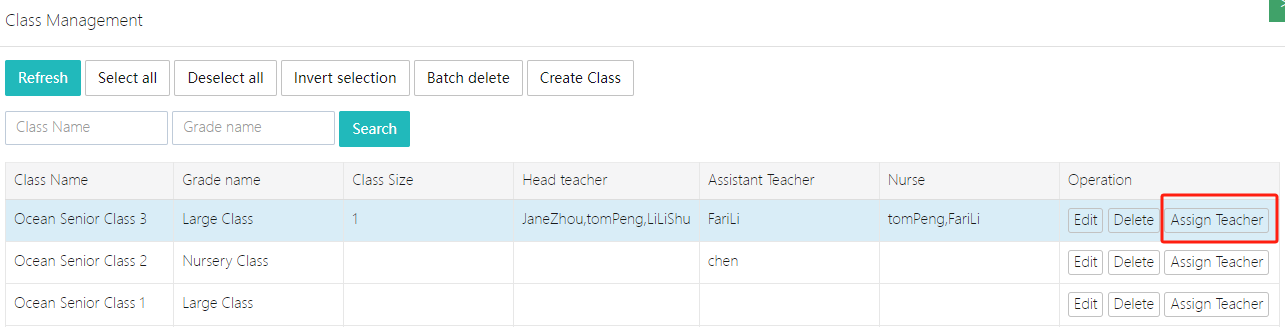
Class Management
You can enter the Class Management feature through the [Class & Grade] -> [Class Management] menu. In this feature, you can customize various classes, assign class teachers, etc. The functionality is shown in the image below:

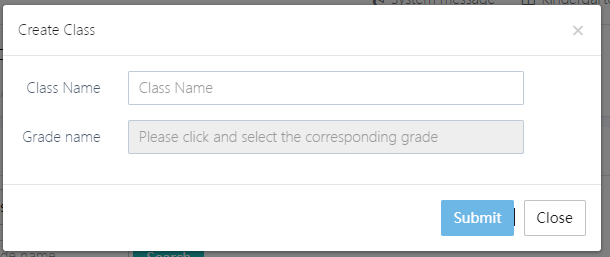
Add a Class
Click [Create Class], then enter the [Class Name] and select the corresponding [Grade Name].
Assign Teachers to the Class
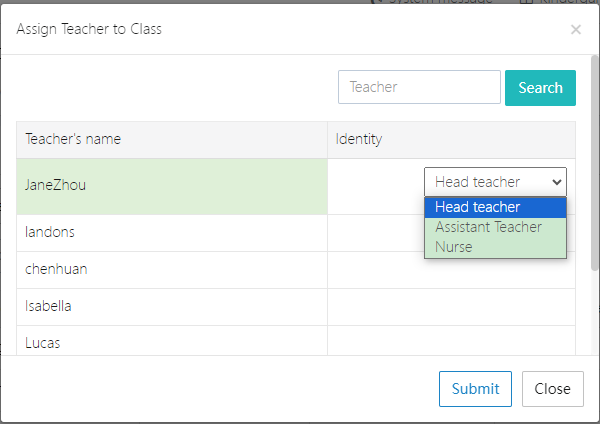
A class can be managed by multiple teachers. By default, there are three types of roles: [Head teacher], [Assistant Teacher], and [Nurse]. Click [Assign Teacher] to make a selection.
In the pop-up window, select the corresponding teacher and role as shown in the image below:
Note: If you need to add other different grade levels, you will need to manage them in the Grade Management. By default, the available levels are Big Class, Middle Class, and Small Class.
Grade Management
You can set different grade levels based on your school's situation, such as 3-6 months as one grade, 6-12 months as another grade, and 1-2 years, etc.
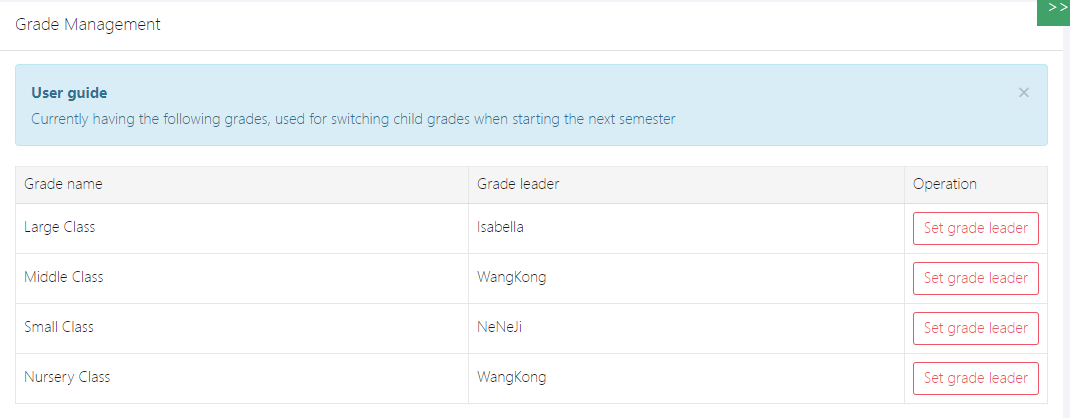
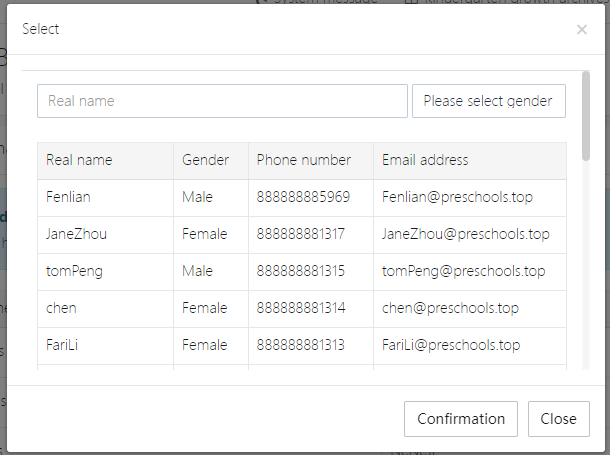
If you need to set a grade leader, you can click [Set grade leader] to configure it.
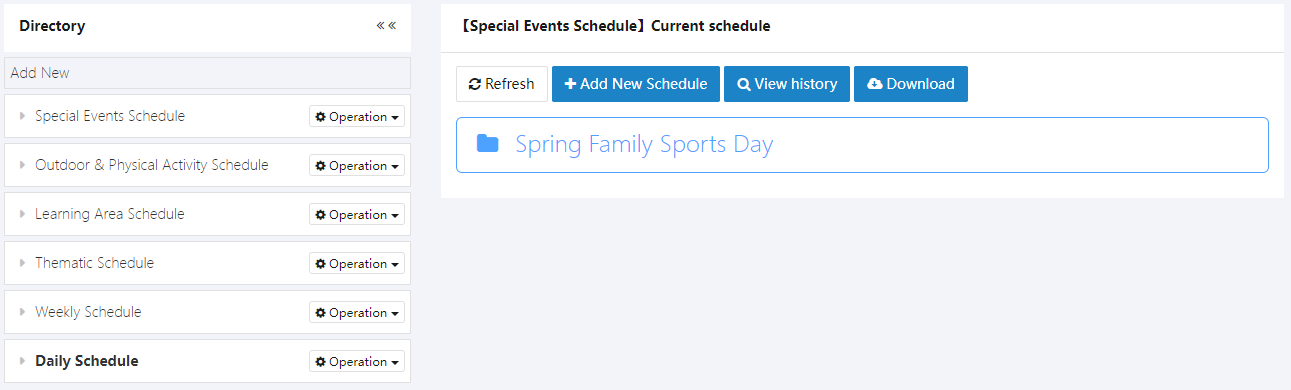
Activity Schedule
This feature is the central place for publishing the school's time schedule. In addition to the activity schedule, users can also upload venue schedules and more, as shown in the image below:
1. Add Category
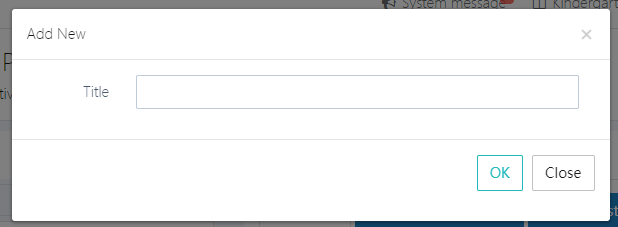
Users can add new main categories by clicking Add New.
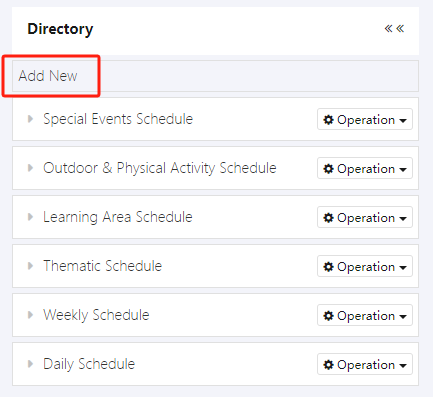
After filling in the category name, click OK to submit.
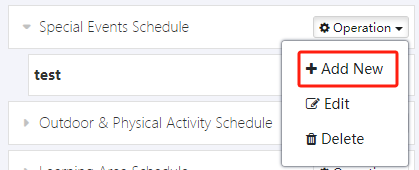
To add a secondary category, click Operation → Add New, then fill in the Title and submit it.
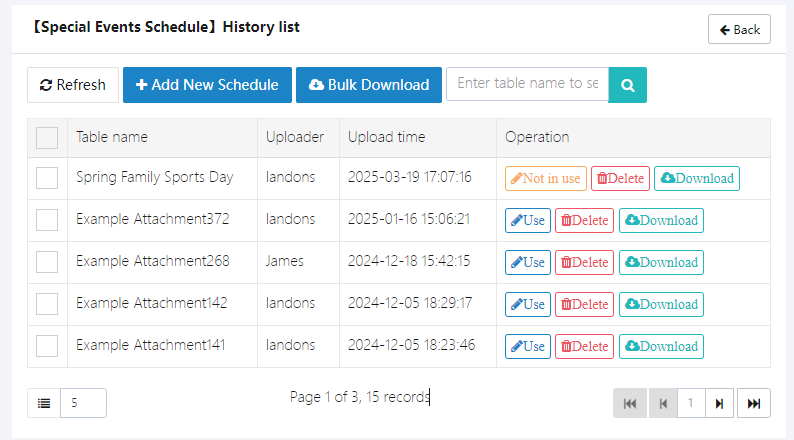
2. Upload Schedule
Select one of the main categories, such as Special Events Schedule, and then click View History. As shown below, we can view the materials uploaded in the past.
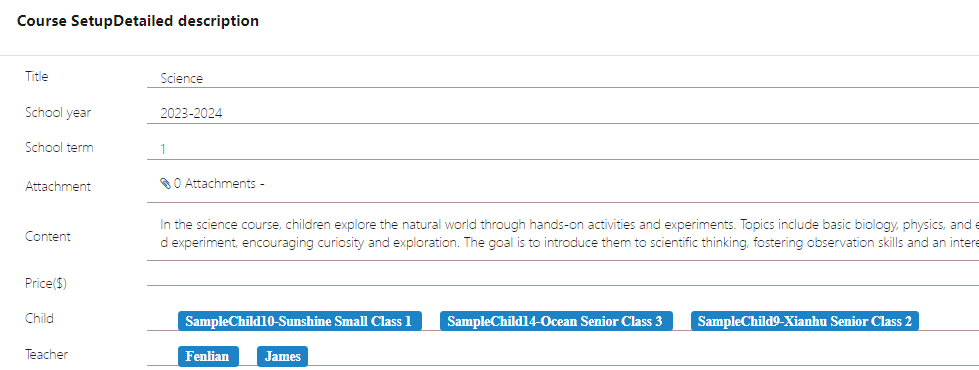
Course Setup
The school can set up various courses based on its own situation in this feature, including course instructors, content, duration, and fees. After setting up these courses, children can start selecting courses.
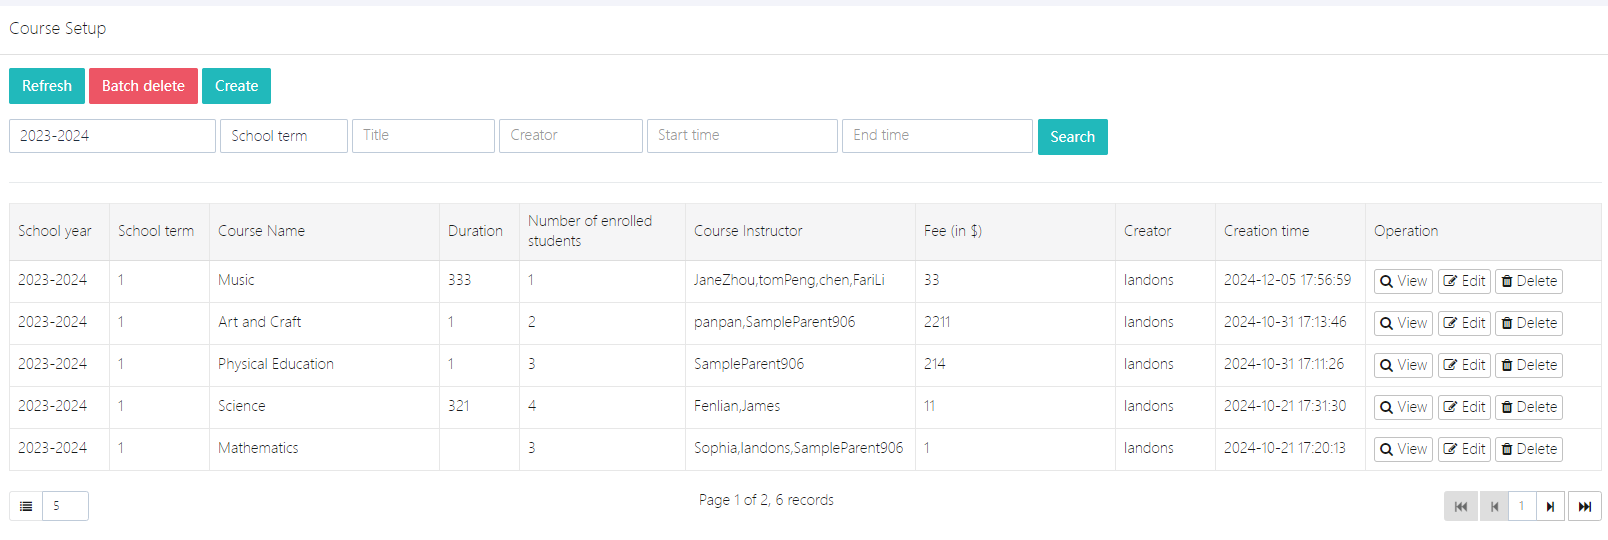
Children who have already selected courses can view them in View.
1. Add a Course
Click Create, fill in the course name, fee information, instructor, and other settings as required, and then click Submit.
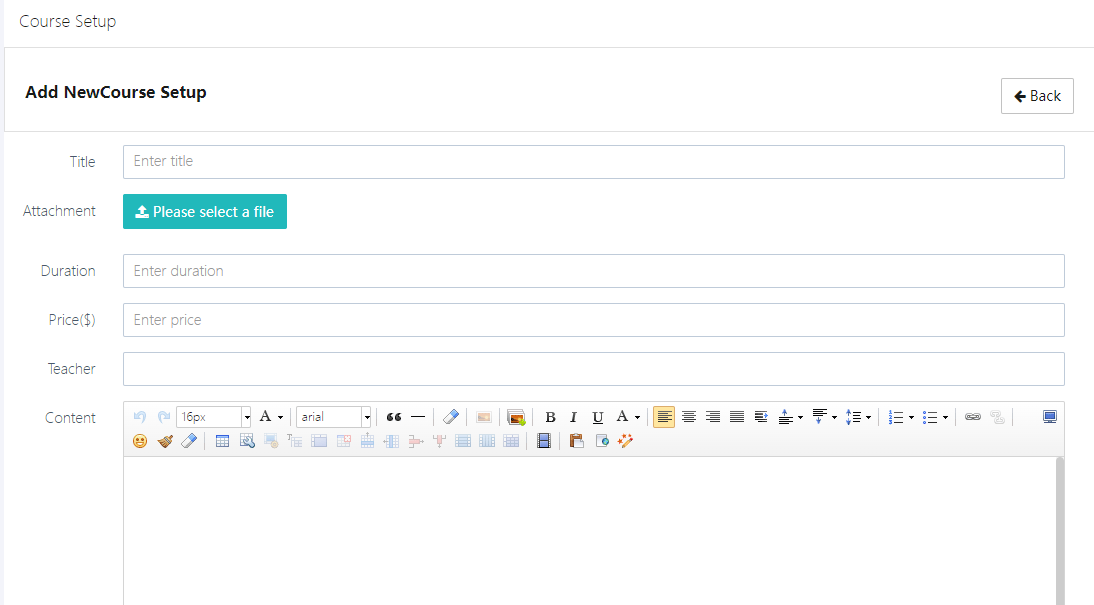
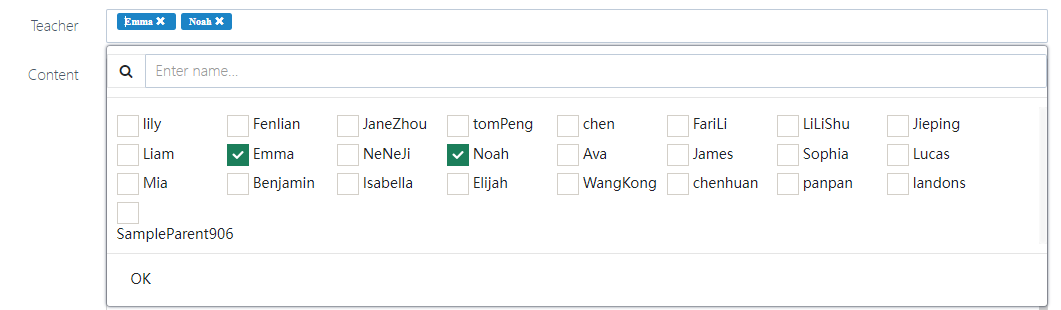
When selecting instructors, multiple instructors can be chosen at once.
2. Edit a Course
Users can modify existing courses at any time. Click the Edit button for the course to enter the edit interface.
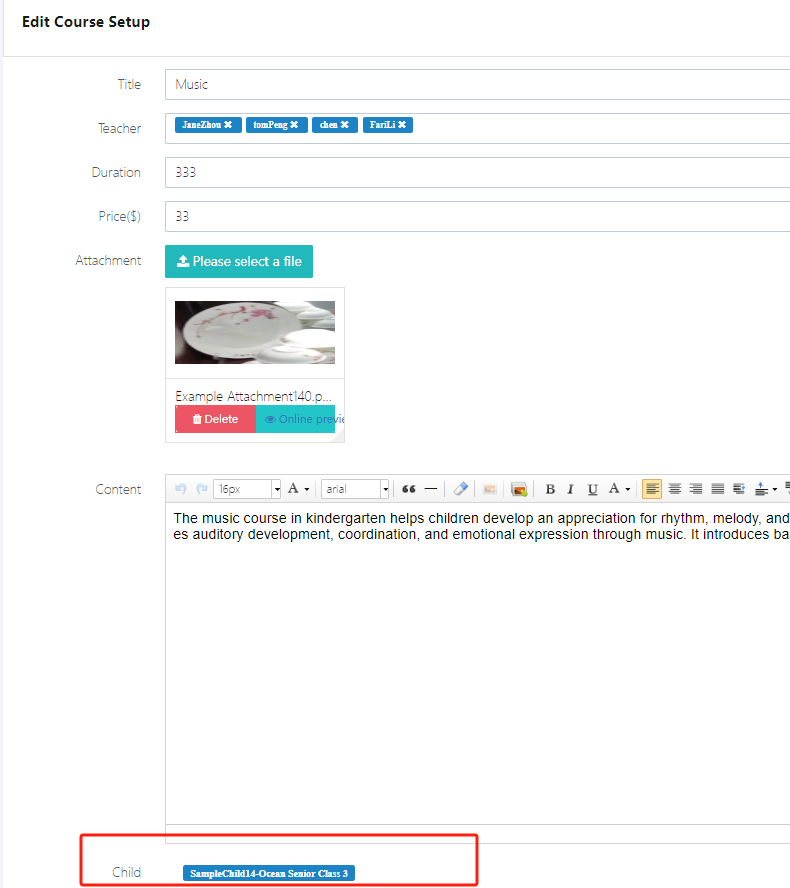
Note: In this feature, course names, prices, etc., can be changed. However, the course selections of children cannot be modified here. This is primarily for editing course attributes. To manage children's course selection (e.g., if a child drops a course or withdraws), go to User Management → Child Management.
3. Delete a Course
Users can delete a course by clicking the Delete button for the course they wish to remove.
Weekly/Monthly Plan
This feature is mainly for users to edit and publish the school's weekly or monthly plans. The following is an example for the weekly plan.
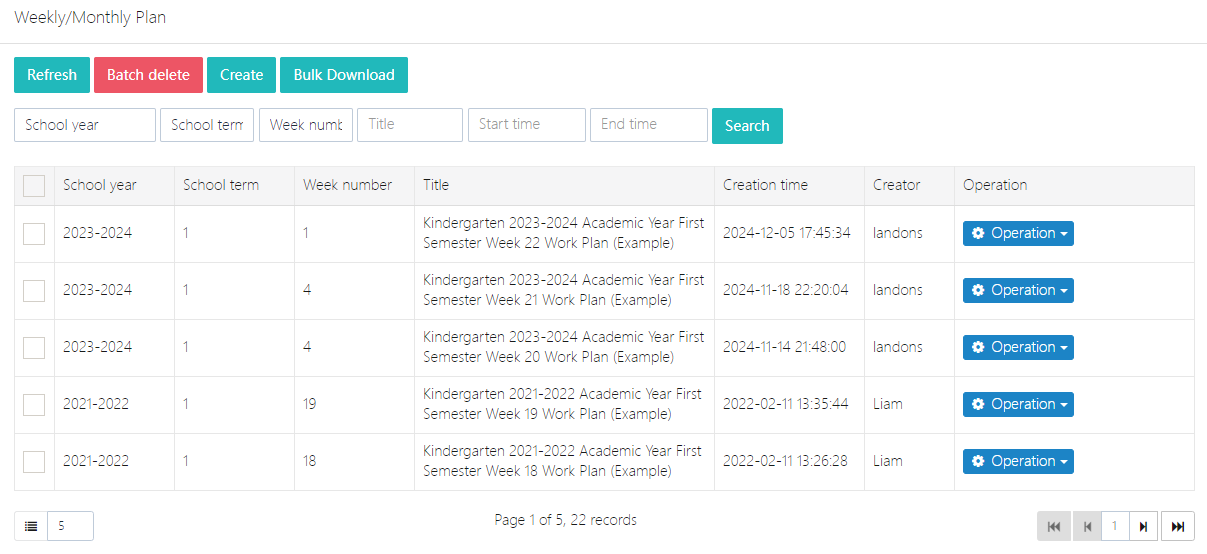
1. Create Weekly Plan
Click Create and fill in the relevant form information, such as Title, Week Number, Content, etc. After completing the form, click Submit to submit.

2. Edit or Delete Existing Weekly Plans
Select the record to operate on, then click Operation → Edit or Delete. Please note that the deletion cannot be undone.

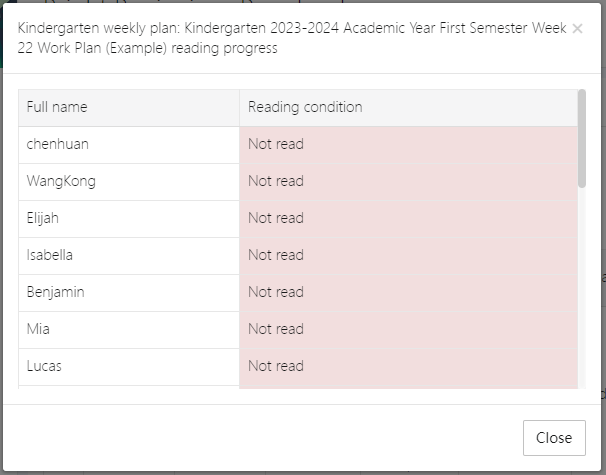
3. Check Reading Progress
After the weekly or monthly plan is published, staff can view who has read it and who hasn't in the system. This can be seen in Check Reading Progress, as shown below:
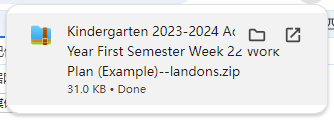
4. Export Plan
If you need to export the weekly or monthly plan as a WORD document, you can use the Export function. The compressed file will contain the specific plan and related attachments.
Office Affairs Application
This application is primarily for various office-related affairs in the school, such as applying for a document certificate, applying for expenses to comfort an injured child, etc. Any office-related affairs you think of can be submitted here.
1. Office Affairs Application List

In the Office Affairs Application page, you can view all employees' office affairs application records. Each record includes the following information:
- School year, School term, Week number: Displays the academic year, term, and week corresponding to the office affairs application
- Department/Other: Displays the department to which the application belongs
- Applicant: Displays the name of the person submitting the office affairs application
- Application Time: Displays the time when the office affairs application was submitted
- Operation: You can view detailed information, edit, or delete the application
At the top of the list, there are several functional buttons:
- [Refresh]: Refresh the current page data
- [Batch delete]: Delete multiple office affairs application records
- [Create]: Submit a new office affairs application
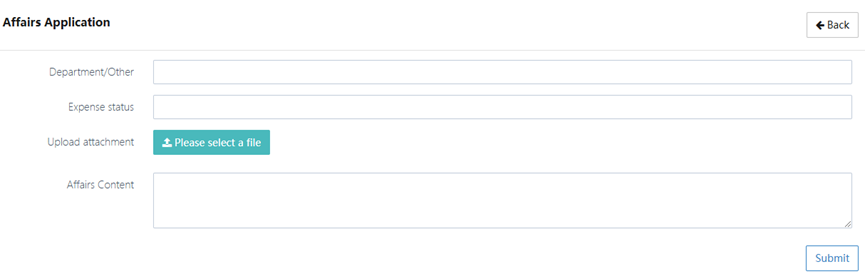
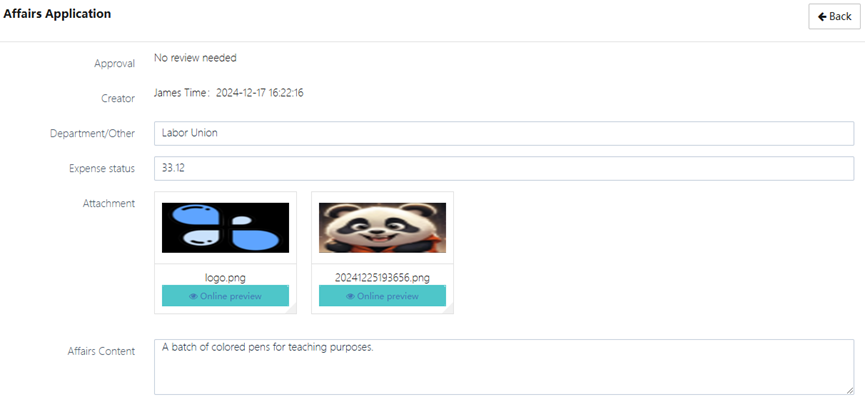
2. Create and Edit Office Affairs Application
When you need to submit an office affairs application, follow these steps to fill in the information:
- Department/Other: Select the department or other relevant category for the application
- Expense Status: Fill in the expense status related to the application
- Upload attachment: Upload relevant attachment files as needed, supporting images or document files
- Affairs Content: Briefly describe the specific content of the affair, explaining the background and reason for the application
Click the [Submit] button to complete the office affairs application submission.
Create office affairs interface:
Edit office affairs interface:
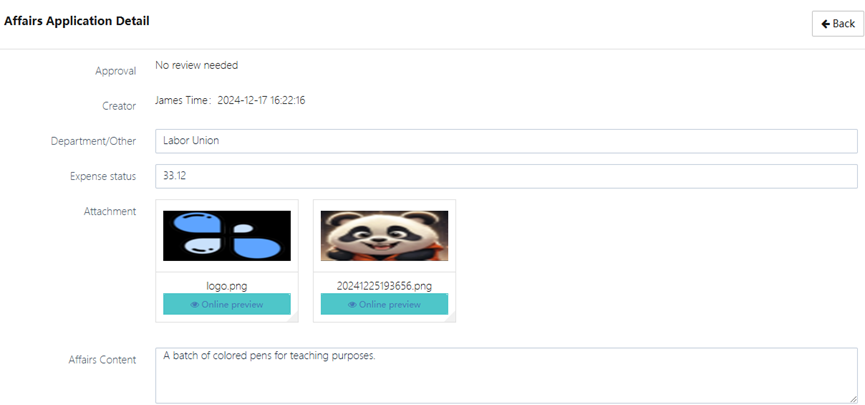
3. View Office Affairs Application Details
In the Affairs Application Detail page, you can view the following detailed information:
- Approval: Displays whether the office affairs application needs approval and the current approval status
- Creator: Displays the creator of the application and their submission time
- Department/Other: Displays the department or other category to which the application belongs
- Expense status: Displays the involved expense amount or status
- Attachment: Displays the uploaded attachment, and you can preview the content online
- Affairs Content: Displays the specific content and reason for the application
Shopping Request
This feature allows users to submit purchase requests for items needed within the school. Once the request is approved, the items can be procured. After receiving the items, the inventory can be synced directly to the Equipment Management feature.
1. Shopping Request List
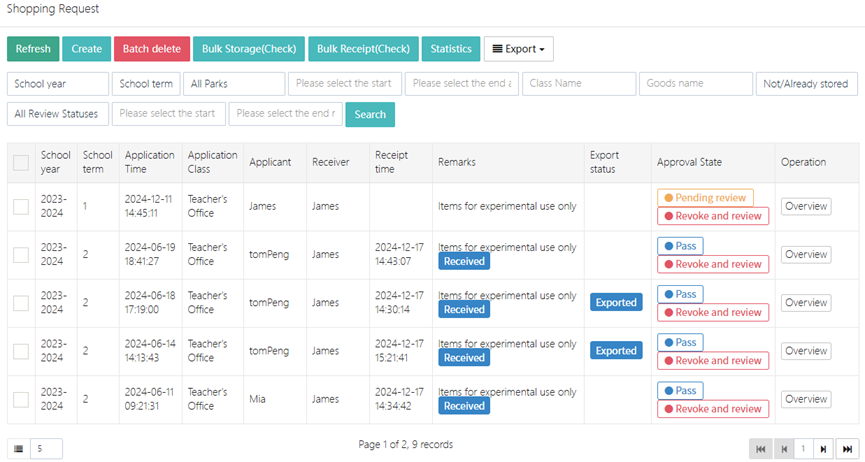
On the "Shopping Request" page, you can view all staff purchase request records. Each record includes the following information:
- School year, School term: Indicates the academic year and term of the request
- Application Time: The submission time of the shopping request
- Application Class: The class making the request
- Applicant: The name of the person submitting the request
- Receiver: The recipient of the requested items
- Receipt time: The receiving time of the goods
- Remarks: Additional notes or requirements about the items
- Export status: Whether the request has been exported
- Approval State: Current approval status, such as “Pending”, “Pass”, etc.
- Operation: View detailed request information
Administrators can click "View purchase request" to see details of each request, including items, price, quantity, receipt time, etc. The approval statuses include “Pending”, “Pass”, or “Reject”. Click [Overview] for a detailed view.
At the top of the list, there are several functional buttons:

- Refresh: Refresh the current page data
- Create: Submit a new shopping request
- Batch delete: Delete multiple shopping records
- Export: Export shopping request records
- Statistics: View related shopping statistics
2. Create a Shopping Request

To submit a shopping request, please fill in the following information:
- Application Class: Select the class requesting the items
- Receiver: Select the recipient of the items
- Category: Choose category: Logistics, Teaching, Trade union
- Remarks: Fill in additional notes for the request
- Requested items: Add items including Product name, Legend, Quantity, Specifications, Unit price, Remarks
You can use the [Download template] button to download a shopping list template, or [Import shopping list] to import an existing one. Click [Commit] to submit the request.
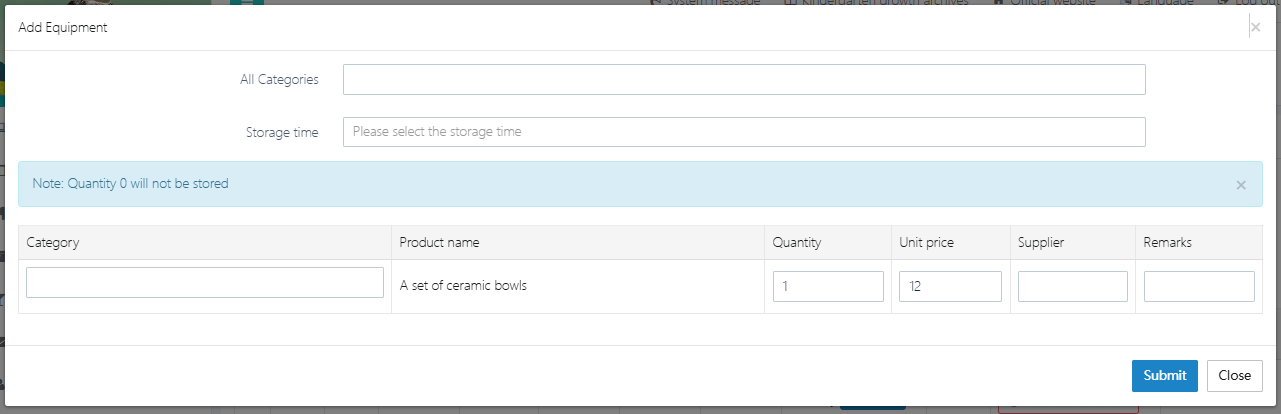
3. Receiving Goods and Inventory
During the shopping request process, use [Bulk Receipt (Check)] to manage received goods. Confirm item receipt via the "Operation Confirmation" screen:

After confirming receipt, if the item should be entered into the inventory system, click [Store in inventory]. If not, click [Do not store].

Assign a category to the new item or create a new category. Fill in the quantity and price. After filling in all fields, click [Submit] to save.
4. Batch Export Function
You can export shopping requests as an Excel file by selecting a date range. You may export your own requests or all records for convenient tracking and statistics.

5. View Shopping Request
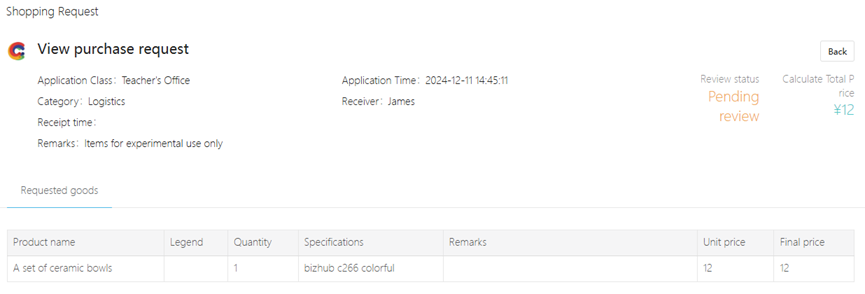
On the "View purchase request" page, you can view the following details:
- Application Class: Class of the purchase request
- Application Time: Submission time of the request
- Receipt time: Expected or actual receiving time
- Receiver: Person receiving the goods
- Product Detail: Lists Product name, Legend, Quantity, Specifications, Remarks, etc.
- Remarks: Additional notes about the items
- Review status: Review status of the request
- Total Price: Total price of all items
Activity Application
The Activity application is a system feature for coordinating internal school or organization activities, managing material requirements, and tracking the approval process. Users can submit lists of materials needed for events, monitor approval progress, and ensure timely delivery of materials. Key features include:
- Create Application: Fill in Activity information and material procurement needs
- View and Edit: Real-time viewing of application status and details, supporting modification or withdrawal
- Multi-level Approval: Supports multi-stage review processes to ensure application compliance
- Record Management: Categorized storage of historical applications by school year and term for easy traceability
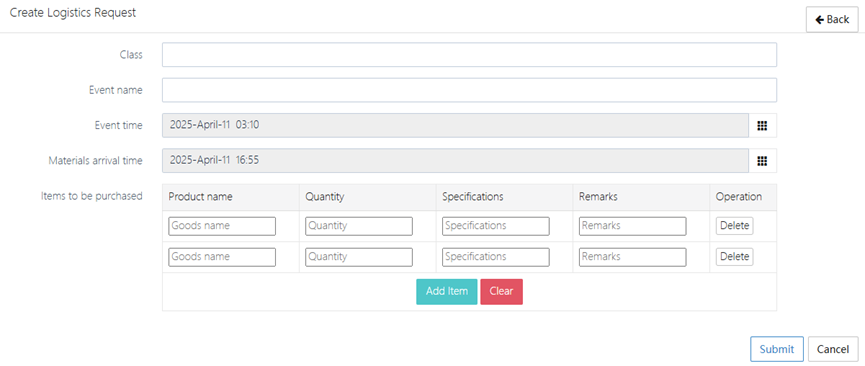
1. Creating a Logistics Application
-
Enter the Creation Page
- Click the [Create] button on the main interface to enter the application form
-
Fill in Basic Information
- Class: Select or enter the class name (e.g., "Rainbow Middle Class 2")
- Event name: Fill in the Activity theme (e.g., "Sunshine Little World")
- Event time: Choose the start and end time for the Activity (format: YYYY-MM-DD HH:MM)
- Materials arrival time: Specify the time when materials should be delivered (suggested to be earlier than the Activity time)
-
Add Procurement Items
- Click "Add Item", and fill in each item:
- Product name (e.g., "Apple")
- Quantity (e.g., "20")
- Specifications (e.g., "kg")
- Remarks (e.g., "for school birthday 10 years")
- Supports [Delete] to remove erroneous items or [Clear] to clear the list
- Click "Add Item", and fill in each item:
-
Submit Application
- After confirming the information is correct, click [Submit] to send it for approval
- Click [Cancel] to abandon the current input
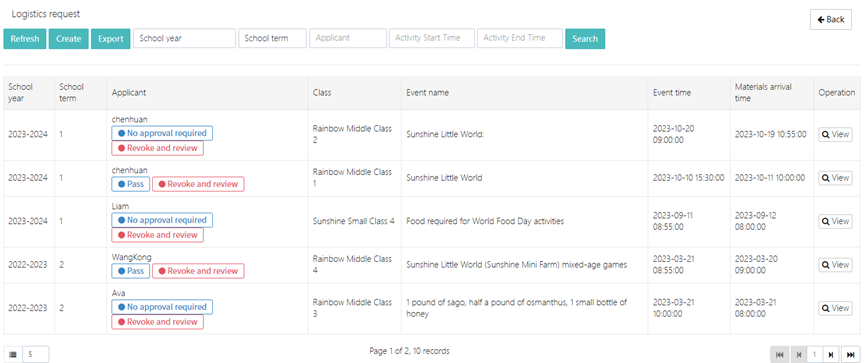
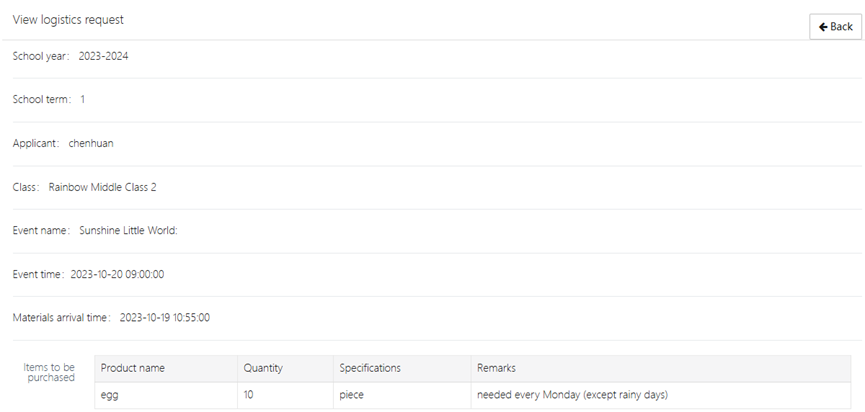
2. View Applications
- The main interface displays all historical applications, with filtering options by school year, school term, and Applicant
- Click [View] to see the details, including: Applicant, Class, Event time, Materials arrival time, and items to be purchased
Overtime Application
Employees need to submit an overtime application here: [Applications & Approvals] -> [Overtime Application].
1. Overtime Application List
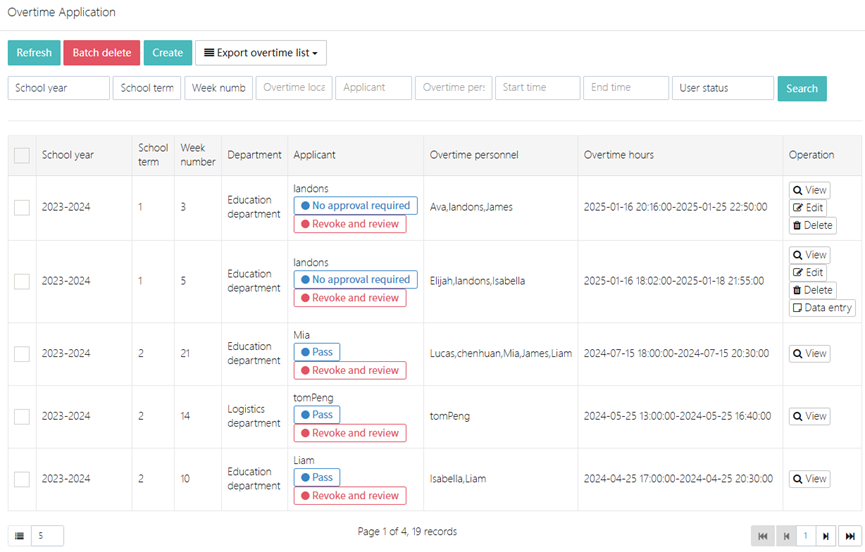
In the Overtime Application page, you can view all employee overtime application records. Each record includes the following information:
- School year, School term, Week number: Displays the academic year, term, and week corresponding to the overtime application
- Department: Displays the department submitting the overtime application, such as "Education Department" or "Logistics Department"
- Applicant: Displays the name of the person submitting the overtime application
- Overtime personnel: Displays the specific personnel applying for overtime
- Overtime hours: Displays the overtime period and duration requested
- Operation: View, edit, or delete the overtime application
At the top of the list, there are several functional buttons:

- Refresh: Refresh the current page data
- Batch delete: Delete multiple overtime records
- Create: Submit a new overtime application
- Export overtime list: Export overtime records as a file
2. Submit or Edit Overtime Application
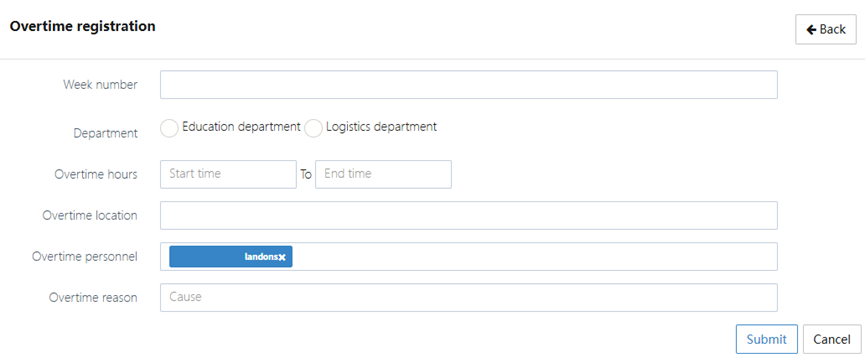
To create an application, click [Create] to open the form and fill it in as shown below:
To edit an application, select the record to be modified, click [Edit] to enter the editing page as shown below:
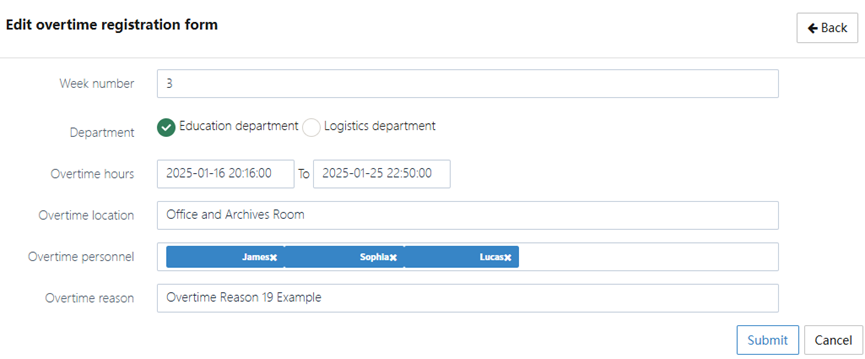
When submitting an overtime application, follow these steps to fill in the information:
- Week number: Select the corresponding week for the overtime application
- Department: Choose the department applying for overtime
- Overtime hours: Select the start and end time of overtime and fill in the overtime duration
- Overtime location: Fill in the specific location of overtime work
- Overtime personnel: Select the personnel participating in the overtime. You can submit the application for one person and list the others who will also work overtime
- Overtime reason: Fill in the reason for overtime, such as "urgent project" or "holiday work"
After filling out the form, click [Submit] to complete the overtime application.
3. Overtime Application Details
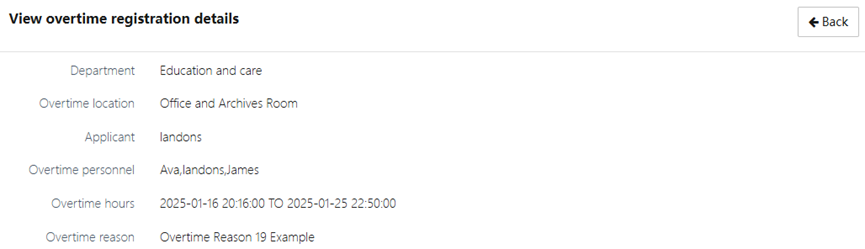
In the View overtime registration details page, you can view the following detailed information:
- Department: Displays the department applying for overtime
- Overtime location: Displays the specific location of overtime
- Applicant: Displays the name of the person applying for overtime
- Overtime personnel: Displays all personnel applying for overtime
- Overtime hours: Displays the start and end time of overtime and the overtime duration
- Overtime reason: Displays the specific reason for overtime
4. Overtime Record Operations

Administrators can perform the following functions using the operation buttons:
- Edit: Modify an already submitted overtime application
- Delete: Delete unnecessary overtime records
- View: Supplement and modify the detailed information of overtime records
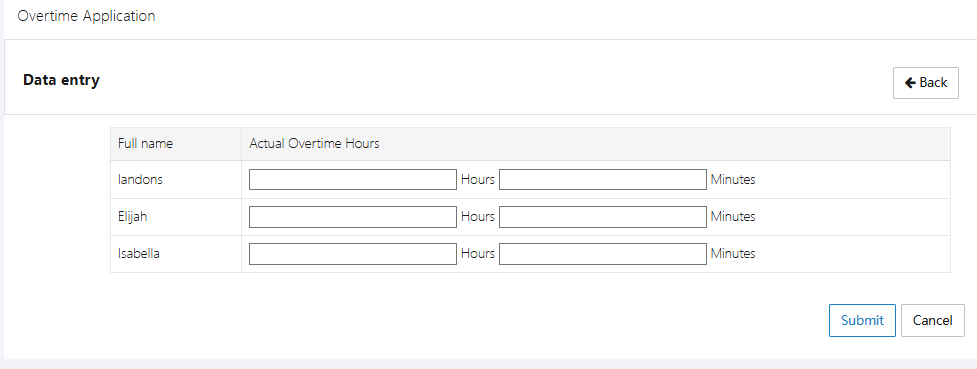
- Data entry: Enter the actual overtime duration for each person into the system, so they can take compensatory time off when requesting leave
5. Enter Actual Overtime Hours
Since some employees may work longer overtime hours while others work shorter, it is necessary to enter the actual overtime time afterward.
Leave Application
When an employee needs to take leave, they can use the [Applications & Approvals] -> [Leave Application] function to submit a request.
1. Leave Application List
In the Leave Application page, you can view all employees' leave records. Each record includes the following information:
- School year, School term, Week number: Displays the academic year, term, and week number corresponding to the leave request
- Class, Applicant: Displays the class and the applicant's name
- Leave time: Displays the start and end time of the leave request
- Creation time: You can view whether the application has been approved or needs to be reviewed
- Operation: You can view, edit, or delete the leave request
Administrators can view the detailed leave information for each employee and approve or reject the request. You can view the specific time, reason, and whether compensatory leave is required. Using the [Edit] or [Delete] buttons in the Operation column, administrators can make changes or delete the requests.

At the top of the list, there are several functional buttons:
- Refresh: Refresh the current page data
- Batch delete: Delete multiple leave records
- Create: Submit a new leave request
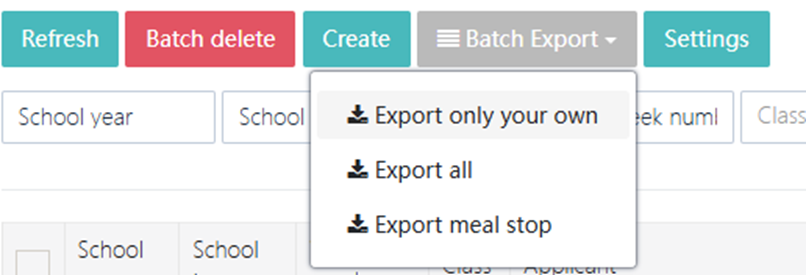
- Batch Export: Export all or specific leave records based on conditions
- Settings: Leave settings, such as adding new leave types
Administrators can choose to export leave records in bulk. You can export all leave records, only records for your own applications, or records with meal stop tags.
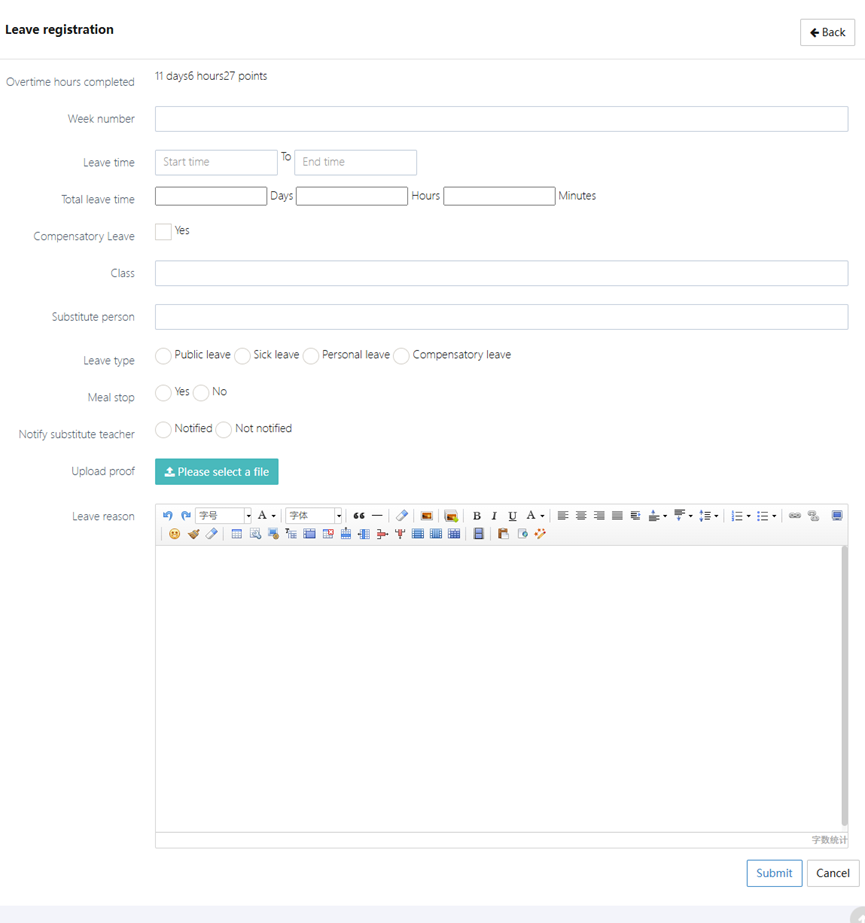
2. Submitting and Editing Leave Requests
When submitting a leave request, you need to fill in the following information:
- Leave time: Select the start and end time of your leave
- Total leave time: Enter the duration of your leave (days, hours, minutes) Note: A full day is calculated as 8 hours. For example, if you request 8 hours, it is considered 1 day. For 16 hours, it is 2 days.
- Compensatory Leave: Choose whether to use compensatory leave
- Leave type: Select the type of leave, such as public leave, sick leave, personal leave, or compensatory leave
- Substitute teacher: Name of the substitute teacher
- Notify substitute teacher: Choose whether to notify the substitute teacher
- Upload proof: Upload related proof documents as needed
- Leave reason: Provide detailed reasons for your leave
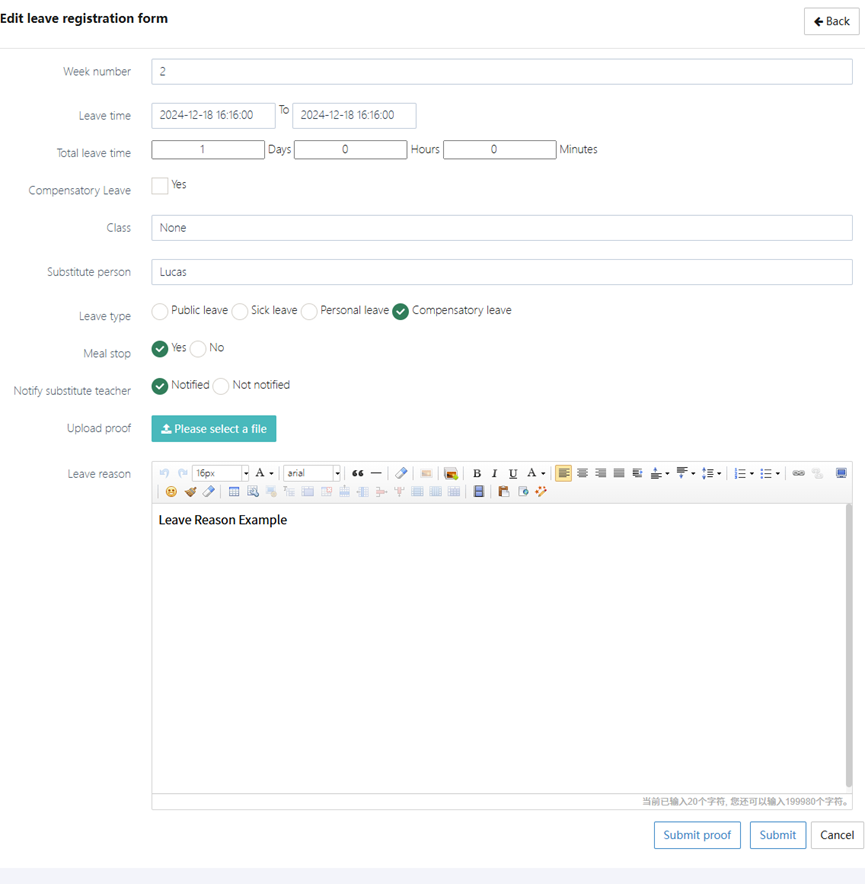
If you need to modify a previously submitted leave request, you can enter the editing page to make changes. You can edit the leave time, leave type, whether to notify the substitute teacher, and more. After editing, click the [Submit] button to save changes.
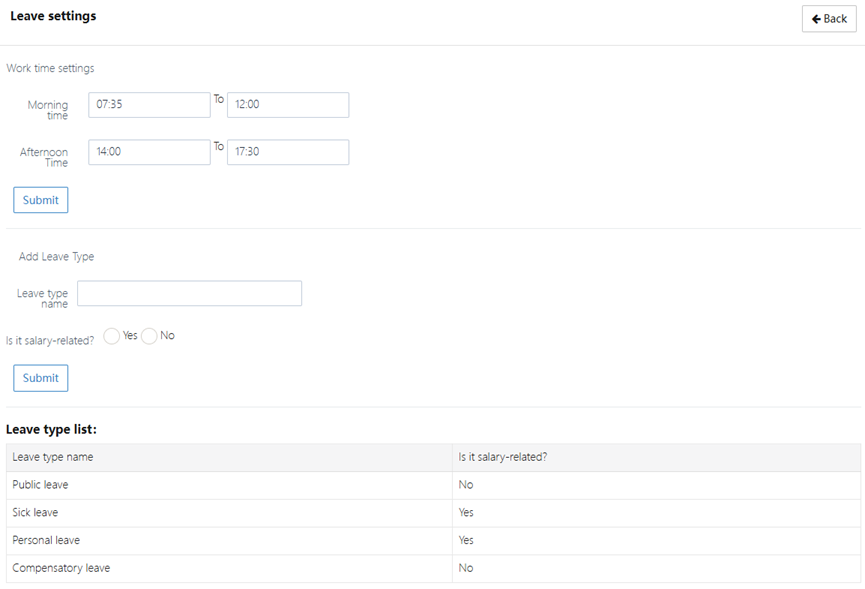
3. Leave Settings
In the Leave Settings page, administrators can configure:
- Work time setting: Define the morning and afternoon work hours for weekdays
- Add leave type: Add new leave types and specify whether they are related to salary
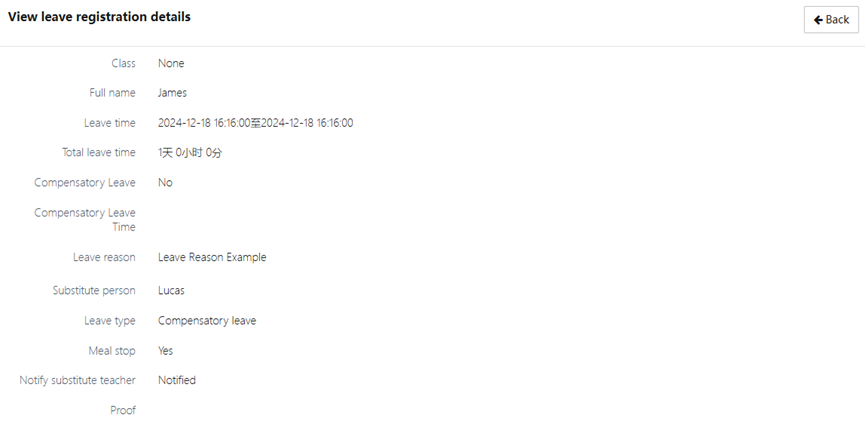
4. Leave Application Details
In the View Leave Registration Details page, you can view:
- Class: Displays the class or department the applicant belongs to
- Full name: Displays the applicant's name
- Leave time: Displays the start and end time of the leave request
- Total leave time: Displays the total duration of the leave, in days, hours, and minutes
- Compensatory Leave: Displays whether compensatory leave is used, usually marked as "yes" or "no"
- Compensatory Leave Time: If compensatory leave was requested, displays the specific time for compensatory leave
- Leave reason: Displays the reason provided by the applicant for the leave, offering detailed descriptions
- Substitute person: Displays the name of the substitute teacher, who will teach during the applicant's absence
- Leave type: Displays the type of leave requested, such as public leave, sick leave, personal leave, or compensatory leave
- Meal stop: If the school provides meals, you can choose not to take meals during the leave, marked as "yes" or "no"
- Notify substitute teacher: Displays whether the substitute teacher has been notified about the leave, marked as "Notified" or "Not notified"
- Proof: Displays any uploaded proof documents for administrators or relevant personnel to review
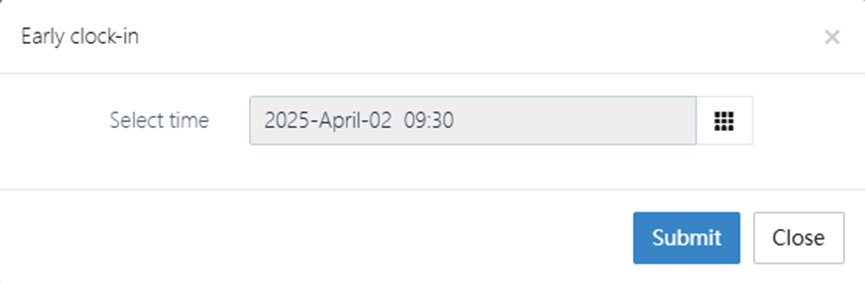
5. Early Clock-in
After an employee takes leave, they may return to work early. The [Early clock-in] function allows recording the time of early return to ensure accurate attendance records.
Maintenance Request
When an item in the classroom is damaged, you can submit a request and record it here by uploading photos.
1. Maintenance Request List
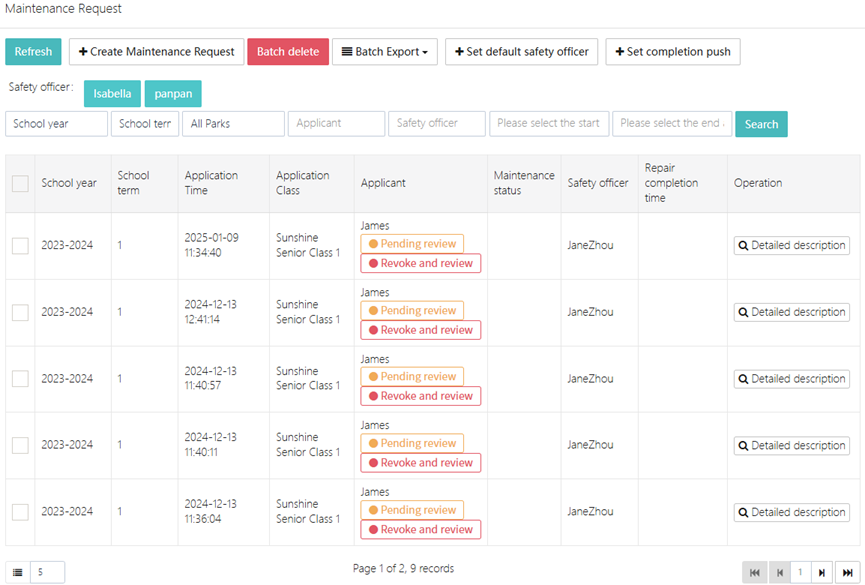
In the Maintenance Request page, you can view all employees' maintenance request records. Each record includes the following information:
- School year: Displays the academic year corresponding to the maintenance request
- School term: Displays the term corresponding to the maintenance request
- Application Time: Displays the time when the maintenance request was submitted
- Application Class: Displays the class for which the request was made
- Applicant: Displays the name of the person submitting the maintenance request
- Maintenance status: Displays the current status of the maintenance request, such as "Completed"
- Safety officer: Displays the staff responsible for the maintenance
- Repair completion time: Displays the expected or actual completion time for the repair
- Operation: You can view the detailed description or edit the maintenance request
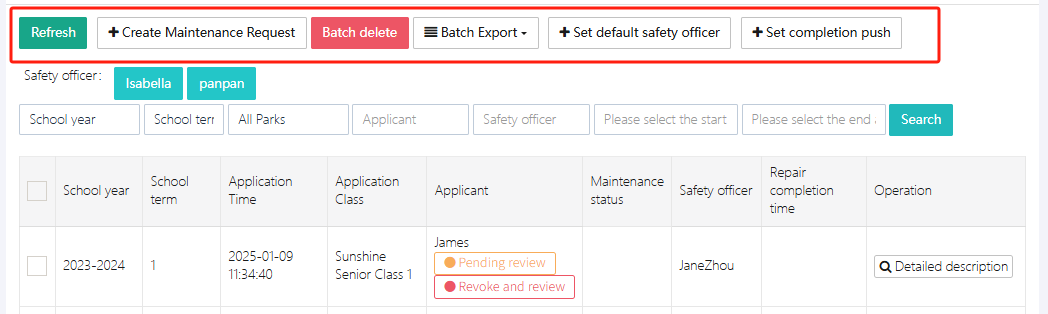
At the top of the list, there are several functional buttons:
- Refresh: Refresh the current page data
- +Create Maintenance Request: Submit a new maintenance request
- Batch delete: Delete multiple maintenance records
- Batch Export: Export the maintenance request records
- Set default safety officer: Set the default safety officer/maintenance personnel
- Set completion push: Push settings after completion
2. Create Maintenance Request
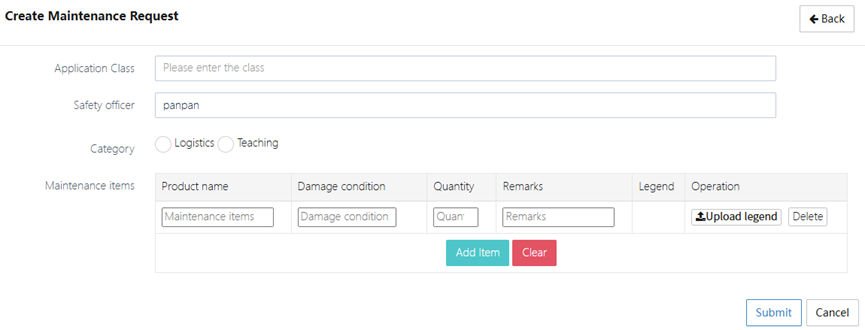
When you need to submit a maintenance request, please follow these steps to fill in the information:
- Application Class: Select the class that needs maintenance
- Safety officer: Select the staff member handling the maintenance
- Category: Choose the maintenance category, such as "Logistics" or "Teaching"
- Maintenance items: List specific maintenance items, such as air conditioners, computers, etc.
- Damage condition: Describe the damage to the equipment or facility
- Quantity: Enter the number of items that need repair
- Remarks: You can add additional notes or considerations about the maintenance
- Legend: Upload related maintenance certificates or photos to help maintenance personnel better understand the issue
After filling in the details, click the [Submit] button to submit your maintenance request.
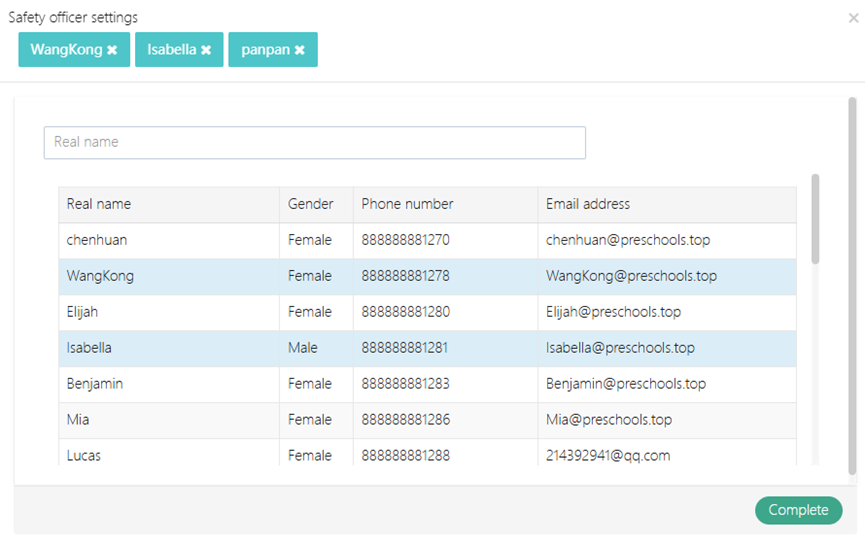
3. Safety Officer Settings
The system allows assigning different safety officers to each maintenance request. You can manage and assign maintenance tasks in the safety officer settings. The safety officer is responsible for reviewing and tracking the progress of the maintenance request.
4. Completion Push Settings
You can set up to push the maintenance information to specific individuals after the repair is completed, such as the personnel responsible for subsequent tasks. This ensures that maintenance updates are communicated in a timely manner to the relevant personnel, ensuring the smooth completion of the maintenance work.

5. Maintenance Request Details
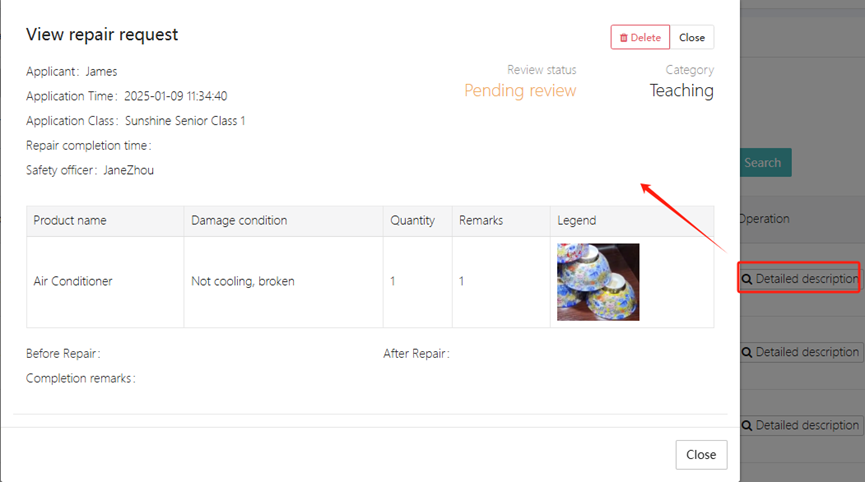
In the View Repair Request page, you can view the following detailed information:
- Application Class: Displays the class corresponding to the maintenance request
- Applicant: Displays the person who submitted the maintenance request
- Repair completion time: Displays the expected or actual repair completion time
- Safety officer: Displays the staff member responsible for the maintenance
- Items: Lists the equipment that needs repair
- Damage condition: Describes the specific damage to the equipment
- Quantity: Displays the number of items that need repair
- Remarks: Displays any additional notes about the maintenance request
- Legend: Displays uploaded certificates or photos
Approval
After logging in, if there are pending approval tasks, they will be listed on the right side of the system under ">>>Pending approval tasks" as shown in the image below:
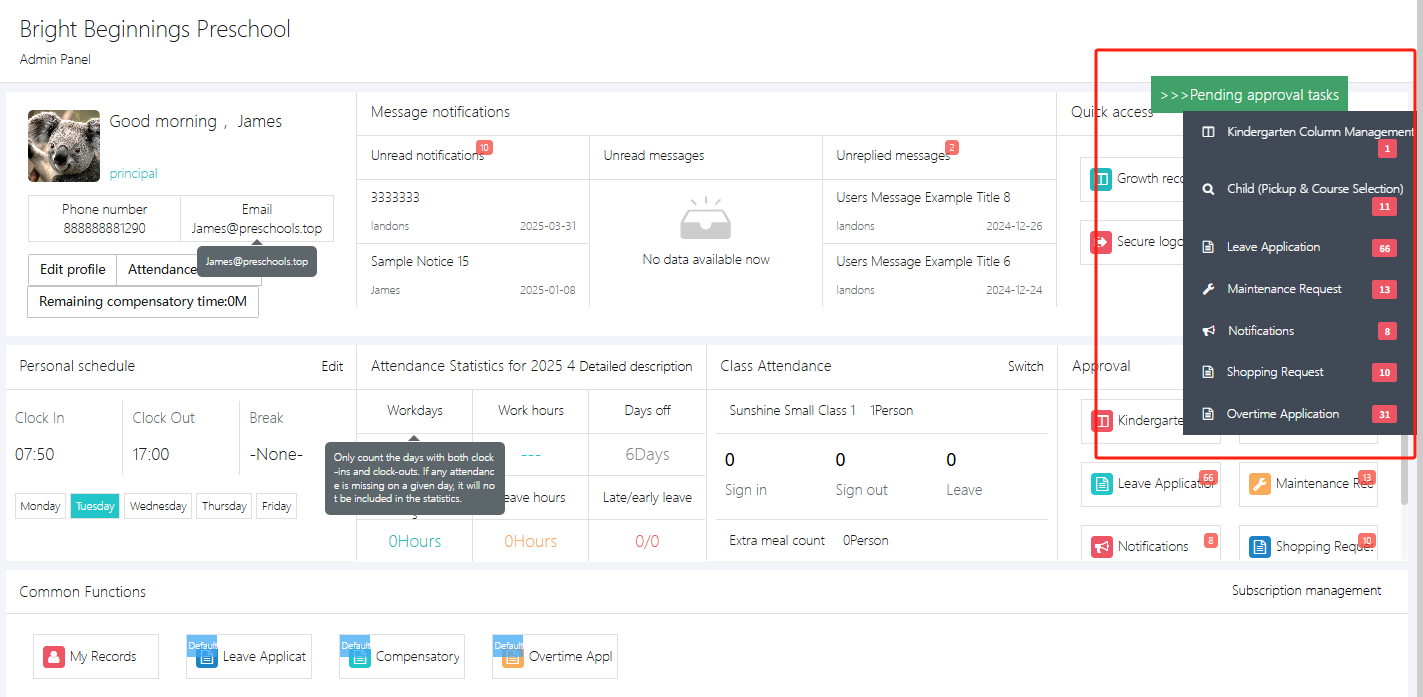
Each red number represents how many records are awaiting approval.
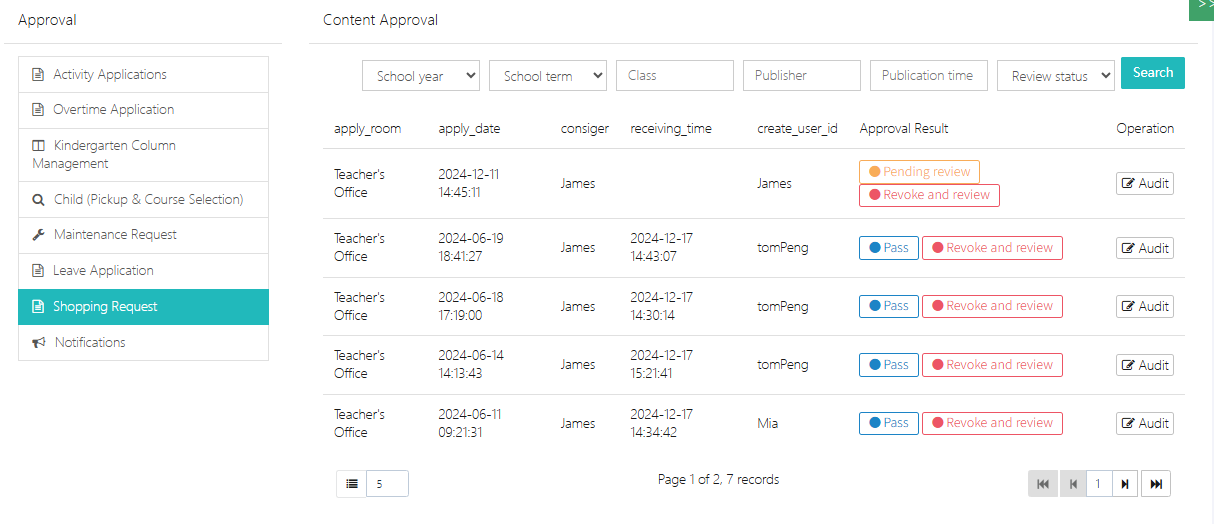
In addition to this location, you can also manage approvals by going to [Applications & Approvals] -> [Approval].
As shown in the image below, the left side displays categories of approval tasks, and the right side shows the specific items to be approved. The approval status can be "no approval required", "pending approval", "pass", or "reject". If an approval mistake is found, you can click [Revoke and review] to review it again.
Approval statuses:
- Pending review: The default status for new applications, requiring manual approval
- Pass: The application has been approved and is now in effect
- No approval required: Automatically approved, no manual review needed
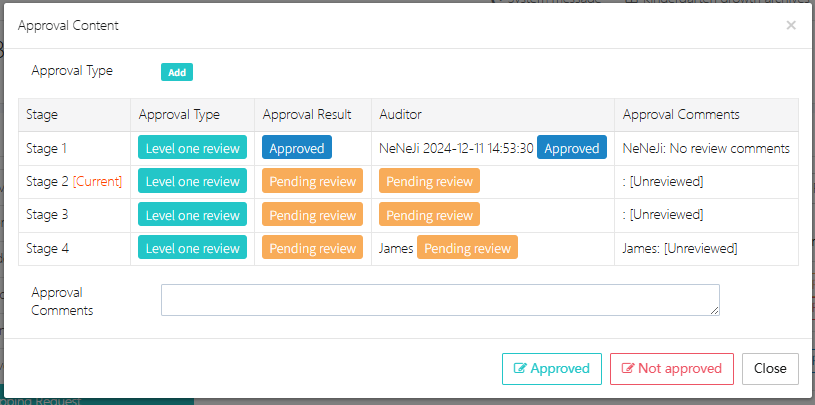
1. Viewing the Approval Process (The process can be customized in "System Settings")
By clicking on the status in the Approval Result column, you can view the approval process for the current record and see the step it is in, as shown in the image below. This process has three stages: stage1 -> stage2 -> stage3.
The lead auditor's approval, marked as "Lead auditor approval", can skip the first three stages of approval. As long as the lead auditor approves it, the final result will be approved regardless of the previous steps.
-
Multi-level approval stages:
- First-level review: Handled by designated reviewers (e.g., "Lucas" or "James"), status is Pending review
- Final review by leadership: The "Lead auditor" gives the final approval. After approval, the status is marked as "Approved", and the time is recorded.
-
Approval status indicators:
- Unreviewed: Displays as "Unreviewed" with the reviewer's name
- No approval required: Some applications are marked as "No approval required", and can be executed directly.
-
Revoke application:
- If the application has not been approved yet, click [Revoke and review] to withdraw and modify it.
- Approved applications require contacting the administrator for further processing.

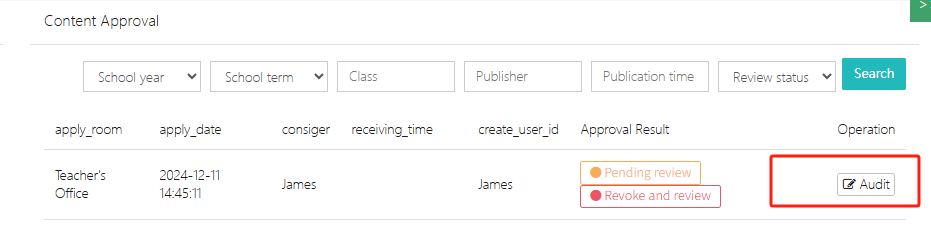
2. Approving Requests
When we see a pending approval record, we can click [Audit] to review it.
After clicking [Audit], a window will pop up as shown in the image below. The current record has four steps, and we are at step 2. The first-step approver was NeNeji, who approved it on 2024-12-11. The user fills in the Approval Comments and then clicks [Approved] or [Not approved] to complete the approval process.
Message Recipient Settings
This module allows administrators to precisely control the messaging permissions based on user roles. By configuring the relationship between roles and sendable recipients, it ensures messages are delivered to the appropriate recipients, improving communication efficiency and avoiding miscommunication.
Below is the permission table for message recipient settings for each role:

Role and Permission Explanation
- admin (Administrator): Has the highest level of messaging permission and can send messages to all roles, including admin, principal, parent, teacher, and super.
- principal (Principal): Can send messages to admin, principal, parent, teacher, and super.
- parent (Parent): Can send messages to admin, principal, parent, teacher, and super.
- teacher (Teacher): Has permissions similar to parents and principals, and can send messages to admin, principal, parent, teacher, and super.
- super (Super User): Has the same permissions as other roles and can send messages to all roles, including admin, principal, parent, teacher, and super.
Usage Scenarios
- Administrators can send messages to any role to ensure notifications are received by all relevant individuals.
- Principals, parents, teachers, and other users have limited sending permissions and can only send messages to specific target groups.
Configuration Explanation
- Administrators can quickly configure the messaging permissions for different roles via the backend settings interface.
- In the system, users will only see recipients they are allowed to send messages to, preventing unnecessary misoperations.
- This setting applies to all types of messages, including notifications, reminders, urgent announcements, etc.
Audit Item Settings
This module is the core part of managing various application approval processes and permissions within the kindergarten, such as leave requests, procurement, overtime, maintenance, etc. Administrators can customize approval processes, assign review roles, and set notification rules through this function.
I. Notification Management
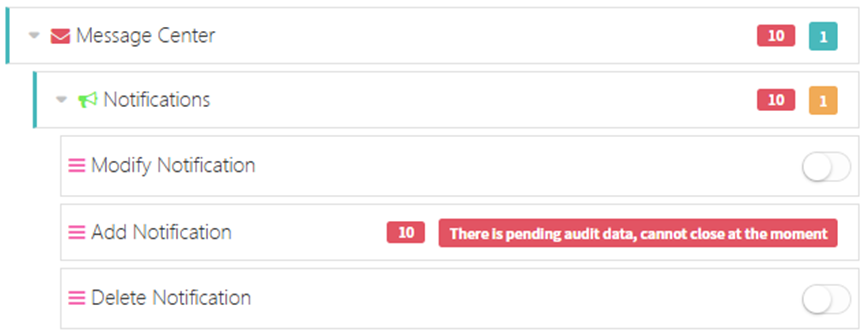
- Modify Notifications: Control whether the modification of notification content requires approval.
- Add New Notifications: Control whether the publication of new notifications requires approval.
- Delete Notifications: Control whether the deletion of notifications requires approval.
II. Users and Permissions
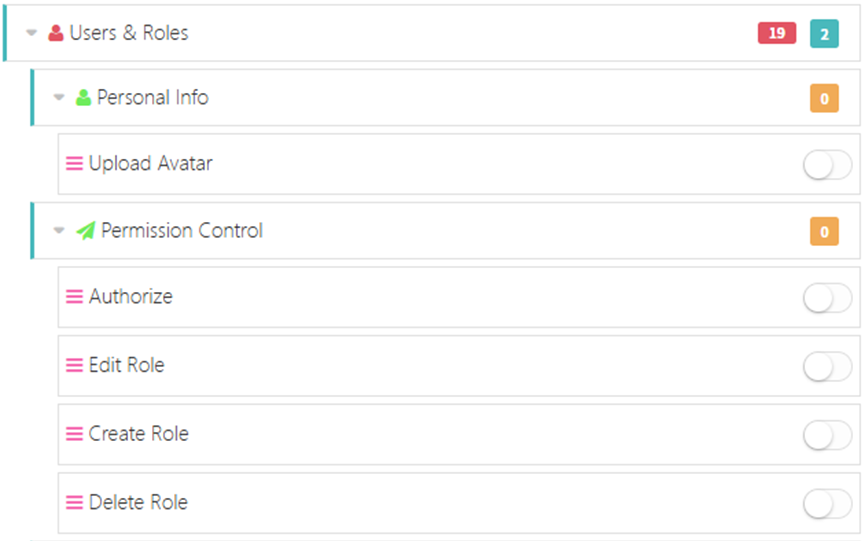
- Personal Information Modification: Control whether the modification of user personal information requires approval.
- Role Creation: Control whether creating new roles requires approval.
- Role Editing: Control whether modifying role permissions requires approval.
- Role Deletion: Control whether deleting roles requires approval.
III. Children's Fees and Course Selection

- Add Fee Personnel Information: Control whether adding personnel related to fees requires approval.
- Delete Fee Personnel: Control whether deleting fee personnel requires approval.
- Edit Fee/Personnel Information: Control whether editing fee or personnel information requires approval.
- Children's Course Selection: Control whether children's course selection requires approval.
IV. Enrollment and Recruitment

- Public Enrollment and Recruitment: Control whether publishing enrollment or recruitment information requires approval.
- Modify Recruitment Information: Control whether editing recruitment information requires approval.
- Delete Recruitment Information: Control whether deleting recruitment information requires approval.
- Create Recruitment Information: Control whether creating new recruitment information requires approval.
V. Enrollment Review
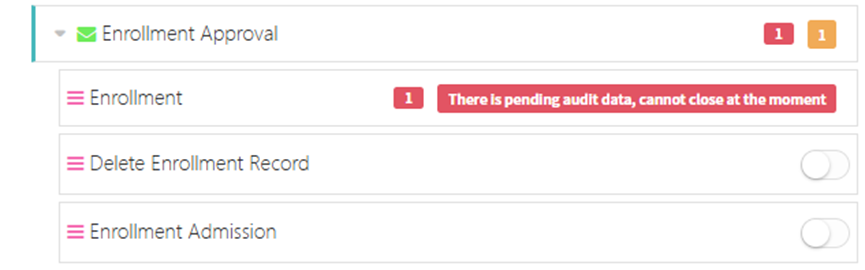
- Enrollment Records: Control whether adding new enrollment records requires approval.
- Delete Enrollment Records: Control whether deleting enrollment records requires approval.
- Admission Approval: Control whether student admission requires approval.
VI. Leave Requests
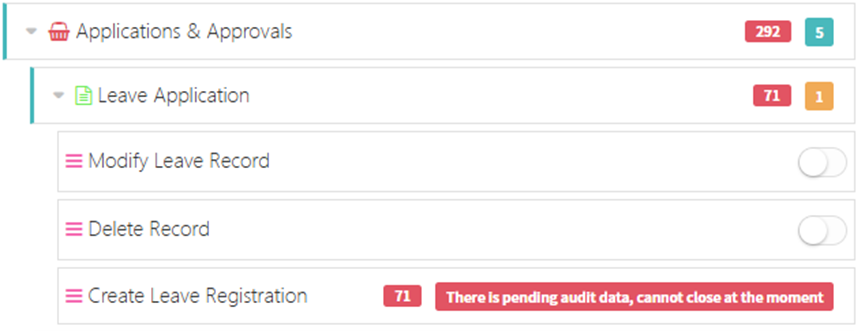
- Leave Request: Control whether submitting leave requests requires approval.
- Modify Leave Records: Control whether editing leave records requires approval.
- Delete Leave Records: Control whether deleting leave records requires approval.
- Create Leave Registration: Control whether creating new leave registrations requires approval.
VII. Maintenance Requests
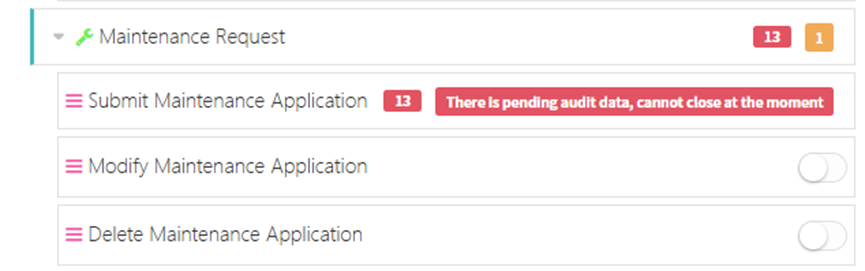
- Extend Maintenance Request: Control whether extending maintenance requests requires approval.
- Modify Maintenance Request: Control whether editing maintenance requests requires approval.
- Delete Maintenance Request: Control whether deleting maintenance requests requires approval.
VIII. Procurement Requests
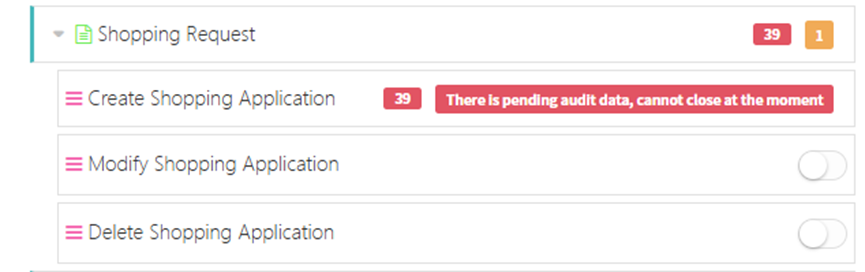
- Create Procurement Request: Control whether creating procurement requests requires approval.
- Modify Procurement Request: Control whether editing procurement requests requires approval.
- Delete Procurement Request: Control whether deleting procurement requests requires approval.
IX. Office Affairs Requests
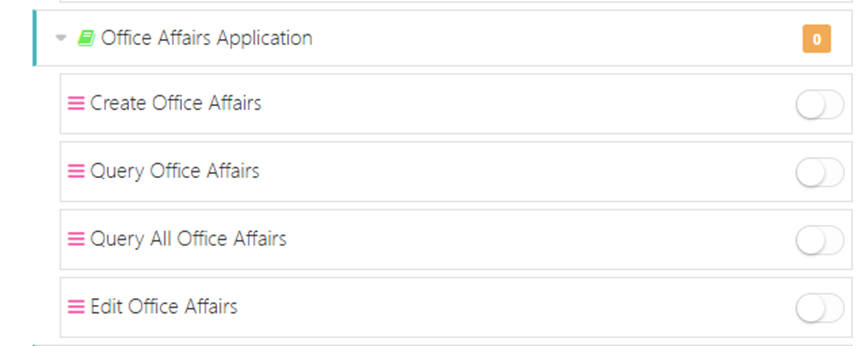
- Create Office Affairs: Control whether creating office affairs requires approval.
- Query Office Affairs: Control whether querying office affairs requires approval.
- Edit Office Affairs: Control whether editing office affairs requires approval.
X. Overtime Requests
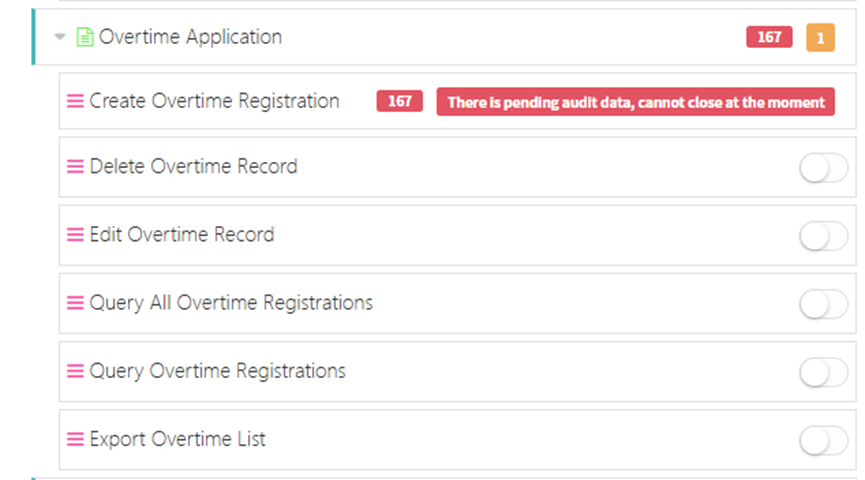
- Create Overtime Registration: Control whether submitting overtime requests requires approval.
- Delete Overtime Records: Control whether deleting overtime records requires approval.
- Edit Overtime Records: Control whether editing overtime records requires approval.
- Export Overtime List: Control whether exporting overtime data requires approval.
XI. Other Requests
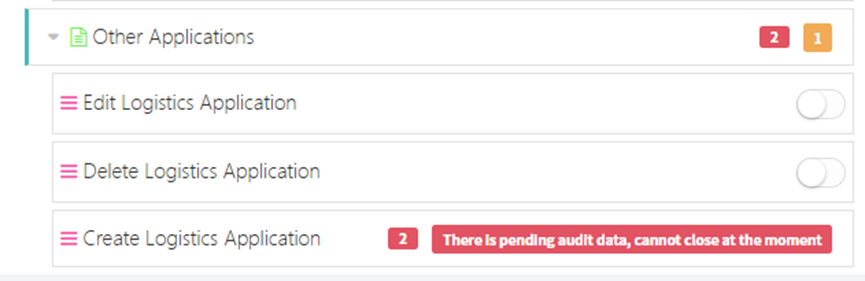
- Edit Logistics Request: Control whether editing logistics requests requires approval.
- Delete Logistics Request: Control whether deleting logistics requests requires approval.
- Create Logistics Request: Control whether creating logistics requests requires approval.
Approval Process Management
This module is used to configure various business approval notification processes, review personnel, and CC settings in the system, ensuring that all business can be efficiently approved under standardized processes. The function supports multi-level and single-level approvals, and allows for customizable approval conditions and CC personnel, achieving both automated and personalized process management.
In the left navigation bar, select the approval type. The following example uses notification approval. Click [Message Center] -> [Notifications] to enter the approval process management interface.
1. Set CC Personnel
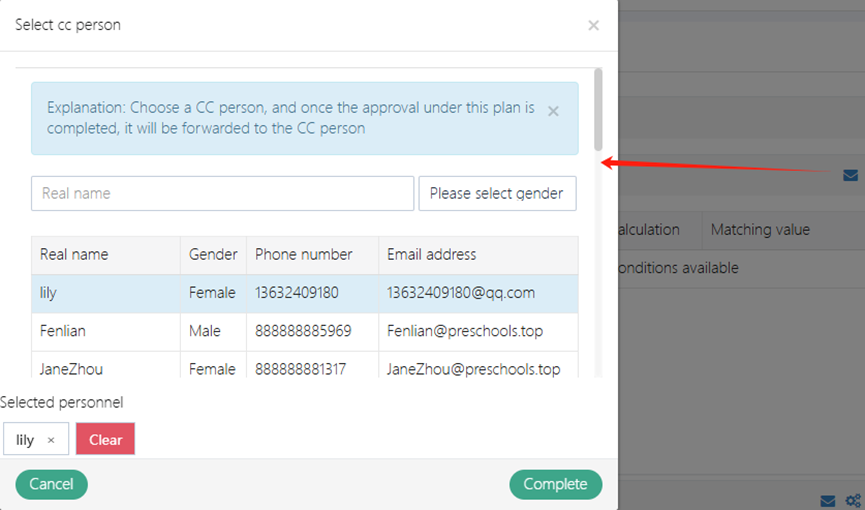
Click the envelope icon to open the CC personnel selection popup. In the popup:
- Personnel can be filtered by name or gender;
- Multiple or single selections are supported;
- Selected personnel will receive related notifications once the approval is completed.
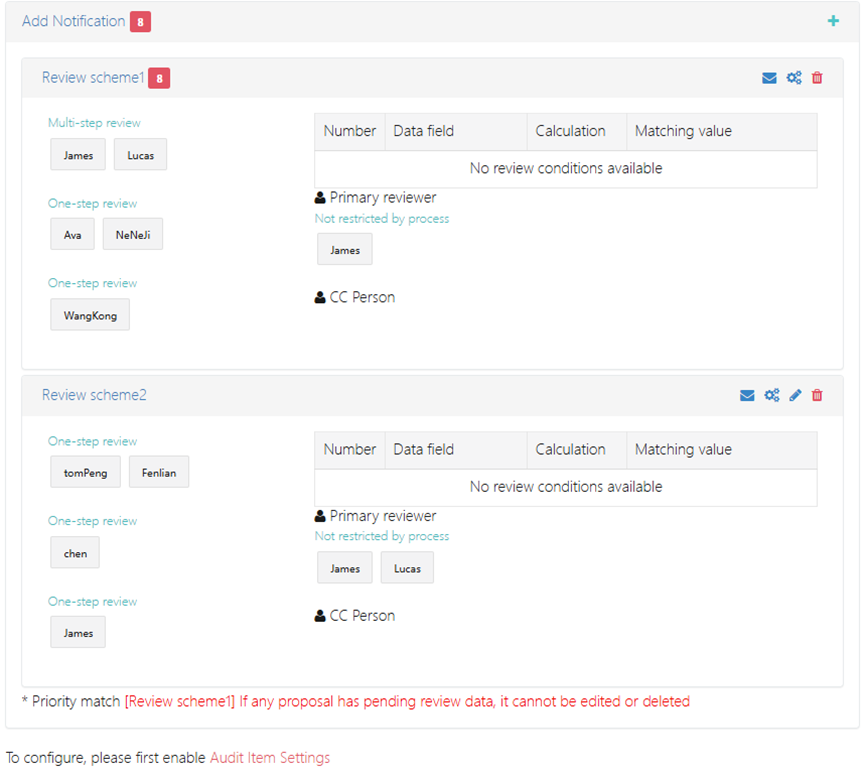
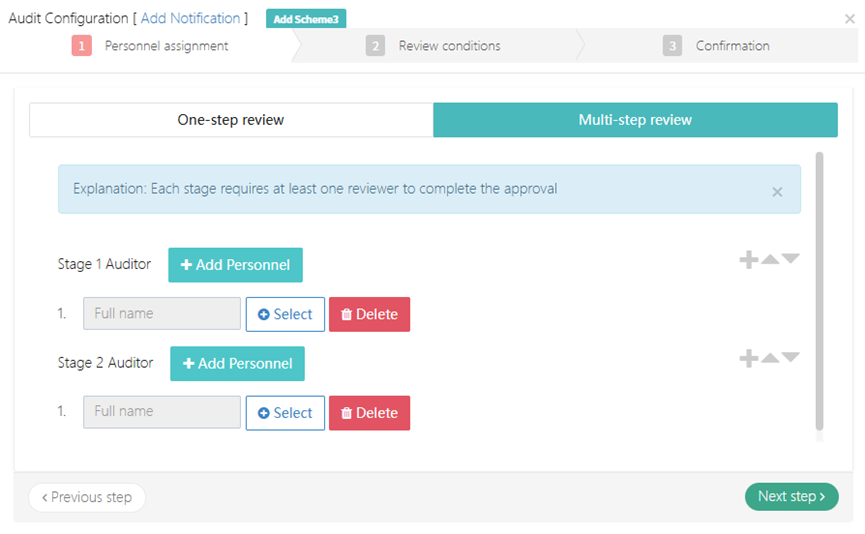
2. Add Approval Process
Click the “➕” icon at the top right to add a new approval process, including the following configuration items:
- Approval Name (e.g., Review scheme1)
- Approval Mode
- Multi-step approval: Multiple reviewers approve in sequence.
- Single-step approval: Reviewers approve directly.
- Primary Reviewer: The person responsible for the final decision. Multiple reviewers can be configured.
- CC Personnel: Automatically CC the selected personnel once the approval is completed.
1. Personnel Allocation
- Single-step approval
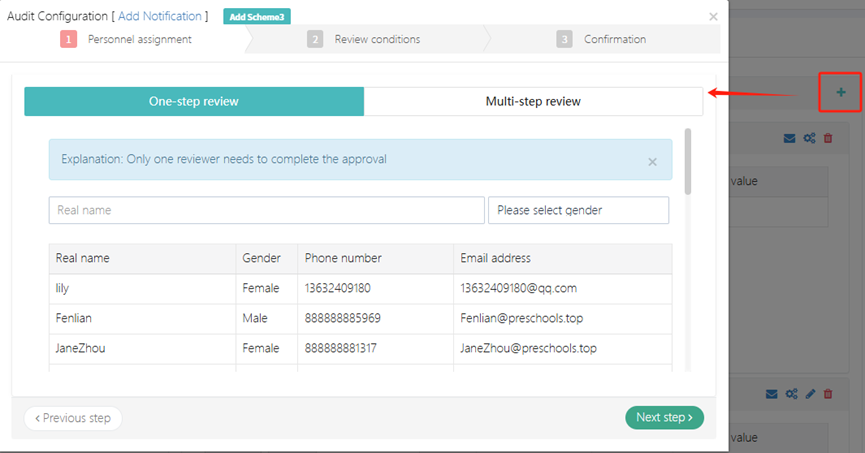
- Multi-step approval
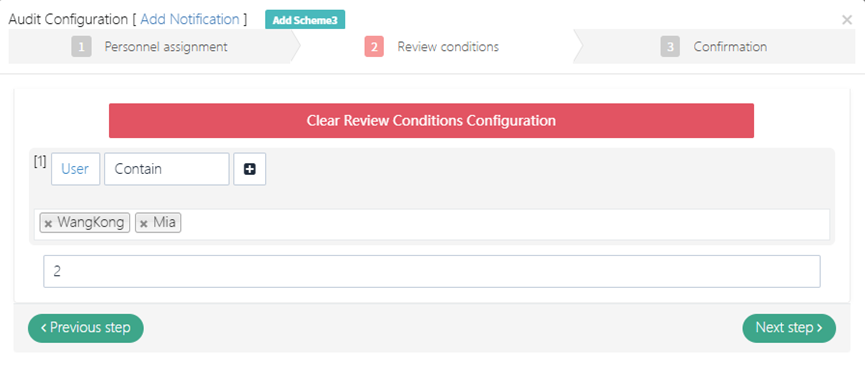
2. Approval Conditions
In each approval scheme, approval conditions can be set, including data fields, calculation methods, and matching values. The current screen shows “No available approval conditions,” which can later be enabled through system configuration.
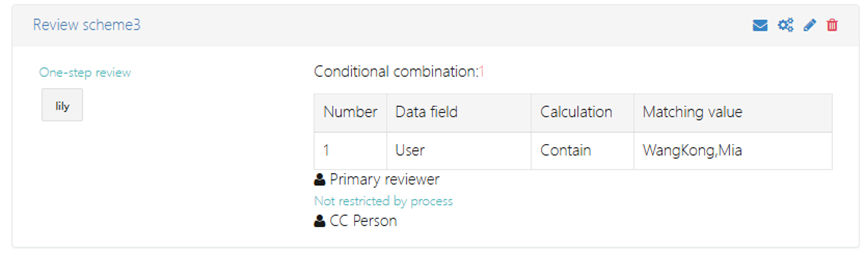
3. Confirm Approval Scheme
After confirming the review personnel and approval conditions, click [complete] to create the approval scheme.
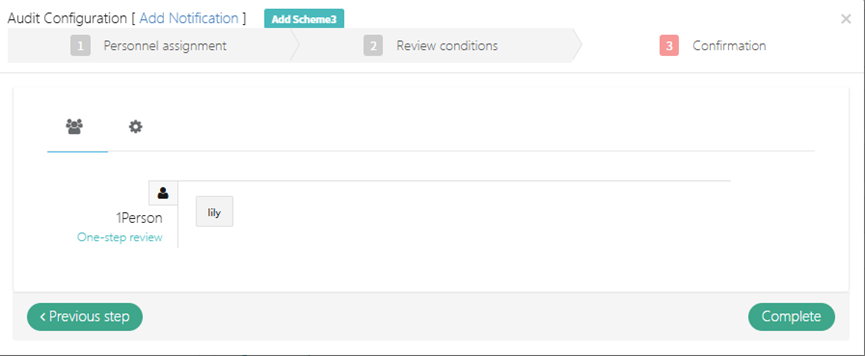
As shown, a new approval scheme is created.
Kindergarten Settings
This module is used to manage basic information of the kindergarten, academic year and semester configuration, display parameters, and system data statistics. Through this function, administrators can flexibly set academic year cycles, student automatic promotion rules, kindergarten brand information (name/logo/contact details), etc., ensuring the consistency of system operation and external display.
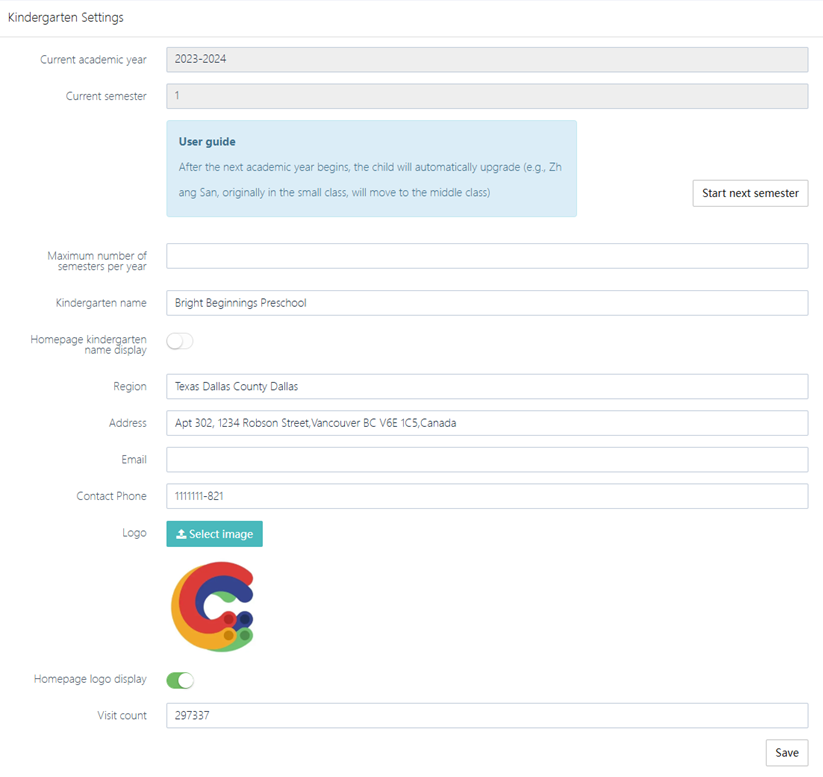
1. Academic Year and Semester Management
- Set the current academic year and semester
- Current academic year: Fill in the current academic year (2023-2024), in the format YYYY-YYYY.
- Current semester: Select the current semester number (e.g., 1 for the first semester).
- Start next semester
Click Start next semester. The system will check if the semester limit has been reached based on the "Maximum number of semesters per academic year" configuration. If set to 2 semesters per year, the new semester cannot be started once it’s full. If not full, it will close the current semester and initialize the new semester's class, timetable, and other data.
- Configure the maximum number of semesters per year
Maximum number of semesters per year: Enter a number (1-4) to limit the total number of semesters that can be started within the academic year.
- Student automatic promotion rule
User guide: At the start of the next academic year, the system will automatically promote students to the next class level (e.g., from small class to middle class).
Exceptions: If the class level is full (e.g., the large class), the administrator must manually assign graduates or adjust the class structure.
2. Kindergarten Basic Information Configuration
- Kindergarten Name and Display Settings
- Kindergarten name: Fill in the full name (e.g., Bright Beginnings Preschool).
- Homepage kindergarten name display: If checked, the name will be displayed at the top of the official website homepage.
- Region and Address
- Region: Fill in the format "Country, City" (e.g., Texas Dallas County Dallas).
- Address: The detailed address must include street number, street name, city, and postal code (e.g., Apt 302, 1234 Robson Street, Vancouver BC V6E 1C5, Canada).
- Contact Information
- Contact Phone: Enter the contact phone number (e.g., 11-1111-821), including area code.
- Email: Fill in the kindergarten’s official email address (e.g., contact@brightpreschool.com).
- Logo Upload and Display
- Logo: Click Select Image to upload the kindergarten's logo (recommended size 200x200px, format PNG/JPG).
- Homepage logo display: If checked, the logo will be displayed in the navigation bar of the official website.
3. Data Statistics and System Maintenance
- Visit Count Statistics
- Visit count: Automatically counts the number of visits to the official website homepage (e.g., 297,337 visits), view-only, not editable.
- Save and update configuration
- After modifying any information, click the Save button at the bottom to save changes.
- Unsaved changes prompt: When closing the page, the system will prompt "There are unsaved changes."
Notes
- Academic Year and Semester Logic
- When starting a new academic year, ensure all semesters are closed, and student promotion rules are configured.
- If the "Maximum number of semesters per year" is set to 1, the second semester cannot be started.
- Contact Information Validity
- The contact phone number should be regularly verified to avoid communication disruption due to invalid numbers.
- Logo Display Compatibility
- After uploading, check the display on different devices (computer/mobile) to ensure there is no stretching or blurriness.
- Data Backup
- It is recommended to export a backup of the current settings before modifying key configurations (such as the academic year cycle).
Publish Enrollment and Recruitment Information
This module is mainly used to publish, edit, and manage the school's enrollment and recruitment information. Users can easily add new announcements, view historical records, and perform editing or deletion operations.
1. Functional Entry Interface

As shown in the image, the main interface displays a list of published enrollment and recruitment information, including the following fields:
- School year
- Term
- Title
- Creation time
- Type: Includes "Enrollments" and "Recruitment"
- Region
- Operation: View, Edit, Delete
Function operations:
- Click the Create button to enter the page for adding new information.
- After selecting the checkbox on the left, you can use the Batch delete feature to delete multiple records at once.
- Use the filter conditions (such as school year, term, type, start and end date) at the top for precise searching.
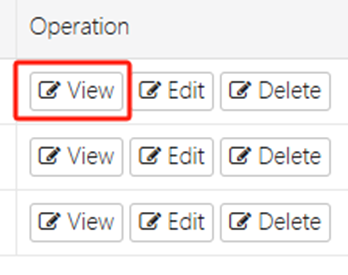
- Each record provides View, Edit, and Delete buttons on the right to view, edit, or delete individual information.
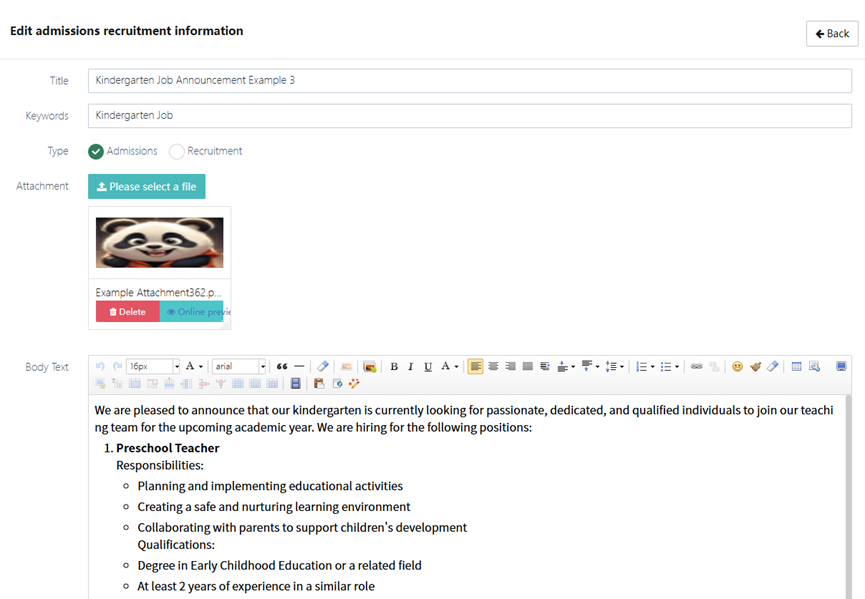
2. Add/Edit Enrollment and Recruitment Information
Click the Create or Edit button in the list to enter the information editing page, as shown below.
Editable items include:
- Title
- Keywords: Separated by commas, used for search optimization
- Type: Choose "Enrollments" or "Recruitment"
- Attachment: Upload relevant attachment files
- Body Text: Supports rich text editing, flexible format, suitable for detailed descriptions of job positions/enrollments
Operation instructions:
- After filling out the form, click Submit to save.
- If you wish to cancel the modification, click Cancel to return.
Add Interface

Edit Interface
3. Delete Existing Enrollment and Recruitment Information
Select the record to be operated on and click the Delete button in the Operation column. Please note that the deletion cannot be undone.

4. View Enrollment/Recruitment Announcement Details
Users can click the View button in the operation column on the main interface (as shown in the image) to be directed to the detailed information page of the announcement.
The displayed content includes:
- Title: e.g., "Kindergarten Job Announcement Example 3"
- Region: e.g., "Texas Dallas County Dallas"
- Type: Displays as "Enrollments" or "Recruitment"
- Attachment: If an attachment has been uploaded, the file name and download link will be displayed. Click to download the attachment (supports multiple formats such as images, PDFs, Word, etc.)
- Body Text: Detailed display of job description, including responsibilities, qualifications, etc. Rich text content, including bullet points, bolded titles, etc.
Additional features:
- The Back button at the top-right corner of the page returns to the previous page.
- The Send push function (if enabled) allows the announcement to be pushed to relevant systems or user terminals.

By using the view enrollments recruitment information function, users can quickly view all the information of each announcement, which is especially useful for leadership approval or third-party reviews.
Clicking on Attachment will allow users to download the file locally.
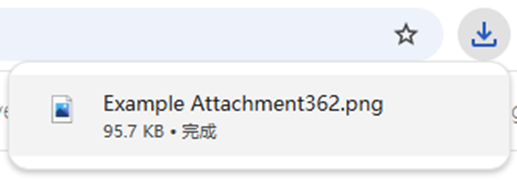
Approve Admission
This module is used to manage student admission applications, supporting functions such as reviewing applications, updating statuses, batch operations (delete/export), and sending SMS notifications. Administrators can efficiently handle the admission process to ensure data accuracy and operational convenience.
1. Admission Application List Management
- Top operation bar:
- Refresh: Updates the application list data in real-time.
- Batch delete: After selecting multiple applications, delete them with one click.
- Batch export: Export the selected or all data to an Excel file (e.g., list17446843534.xlsx).
- Search bar: Supports quick filtering by "Name," "Class type," and "Admission status."
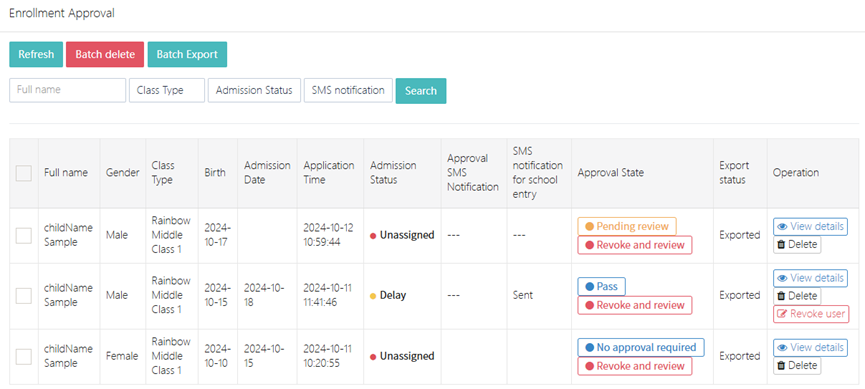
2. Single Application Approval Process
- View detailed information
Click View details to enter the student details page, which includes:
- Basic information (Name, Gender, Date of Birth, Ethnicity).
- Family address (e.g., Health Canada Headquarters...).
- Health and history information (allergy history, medical records, etc.).
- Other custom fields (e.g., whether the student has siblings attending, past educational experience).
- Attachment management: Upload or download relevant files (e.g., Example Attachment362.pr).
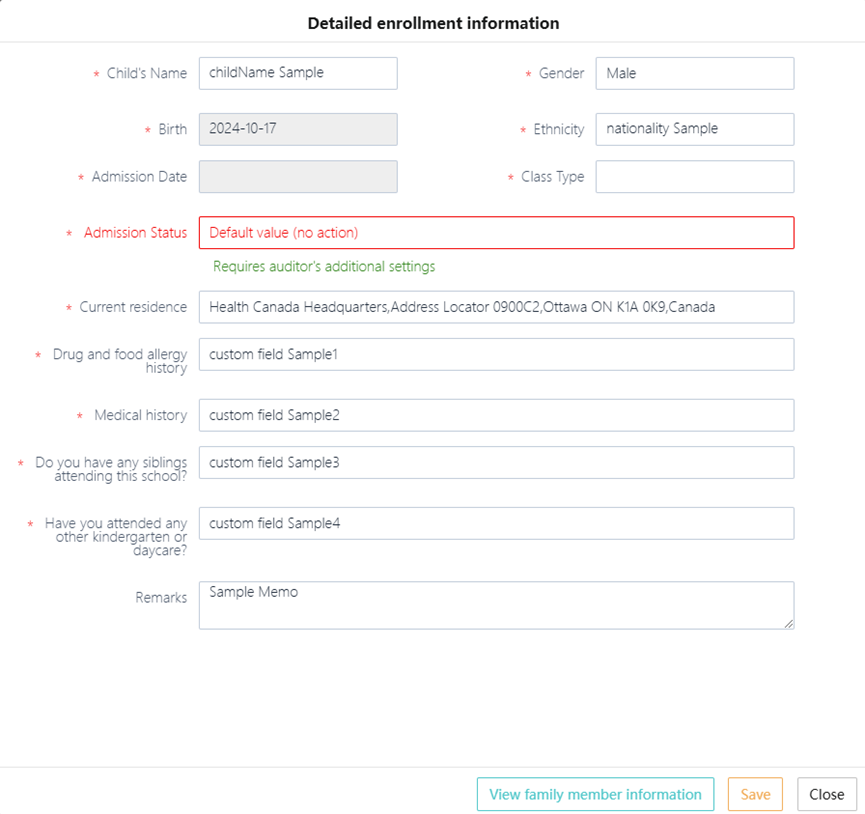
- View family member information
At the bottom of the student details page, click View family member information to enter the family member management interface.
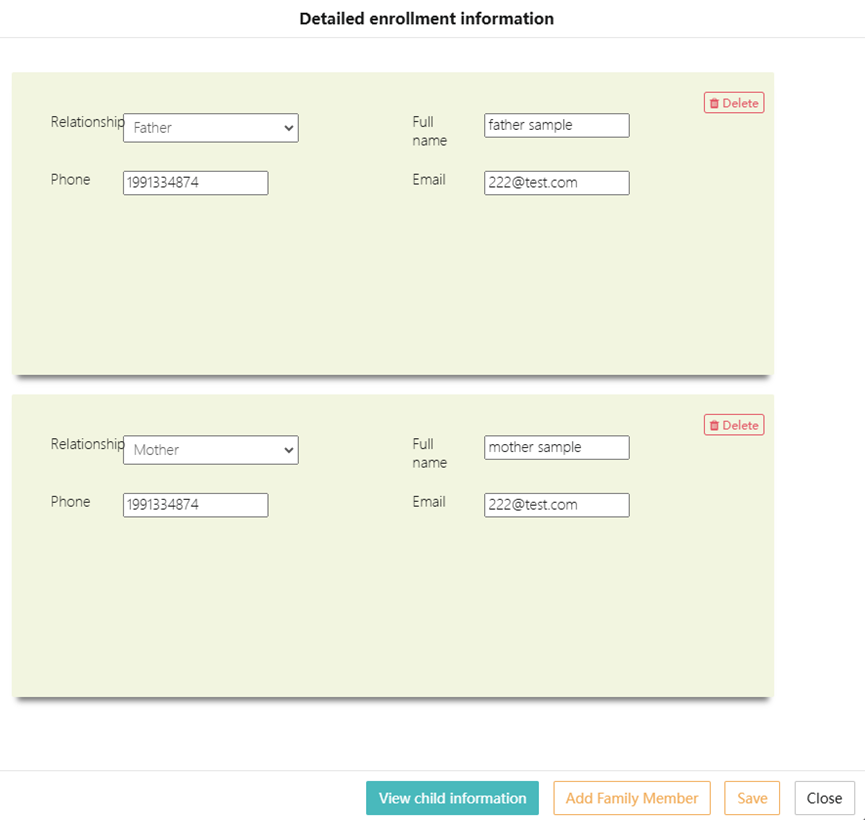
1) Add family member
Click Add Family Member, a new form will pop up. Fill in the following required information:
- Relationship (Father/Mother/Other).
- Contact number (must verify format).
- Name.
- Email (optional).
Click Save to save the information, and the system will automatically sync it to the student's file.
2) Delete family member
Click Delete on the right side of the family member entry, and confirm to remove the member's information.
Note: Deletion cannot be undone, proceed with caution.
3) Edit and save
After modifying the existing family member information, click the Save button at the bottom to save the changes. Click Close to exit the page. Unsaved changes will be lost.
- Update approval status
On the list page or the details page, select the following operations:
- Pass: Mark as approved and send an admission SMS notification.
- Delay: Require additional materials or further review.
- Revoke: Revoke an approved application and return it to the pending status.
- Send SMS notification
1) Set SMS sending time
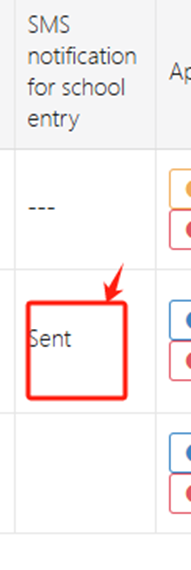
In the approval list page, find the target record and double-click the SMS notification for school entry column to enter the details page.
In the approval page, fill in the following fields (marked * are required):
- SMS entry time 1*: First SMS sending time (e.g.,
2024-10-20 09:00). - SMS entry time 2*: Backup SMS sending time (optional, triggered if the parent does not confirm).
The time format must follow the system's requirements (default is YYYY-MM-DD HH:MM).
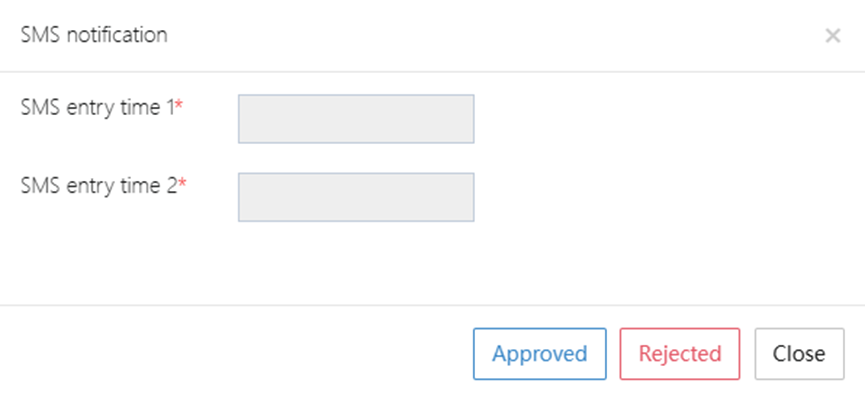
2) Send SMS when approved
Click the Approved button to complete the approval, and the system will automatically send an admission confirmation SMS based on the set SMS entry time 1.
- Status display: After successful sending, the record will be marked as Sent (see the example in the interface).
3) Handling when approval is rejected or closed
- Click Rejected: If the application is not approved, no SMS will be sent.
- Click Close: Close the current approval window, and any unsaved SMS time settings will be lost.
3. Batch Operations
- Batch delete: Select multiple application records → Click Batch delete → Confirm deletion.
- Batch export: Select records or select all → Click Batch Export → Choose export format (default is Excel).
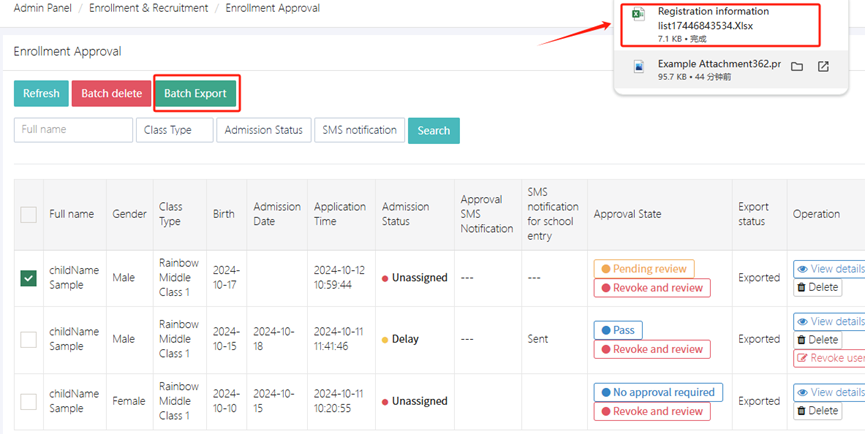
4. Common Status Descriptions
- Pending review: Default status for new applications, needs manual review.
- Approved: The student is eligible for admission, an SMS notification needs to be sent.
- No approval required: Automatically eligible for admission (e.g., internal recommendations).
- Delay: Requires the parent or school to provide additional materials.
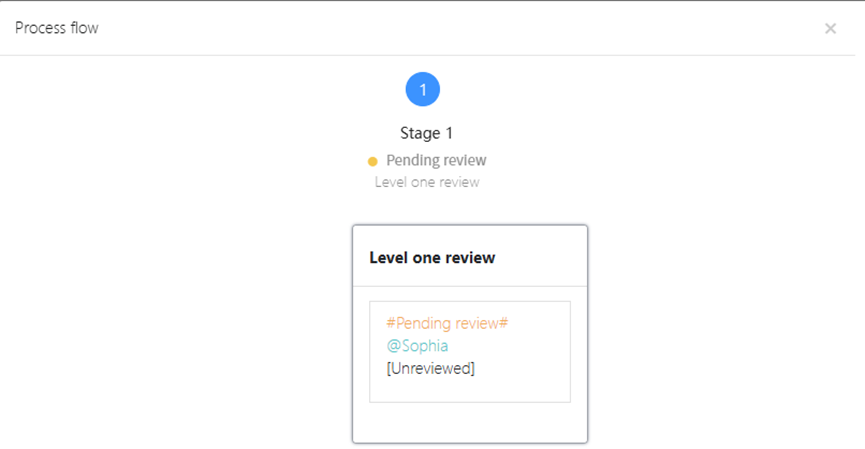
Notes:
- Before approval, please verify the student's health information (e.g., allergy history).
- The exported file is saved to the system's download directory, and the file name includes a timestamp (e.g., list17446843534.xlsx).
- After revoking an approval, an SMS notification must be triggered again.
Student Enrollment Registration
Enrollment Address: https://****.preschools.top/OA/kgentryform/index/formOnLine
1. Online Enrollment
This module provides a complete enrollment process for preschools, suitable for both toddler and kindergarten classes. The design is clear and intuitive, supporting users to complete online registration and other steps, greatly improving the convenience for parent users. The entire process can be customized according to your school, and the following content is customizable.
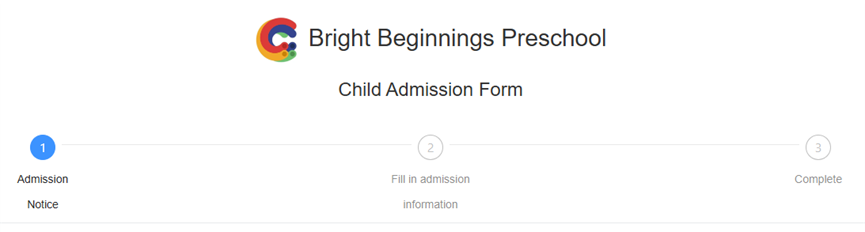
The interface clearly displays the entire enrollment process in a 3-step flowchart:
- Admission Notice
- Fill in Admission Information
- Complete
This flowchart is not only simple but also provides real-time indications of the current stage, guiding users through the enrollment process.
1. Admission Notice

The Admission Notice provides detailed information about the enrollment targets and admission process, including:
-
Enrollment Target:
- Toddler Class: 1.5 to 3 years old
- Kindergarten Class: 3 to 6 years old
-
Admission Process: a) Complete the online registration form
b) The review team will notify the result via phone or text
c) Issue the official admission notice (including the school entry guide)
d) Parents complete the subsequent entry procedures based on the guide
2. Fee Standards
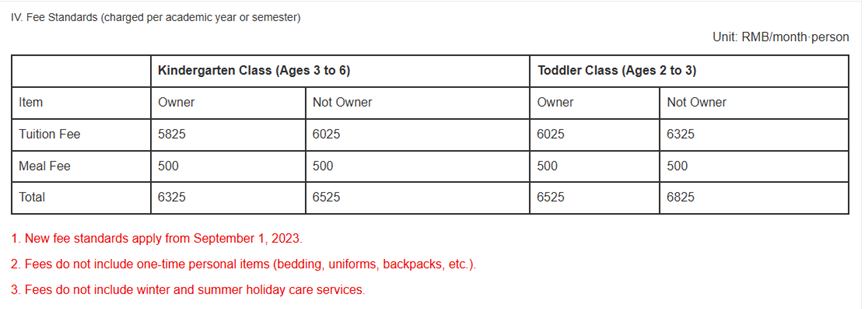
The fee standards section clearly lists tuition and meal fees for different age groups and parent identities through a table.
Additional Notes:
- New standards will be effective from September 1, 2023.
- Does not include one-time items (e.g., bedding, school uniforms, backpacks, etc.).
- Does not include holiday daycare services.
3. Consultation Contact
The bottom of the page clearly lists the consultation phone number, allowing parents to easily contact the enrollment office for assistance.
2. Filling in Registration Information
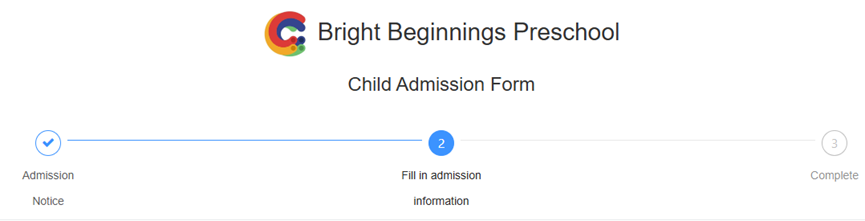
In the student enrollment process, the second step is "Fill in Admission Information." Parents need to enter the child's basic information, guardian contact details, health status, and other additional notes based on the page prompts. Below are the field descriptions:
-
Child's Name
- Required. Enter the child's real name, preferably consistent with their ID information, for future admission notifications and student registration.
-
Gender
- Required. Options are "Male" or "Female." Once selected, it cannot be changed.
-
Year and Month of Birth
- Required. Used to confirm if the child's age meets the enrollment standard for toddler or kindergarten classes. The format is "YYYY-MM."
-
Ethnicity
- Required. Fill in the ethnicity (e.g., "Han", "Zhuang") for statistical and file management purposes.
-
Father's Name
- Required. Fill in the main guardian's name for contact and document verification.
-
Father's Phone
- Required. Enter a commonly used phone number for notifications and communications.
-
Mother's Name
- Required. Same as the father's information for the other guardian.
-
Mother's Phone
- Required. Used for receiving notifications and contact with the school.
-
Current Residence
- Required. Enter the family's actual residence address for district allocation and transportation arrangements.
-
Drug and Food Allergy History
- Optional. If the child has allergies to any drugs or food, list them here for safety during care.
-
Medical History
- Optional. If there is a medical history (e.g., asthma, epilepsy, heart disease), fill it out for safety management.
-
Do you have any siblings attending this school?
- Optional. If there are siblings already enrolled, please provide this information to help the school offer family-related services or discounts.
-
Have you attended any other kindergarten or daycare?
- Optional. You can enter the name of any previous institution for evaluating the child's adaptability and educational continuity.
-
Memo
- Optional. You can provide any additional information that the school should know, such as dietary preferences, special care needs, or transportation arrangements.
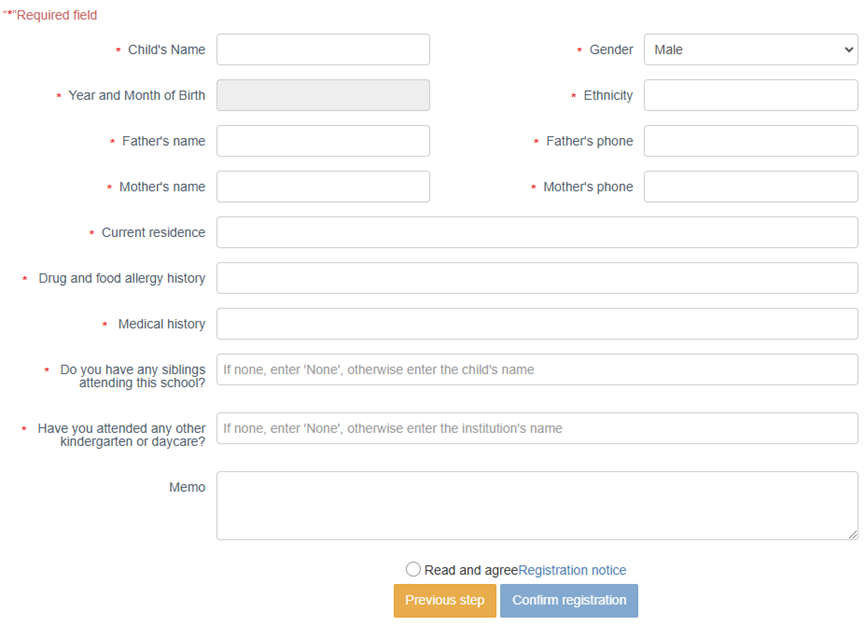
Form Filling Tips:
- All fields marked with “*” are required and must be filled in before submitting the form.
- Before submitting, please verify contact details and date of birth to avoid issues with delivery of admission notifications.
- The system supports both Chinese and English input. It is recommended to use accurate information to ensure consistency in future entry materials.
The information can be modified before submission, but once submitted, it will be sent for review by the enrollment team.